
Do you have a thick synthetic wig that you want to thin out? Thinning out a wig can help give it a more natural and realistic look, especially if the wig is very full or dense. Luckily, there are several methods on how to thin out a thick synthetic wig at home.
Thinning can also make the wig more comfortable, as it will be lighter and less bulky. Whether you’re looking to reduce bulk, achieve a sleeker profile, or make the wig more comfortable to wear, the process requires some care and the proper techniques. Synthetic wigs are made from delicate fibers, so proper tools and methods are essential to avoid damage.
With a little patience and attention to detail, you can successfully customize your wig to suit your preferences and style better.
What Will You Need?
Before you begin thinning out your wig, gathering all the necessary tools and materials is essential. Here are some things you’ll need:
- A comb or brush
- Hair-cutting scissors or thinning shears
- A wig stand or mannequin head
- Pins or clips to secure the wig in place
Now that you have everything prepared let’s examine the different methods for thinning a synthetic wig.
10 Easy Steps on How to Thin Out a Thick Synthetic Wig
Step 1: Secure the Wig on a Wig Stand
Start by placing your synthetic wig on a wig stand or mannequin head. This step is crucial as it provides stability and allows you to work on the wig with both hands-free. Make sure the wig is adjusted correctly on the stand, aligning it as you would when wearing it to ensure an even look. Use pins or clips to secure the wig, especially around the base and sides, to prevent it from slipping or moving while you work on it. This will help you maintain control during the thinning process and ensure you can accurately target the areas needing adjustments. Properly securing the wig will make the entire process smoother and reduce the risk of uneven thinning.
Step 2: Detangle the Wig
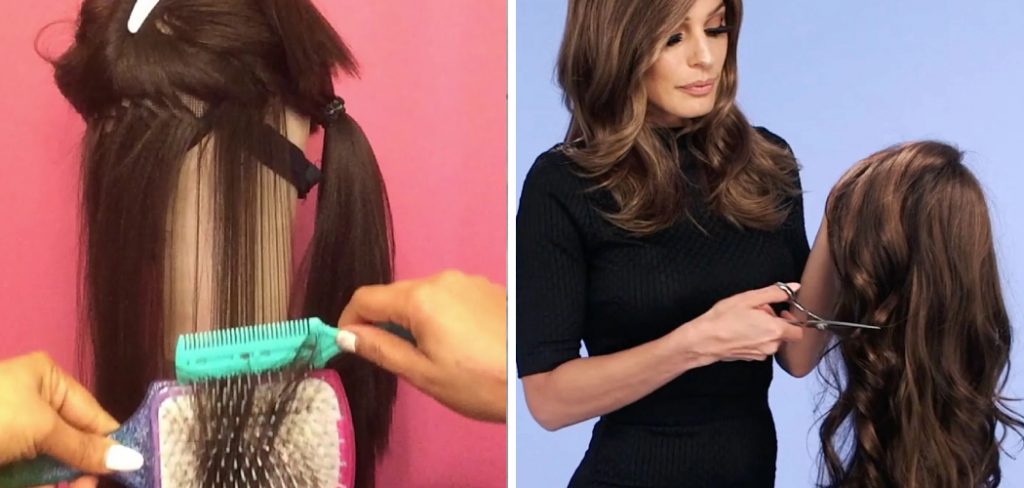
Before thinking, gently detangle the wig using a wide-tooth comb or a wig brush designed for synthetic fibers. Start from the ends of the hair and work your way up to the roots, carefully removing any knots or tangles. This step ensures the fibers are smooth and manageable, preventing accidental damage during thinning. Avoid using excessive force, as synthetic fibers can be delicate and prone to breaking if handled roughly. A detangled wig will make it much easier to identify the sections you want to thin out and create a more polished final result.
Step 3: Identify the Areas to Be Thinned
Scrutinize the wig and decide which sections need to be thinned out. Pay attention to areas that appear overly dense or bulky, such as the wig’s crown, sides, or back. Use your fingers or a comb to separate these sections from the rest of the wig.
It’s important to thin out evenly to maintain the wig’s natural look and balance. If you’re unsure, start with smaller sections to avoid removing too much fiber all at once. This deliberate approach ensures greater precision and minimizes the risk of over-thinning.
Step 4: Use Thinning Shears or Scissors
Once you’ve identified the sections to be too thin, take your thinning shears or regular hair-cutting scissors. If using thinning shears, they are designed to remove bulk without creating harsh lines, making them ideal for this process. Hold a small section of hair away from the wig, keeping it taut but not overly stretched. Starting at mid-length or closer to the ends, gently cut into the fibers with the thinning shears.
Avoid cutting too close to the wig cap to prevent exposing the base or damaging the structure of the wig. Work slowly and evenly across the selected areas, checking your progress frequently to ensure you achieve the desired level of thinning. Always err on caution, as you can remove more fiber if needed but cannot undo cuts.
Step 5: Check Your Progress Frequently
As you thin out the wig, you must pause and check your progress regularly. Place the wig on your head or step back from the wig stand to evaluate how the adjustments look. This step allows you to ensure that the thinning is even and that you’re achieving the desired look.
Pay close attention to the overall shape, particularly around areas like the crown or sides, which can significantly influence the wig’s natural appearance. If certain regions still seem too thick, you can gradually remove more fiber. Checking frequently helps avoid over-thinning or creating an uneven appearance, ensuring a balanced and polished final result.
Step 6: Blend the Layers
After thinning out the targeted areas, use a comb or brush to blend the layers of the wig. This step helps distribute the thinned sections more evenly and creates a cohesive, natural look. If you notice any sharp transitions or uneven areas, use the thinning shears or scissors again to gently trim and blend those sections. Work slowly and check the wig from different angles to ensure a smooth and balanced finish. Blending is key to maintaining the wig’s realistic appearance, so take your time to refine the overall look.
Step 7: Trim the Ends if Necessary
Once you have finished thinning and blending the layers, take a moment to evaluate the ends of the wig. If any fibers appear uneven or frayed, use hair-cutting scissors to trim them lightly.
This step helps create a polished and tidy look, especially if thinning has left certain sections longer than intended. Work slowly, snipping just a tiny amount to avoid cutting too much. Keeping the ends neat enhances the wig’s overall shape and ensures a more natural flow to the hair, making the final results look professional and well-maintained.
Step 8: Style the Wig
After completing the thinning process, it’s time to style the wig to achieve the desired look. Use a wig-friendly styling tool or just your fingers to shape and arrange the fibers. Synthetic wigs can often be styled using low-heat tools if they are heat-resistant, but check the manufacturer’s guidelines before applying any heat. You can also use products like setting spray or mousse designed explicitly for synthetic wigs to hold the style in place.
Experiment with techniques such as creating curls, waves, or a sleek finish to ensure the wig complements your preferences. Styling enhances the look of your thinned wig and allows you to personalize it, making it uniquely yours.
Step 9: Final Touches and Maintenance
Once the styling is complete, take a moment to inspect the wig for any final adjustments. Check for loose fibers or sections requiring minor blending to perfect the overall appearance. To maintain the wig after thinning and styling, store it properly on a wig stand or in a wig bag to preserve its shape.
Regularly clean the wig according to its care instructions to remove buildup and keep it looking fresh. Use wig-specific care products to prolong the life of the fibers while avoiding harsh chemicals. Proper maintenance will ensure that your thinned and styled wig lasts longer and retains its natural, polished look.
Step 10: Enjoy Your Customized Wig
With complete thinning, blending, and styling, your wig is now customized to suit your personal preferences. Put on your wig and admire the final look, ensuring it complements your style and feels comfortable to wear. Whether wearing it for a special occasion or everyday use, your wig should now have a more natural and tailored appearance that enhances your confidence.
Remember to revisit the previous steps if you notice any areas requiring further adjustment. Enjoy the benefits of a wig that genuinely feels like it was made just for you!
Following these steps, you can successfully thin out a wig and achieve a natural and polished appearance.
5 Things You Should Avoid
- Using Regular Scissors: Avoid using regular household scissors. They are not designed for precise cutting and may leave uneven edges on the wig’s fibers, making it look unnatural.
- Over-Thinning the Wig: Removing too much hair can result in an overly sparse wig, which is difficult to fix. Always proceed cautiously and thin out small sections at a time.
- Applying Excessive Heat: Synthetic wigs are highly sensitive to heat, and using hot tools like straighteners or curling irons can damage the fibers, leading to frizz or melting.
- Pulling or Tugging on the Fibers: Aggressive pulling can tear or stretch the delicate synthetic fibers, compromising the wig’s structure and overall appearance.
- Ignoring Proper Tools: Avoid using incorrect tools, such as razors or combs not meant for wigs. For the best results, stick to thinning shears or wig-specific tools.

Conclusion
How to thin out a thick synthetic wig requires patience, precision, and the right tools. Start by sectioning the wig into manageable parts to ensure an even result.
Use thinning shears designed explicitly for wigs to carefully remove small amounts of fiber at a time, focusing on areas that feel overly bulky. Always work in layers and check the wig’s overall appearance to avoid over-thinning. Remember, it’s better to thin gradually than to remove too much at once, as you cannot add fibers back once cut.
By following these guidelines and avoiding common mistakes, you can achieve a natural and flattering look for your wig.
About the Author
Jane Hubbard is a passionate beauty expert with a wealth of experience in makeup, hair, and overall beauty techniques. After years of working as a hairdresser specialist, she followed her entrepreneurial spirit and started her own consultancy business.
Jane has always been driven by her desire to help others feel confident in their own skin, and she does this by sharing her knowledge, experiences, and practical beauty tips. Through her consultancy, she empowers individuals to embrace their unique beauty, offering tailored guidance that boosts both self-esteem and personal style.
Professional Focus
Specializes in makeup, hairstyling, and beauty consulting.
Provides personalized beauty advice, tips, and techniques to help individuals feel confident in their appearance.
Dedicated to staying up-to-date with the latest industry trends and developments.
Passionate about creating a comfortable and empowering experience for every client.
Education History
University of Craft and Design – Bachelor of Fine Arts (BFA) in Woodworking and Furniture Design
Woodworking Apprenticeships – Extensive hands-on training with skilled craftsmen to refine carpentry and furniture making techniques
Online Courses & Masterclasses – Continued education in advanced woodworking techniques, design principles, and specialized tools
Expertise:
Makeup artistry, hairstyling, and beauty consulting.
Personalized beauty techniques to enhance confidence and self-expression.
Educating clients on how to maintain their beauty routines at home.