
Understanding how to use orange color corrector effectively can make the difference between a flawless makeup look and one that appears patchy or uneven. Many people struggle with persistent dark circles or discoloration that regular concealer simply can’t cover, leading to frustration and cakey makeup application. Orange color corrector provides the perfect solution by neutralizing these unwanted tones before you apply your regular makeup base.
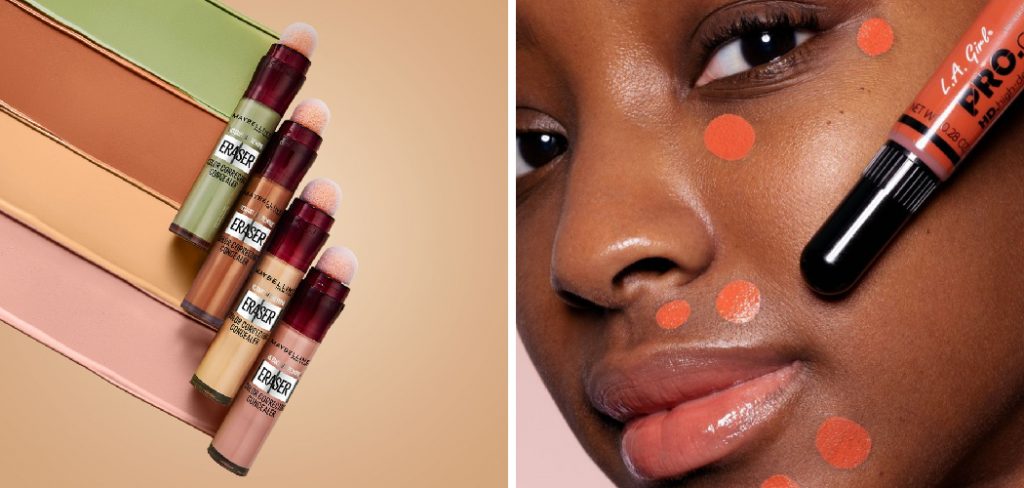
This comprehensive guide will walk you through everything you need to know about incorporating orange color corrector into your beauty routine. From selecting the right shade to mastering professional application techniques, you’ll discover how this game-changing product can help you achieve the smooth, even complexion you’ve always wanted. Whether you’re dealing with stubborn under-eye circles or other areas of discoloration, these expert tips will help you use this corrector with confidence.
Why Mastering Orange Color Correction Is Essential for Flawless Makeup
Orange color corrector serves a crucial role in creating an even makeup base, particularly for individuals with medium to deep skin tones who often struggle with blue or purple discoloration. Traditional concealers alone frequently fail to adequately neutralize these undertones, resulting in an ashy or grey appearance that looks unnatural under various lighting conditions.
Additionally, proper color correction techniques can significantly reduce the amount of foundation and concealer needed to achieve full coverage, creating a more natural finish while preventing the heavy, mask-like appearance that often occurs when trying to cover discoloration with base products alone.
7 Step-by-Step Guide: How to Use Orange Color Corrector
Step 1: Choose the Right Shade of Orange Corrector for Your Skin Tone
Selecting the appropriate orange color corrector shade is fundamental to achieving natural-looking results that enhance rather than compete with your complexion. Light to medium skin tones typically benefit from peachy-orange correctors that provide gentle neutralization without appearing too vibrant against the skin. Medium to deep skin tones can handle more intense orange shades that effectively counteract deeper purple and blue discoloration.
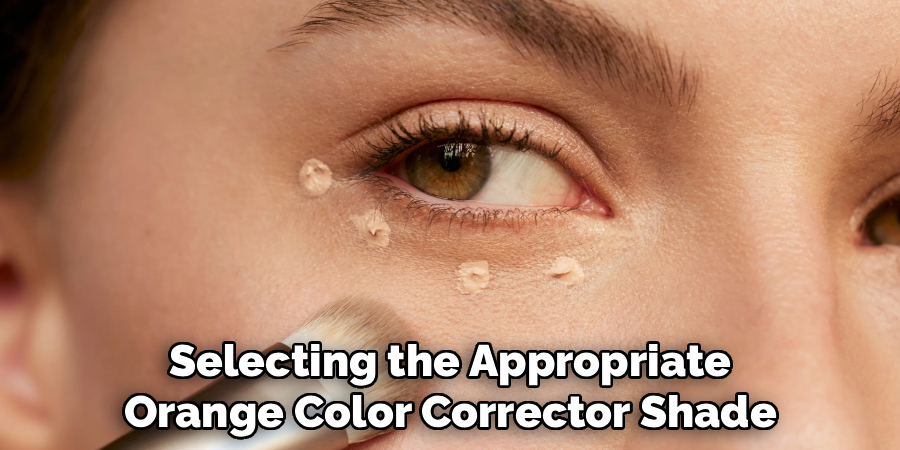
Test different shades on your jawline in natural lighting to find the perfect match. Consider having multiple shades available, as you may need different intensities for various areas of discoloration on your face. The goal is to find a corrector that disappears seamlessly when blended, creating a neutral base for your subsequent makeup application.
Step 2: Prepare Your Skin with Proper Cleansing and Moisturizing
Clean, well-moisturized skin provides the ideal canvas for color corrector application and ensures smooth, even blending throughout your makeup routine. Begin with a gentle cleanser to remove any residual products or oils that could interfere with adhesion. Follow with a lightweight, fast-absorbing moisturizer appropriate for your skin type, paying special attention to the delicate under-eye area where dryness can cause products to appear patchy or settle into fine lines. Allow the moisturizer to fully absorb before proceeding with color correction, typically waiting 2-3 minutes for optimal results.
Step 3: Apply Orange Color Corrector to Target Areas Using Gentle Patting Motions
How to use orange color corrector effectively begins with precise application to areas where blue or purple discoloration is most prominent, typically under the eyes and around the nose. Use a small, dense synthetic brush or clean fingertip to apply the corrector in thin layers, building coverage gradually rather than applying too much product at once.
Pat the corrector gently onto the skin rather than rubbing or dragging, which can disturb the underlying skin and create an uneven finish. Focus on the darkest areas first, then gradually blend outward to create seamless transitions.
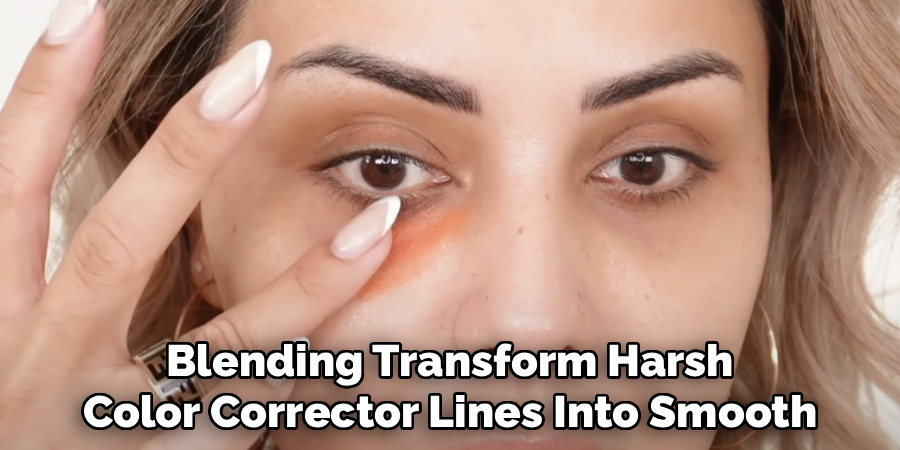
Step 4: Blend the Corrector Seamlessly into Your Skin
Proper blending techniques transform harsh color corrector lines into smooth, natural-looking coverage that creates the perfect base for subsequent makeup application. Use gentle patting and pressing motions with a damp beauty sponge or stippling brush to soften the edges of the corrector, working from the center of the application area outward. The key is to blend only the edges while maintaining full coverage in the areas where correction is needed most.
Avoid circular rubbing motions that can lift the product and create patchiness. If the corrector appears too intense after blending, lightly pat with a clean, damp sponge to sheer out the coverage slightly. Take your time during this step, as proper blending is crucial for achieving professional results and preventing visible lines or color patches in your finished makeup look.
Step 5: Set the Color Corrector with Translucent Powder
Setting your color corrector with a light dusting of translucent powder helps lock the product in place and prevents it from moving or mixing with subsequently applied products. Use a small, fluffy brush to apply a minimal amount of powder, focusing on areas where you tend to experience creasing or product movement throughout the day. Press the powder gently into the skin rather than sweeping it across the surface, which can disturb the carefully blended corrector underneath.
This setting step is particularly important in the under-eye area, where natural oils and movement can cause products to shift or fade throughout the day. Choose a finely-milled powder that won’t add texture or emphasize dry patches, ensuring your corrected areas remain smooth and natural-looking under your foundation and concealer.
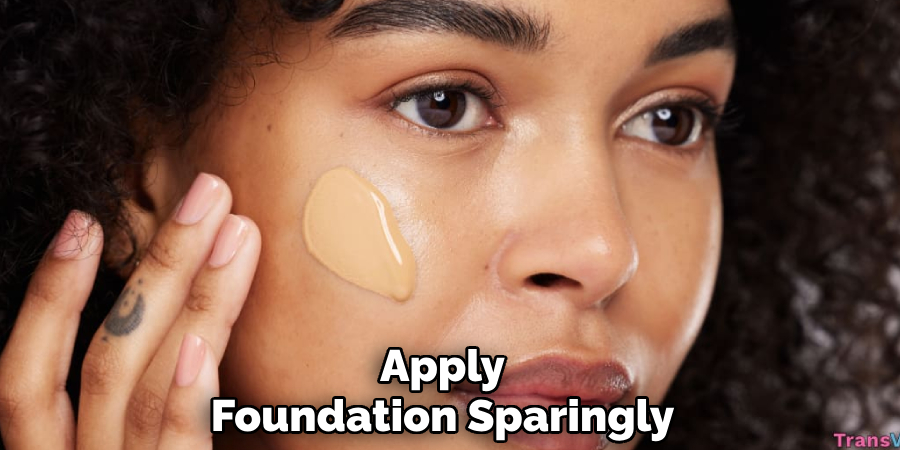
Step 6: Apply Foundation Over the Corrected Areas
Foundation application over color-corrected areas requires a delicate touch to maintain the correction work you’ve already completed while achieving seamless overall coverage. Use a damp beauty sponge or foundation brush to apply your regular foundation in thin layers, being careful not to disturb the corrector underneath. Build coverage gradually, focusing more product on areas that still need additional correction while using lighter coverage over areas where the orange corrector has already done most of the work.
Step 7: Add Concealer Only Where Additional Coverage Is Needed
With proper orange color correction as your base, concealer application becomes much more targeted and effective, requiring significantly less product than traditional methods. Apply concealer only to areas where additional coverage is needed, such as small blemishes or remaining hints of discoloration that weren’t fully neutralized by the corrector. Use a shade that matches your foundation rather than going lighter, as the orange corrector has already neutralized the dark tones that typically require lighter concealer shades.
Blend the concealer carefully to avoid disturbing your correction work, using gentle patting motions with a small brush or fingertip. This layered approach creates more natural-looking coverage that won’t appear heavy or mask-like, while providing the high level of correction needed for a flawless makeup base.
Perfect Your Blending Technique
Achieving seamless integration between all your color correction layers requires mastering advanced blending techniques that create invisible transitions and natural-looking coverage. Use a clean, slightly damp beauty sponge to gently bounce over the entire corrected area, softening any harsh lines and ensuring all products meld together naturally.
Pay special attention to the edges where corrected areas meet uncorrected skin, as these transition zones are often the most visible when blending is incomplete. Rotate your sponge frequently to use clean surfaces, and rinse as needed to prevent product buildup that can cause streaking or uneven application. The final result should show no visible demarcation lines between corrected and uncorrected areas, creating a smooth, even complexion that serves as the perfect canvas for the rest of your makeup routine.
Frequently Asked Questions
What Skin Tones Should Use Orange Color Corrector?
Orange color corrector works best on medium to deep skin tones, particularly those with warm or neutral undertones. People with lighter skin may find peach correctors more suitable, while very deep skin tones might need deeper orange or red-orange shades for optimal correction. The key is matching the intensity of the corrector to your natural skin depth. Test different shades to find what neutralizes discoloration without looking unnatural on your complexion.
Can Orange Color Corrector Be Used for Dark Spots and Hyperpigmentation?
Yes, orange color corrector can effectively neutralize purple and blue-toned dark spots, age spots, and post-inflammatory hyperpigmentation. However, it works best on cooler-toned discoloration rather than brown or yellow-toned spots. For comprehensive coverage:
- Use orange corrector on purple/blue spots
- Try yellow or peach correctors for brown spots
- Apply in thin layers for buildable coverage
- Always follow with foundation and concealer as needed
How Long Does Orange Color Corrector Last Throughout the Day?
With proper application and setting techniques, orange color corrector can last 8-12 hours without significant fading or shifting. Longevity depends on several factors including skin type, product quality, and environmental conditions. To maximize wear time:
- Always set with translucent powder
- Use primer underneath if you have oily skin
- Choose long-wearing, high-quality formulas
- Touch up as needed with a small brush
Should I Apply Orange Color Corrector Before or After Primer?
Orange color corrector typically works best when applied after primer but before foundation. The primer creates a smooth base and helps the corrector adhere better while preventing it from being absorbed too quickly into the skin. However, some makeup artists prefer applying corrector directly to clean skin for maximum color payoff. Experiment with both methods to see which works better with your specific products and skin type.

Can I Mix Orange Color Corrector with Foundation or Concealer?
While it’s possible to mix orange corrector with other products, it’s generally more effective to apply each product separately in thin layers. Mixing can dilute the corrective properties and make it harder to achieve precise coverage where needed. However, you can:
- Mix a tiny amount with concealer for custom correction
- Blend products on the back of your hand before applying
- Use this technique for large areas of mild discoloration
- Always test mixed products before full application
Conclusion
Successfully mastering how to use orange color corrector opens up a world of possibilities for achieving flawless, natural-looking complexion in your daily makeup routine. This powerful tool can transform stubborn dark circles and discoloration from makeup challenges into easily manageable concerns that no longer require heavy coverage or multiple layers of concealer.
With consistent practice and the techniques outlined in this guide, you’ll soon be able to create a smooth, even complexion that serves as the perfect canvas for any makeup look you want to achieve.
About the Author
Jane Hubbard is a passionate beauty expert with a wealth of experience in makeup, hair, and overall beauty techniques. After years of working as a hairdresser specialist, she followed her entrepreneurial spirit and started her own consultancy business.
Jane has always been driven by her desire to help others feel confident in their own skin, and she does this by sharing her knowledge, experiences, and practical beauty tips. Through her consultancy, she empowers individuals to embrace their unique beauty, offering tailored guidance that boosts both self-esteem and personal style.
Professional Focus
Specializes in makeup, hairstyling, and beauty consulting.
Provides personalized beauty advice, tips, and techniques to help individuals feel confident in their appearance.
Dedicated to staying up-to-date with the latest industry trends and developments.
Passionate about creating a comfortable and empowering experience for every client.
Education History
University of Craft and Design – Bachelor of Fine Arts (BFA) in Woodworking and Furniture Design
Woodworking Apprenticeships – Extensive hands-on training with skilled craftsmen to refine carpentry and furniture making techniques
Online Courses & Masterclasses – Continued education in advanced woodworking techniques, design principles, and specialized tools
Expertise:
Makeup artistry, hairstyling, and beauty consulting.
Personalized beauty techniques to enhance confidence and self-expression.
Educating clients on how to maintain their beauty routines at home.