
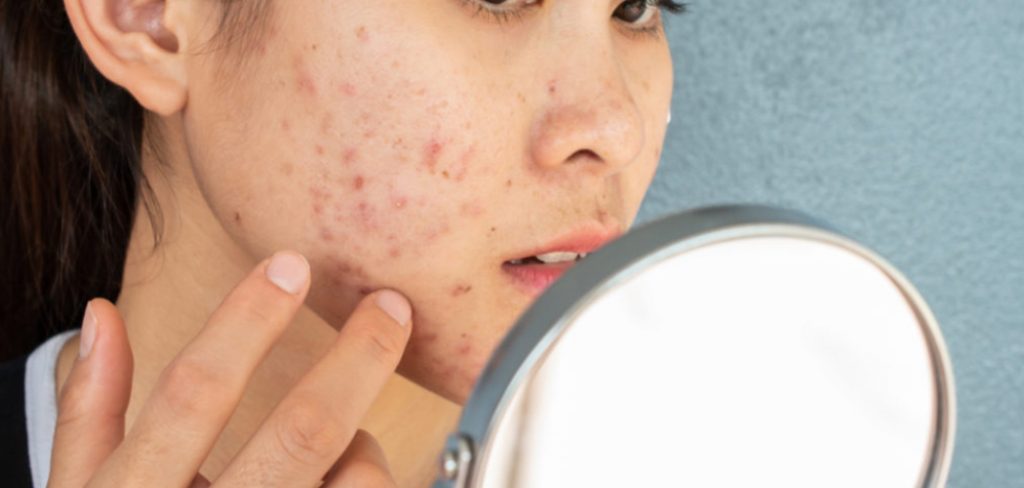
When a cut on your skin is in the process of healing, it can attract unwanted attention and impact your self-confidence. Fortunately, expertly applied makeup allows you to discreetly cover cuts while letting the skin recover. However, the most important rule is to safeguard the healing process—makeup should never be used on open, fresh, or infected wounds. Only once a cut has a dry, closed scab and shows clear signs of healing is it appropriate to consider makeup for coverage.
In this guide, you’ll learn everything you need to know about how to hide cuts with makeup, from preparation to safe application and long-lasting results. We’ll start by covering essential safety considerations, so you know when to conceal and when to wait. After that, you’ll discover how to prep the area, manage texture, and use color correction and pinpoint concealing for skin-like results. You’ll also learn how to set and maintain coverage throughout the day, select the most effective tools and formulas, and avoid common pitfalls that can undermine your efforts or irritate your skin. The goal is natural, undetectable coverage that respects your skin’s healing needs—so you can look and feel your best as you recover.
Safety First: When to Cover vs. When to Wait
Understanding the Healing Stages
Before reaching for your concealer, it’s critical to assess your cut’s stage of healing. Makeup should only be applied to closed wounds where the skin is intact and no fresh blood, oozing, or pus is present. If a scab is still moist, soft, or appears inflamed, it’s best to wait until it becomes dry and begins to detach naturally. Covering an open wound can increase infection risk, slow healing, and lead to scarring or pigmentation issues. Always prioritize skin health over aesthetics during the initial stages following an injury.
Products and Ingredients to Avoid
Even after your cut has closed, exercise caution with your product choices. Steer clear of makeup containing alcohol, strong fragrances, or comedogenic (pore-clogging) oils, which can dry out or further irritate healing skin. Avoid liquid latex, heavy waxes, and thick creams that may cause buildup or suffocate the area. Stick to non-comedogenic, hypoallergenic, and dermatologist-tested formulas whenever possible. It’s often best to check ingredient lists if you have especially sensitive skin.

When to Seek Medical Advice
If your cut appears red, swollen, warm, or is accompanied by pain or discharge, consult a healthcare professional before using any makeup. These can be warning signs of infection, which may worsen. Likewise, if a wound does not heal or develops significant scarring, scab darkening, or abnormal tissue growth, medical guidance is advised. Never prioritize cosmetic coverage over proper wound care.
Sterile Prep for the Area
Gentle Cleanse and Disinfect
Cleanliness is non-negotiable when applying makeup to healing skin. Begin by washing your hands thoroughly to prevent transferring bacteria. Using a gentle cleanser or mild antibacterial soap, carefully cleanse the skin around the cut, being mindful not to soak or disturb the scab. Pat the area dry with a clean tissue or lint-free cloth. For added reassurance, swab the wound’s perimeter with a bit of sterile saline or a mild antiseptic solution—avoid strong rubbing that could cause the scab to loosen or flake.
Drying and Barrier Layer
Once the area is clean and completely dry, apply a very thin layer of a healing ointment—such as a petroleum-free jelly or a silicone-based scar gel—as a protective barrier. This step helps to prevent moisture loss, shields the cut from direct contact with makeup, and minimizes irritation. Don’t use greasy or thick ointments that can interfere with makeup’s adherence; opt for lightweight, non-comedogenic formulations designed for facial use. Allow the barrier to set for a minute before proceeding.
Hands and Tool Hygiene
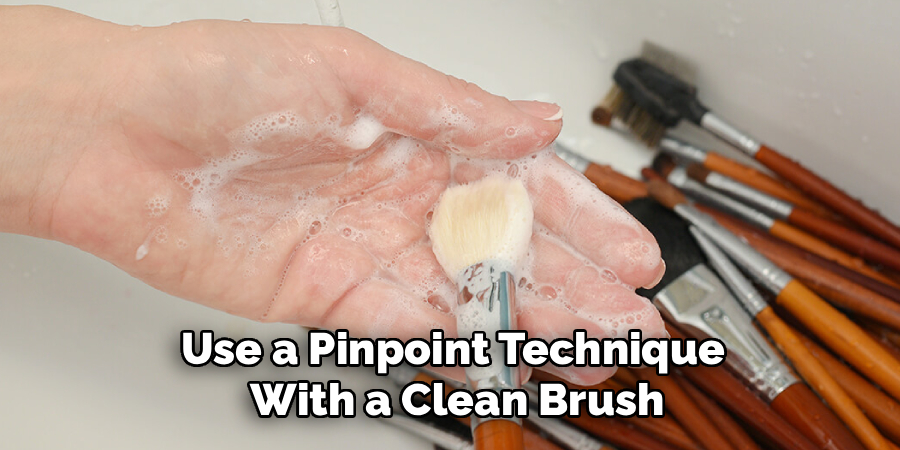
Always sanitize any brushes, sponges, or other tools before use. Wipe them with an alcohol-based cleanser or use a fresh, disposable applicator. Avoid double-dipping tools back into products after touching your skin to keep formulas contamination-free. Even brief lapses in hygiene can introduce bacteria that undermine healing and increase the risk of breakouts or infection.
Base and Texture Management
Blurring Edges Without Lifting Scabs
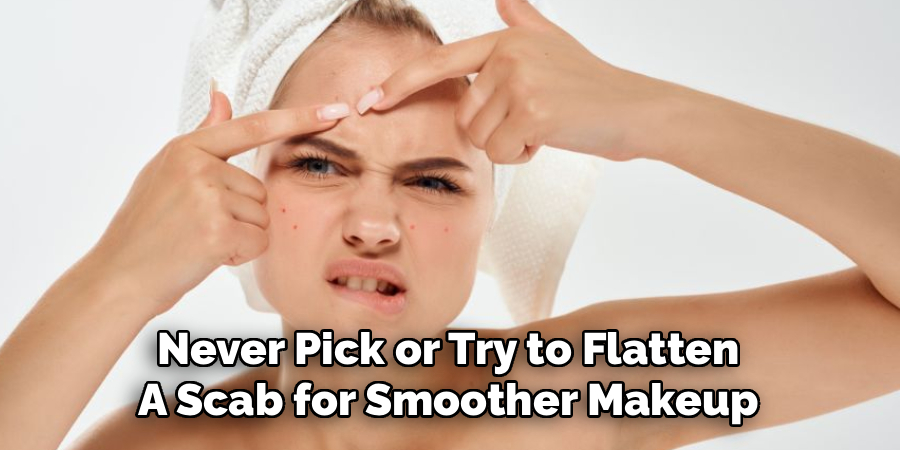
Texture is your greatest challenge when covering a cut with makeup. To achieve a soft, undetectable finish, focus first on feathering out the scab’s edges. Using a clean, small brush, gently tap a lightweight, color-appropriate primer around the border of the healed cut. The goal is to visually blur any raised or rough areas without manipulating or disturbing the scab itself. Never pick or try to flatten a scab for smoother makeup application—this risks opening the wound and causing long-term marks.
Applying Sheer Foundation Around the Site
Rather than slathering on a heavy base, opt for a sheer, buildable foundation or tinted moisturizer around (not on) the injury. Lightly buff and blend the product up to—but not directly over—the scab. This creates a uniform skin tone and helps reduce contrast between the unaffected skin and the area to be concealed. Avoid cakey or matte foundations, as these can accentuate texture and dry patches.
Avoiding Flakes and Crust
Scabs and healing cuts are prone to forming flakes. Before makeup, gently check for loose or lifting skin. If you find any, use a clean spoolie or soft brush to delicately whisk away debris—never pick or force anything that’s still attached. If the area is extra dry, use a drop of lightweight, non-greasy moisturizer an hour before application to soften, then blot away any residue.
Step-by-Step Guide: How to Hide Cuts with Makeup
Step 1: Neutralize Redness
Redness is often the most noticeable aspect of a healing cut. Begin with a tiny amount of a green-tinted color corrector, which counteracts redness. Dab it precisely over the red mark with a clean, pointed cotton swab or minute brush, focusing on the most vivid spots. Blend the edges carefully so no green tinge remains. Use a light hand—overapplying corrector can cause color to peek through or look unnatural under concealer.
Step 2: Conceal with Pinpoint Technique
After color correction, use a high-pigment, creamy concealer that matches your skin tone. The key to how to hide cuts with makeup is accuracy—apply concealer only to the area that needs it with a micro-brush or your fingertip. Avoid swiping or heavy-handed application. Instead, dot the product directly onto the cut or scab, then gently tap and build until the area visually blends with the surrounding skin. A second, slightly lighter concealer can sometimes be dotted at the very edge to mimic the way natural skin reflects light.
Step 3: Feather Edges with a Micro-Brush
For the most invisible finish, spend extra time diffusing the perimeter of the concealed area. Using a clean, dry micro-brush or soft, fluffy eye brush, softly feather the edges of the concealer outward. This prevents ringed or cakey borders and allows the product to mesh seamlessly with your foundation. If needed, go back in with the tiniest bit of foundation to mesh everything together—just be careful to keep layers thin.

Step 4: Set with Fine Powder and Puff
Once you’re satisfied with the coverage, use a very fine, loose setting powder to lock the makeup in place. Choose a powder with a light texture and no strong tint. Press—don’t rub—a minimal amount onto the area with a clean powder puff or disposable sponge. The goal is to stabilize the product and reduce shine while adding as little weight as possible. Heavy powdering looks obvious and can accentuate texture, so err on the side of less.
Step 5: Seal with Setting Spray
The final touch for all-day wear is a gentle mist of setting spray. Hold the spray several inches from your face and allow the mist to settle over the concealed area. A good setting spray helps to prevent transfer, keeps powder from looking dry, and preserves the skin-like finish. Let it dry completely before touching the skin or proceeding with the rest of your makeup.
Longevity and Reapplication
Timing for Dry-Down and Minimal Touch
To avoid disturbing your careful work, let each layer—moisturizer, color corrector, concealer, powder, and spray—dry fully before applying the next. Rushing can cause products to shift or clump. Once finished, avoid touching or picking at the area. Resist the urge to “fix” makeup on your cut during the day unless necessary, as frequent handling can lead to patchiness and irritation.
Transfer-Proofing Under Masks
If you need to wear a face covering, like a mask, take extra precautions to ensure your makeup stays put. After setting with powder and spray, allow at least ten minutes of drying time. Opt for transfer-resistant formulas and press a tissue gently over the site to blot away excess. If mask friction is a concern, consider using a silicone-based scar gel under makeup to create a long-wearing, flexible cushion.
Touch-Up Strategy Without Buildup
Even the best makeup may require a quick touch-up after several hours or if you accidentally brush the area. Instead of layering more product, blot gently first to remove oil and excess. Then, if needed, use a pinpoint technique with a clean brush and a dot of concealer to refresh the coverage, feathering, and setting as before. This keeps buildup—and the risk of cakiness—to a minimum.
Tools and Formulas That Work
Micro-Brushes, Cotton Buds, and Puffs
Precision is everything for undetectable coverage. Invest in small, pointed brushes or disposable cotton swabs to target only the problem area. Use a soft powder puff for gentle setting, which prevents pressure from lifting or cracking the scab. Avoid using large or stiff brushes that might snag the skin.
Corrector and Concealer Textures
Select creamy, blendable correctors and concealers formulated for sensitive or post-procedure skin. Products with a semi-matte or satin finish typically provide the most natural appearance and the best adherence. Avoid heavy-duty or stage makeup unless truly necessary—these can be difficult to blend and may suffocate healing skin.
Non-Comedogenic Choices for Sensitive Skin
Skin that’s healing is often more reactive. Look for products labeled non-comedogenic and hypoallergenic, as these are less likely to clog pores or provoke breakouts. Mineral-based powders and silicone-based concealers are usually well-tolerated and provide lightweight, breathable coverage. If your skin has reacted to makeup in the past, perform a patch test on a different part of your face before using a new product on the cut.
Common Mistakes and Fixes
Trying to Cover Open Wounds
Many people make the mistake of reaching for makeup too soon. Concealing an open wound or a cut that is still oozing leaves it vulnerable to infection, slows down healing, and can result in permanent scarring. If you’ve prematurely applied makeup, remove it with a gentle, fragrance-free cleanser, and let the skin rest until it is fully closed.
Over-Layering and Crusting
In pursuit of total camouflage, some resort to piling on thick layers of concealer and powder. Unfortunately, this almost always accentuates texture and creates a crusted look, especially as the day wears on. Instead, focus on correcting color with thin, blendable layers and prioritize realistic improvement over total invisibility.
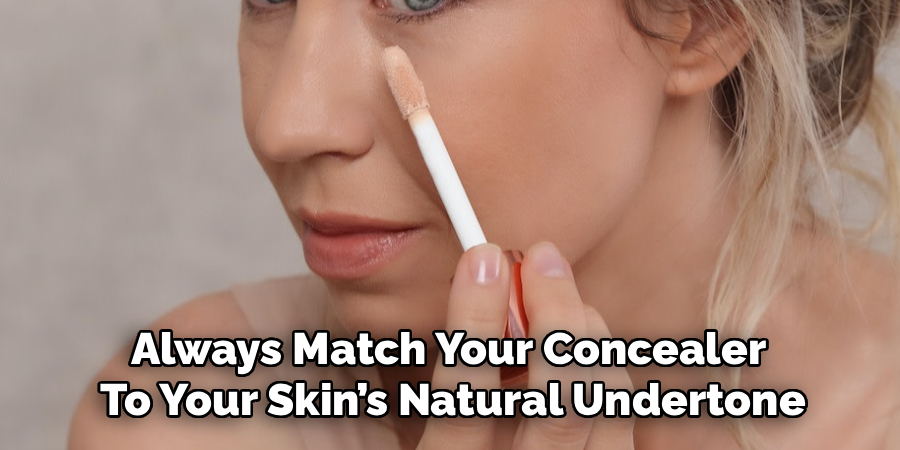
Using the Wrong Undertone
If you notice the concealed area looks pink, grey, or ashy compared to the surrounding skin, the undertone may be off. Always match your concealer to your skin’s natural undertone and adjust with color correctors as needed. Feather the edges extensively, and, if necessary, top the very edge with a trace of your usual foundation to harmonize the transition.
Conclusion
Mastering how to hide cuts with makeup begins with a careful respect for the skin’s healing process. Never apply product to open or inflamed wounds; instead, wait for the area to become fully closed and dry. Once it’s safe, start with sterile prep, choose gentle and non-comedogenic products, and use pinpoint precision to correct, conceal, and set the area. Remember that thin, well-blended layers deliver the most natural result while minimizing the risk of irritation or scarring. By following these guidelines, you can discreetly cover cuts with makeup, feel more confident, and support your skin’s journey to full recovery. If you need daily coverage, continue to check the cut’s condition and always prioritize your skin’s health alongside its appearance.
About the Author
Jane Hubbard is a passionate beauty expert with a wealth of experience in makeup, hair, and overall beauty techniques. After years of working as a hairdresser specialist, she followed her entrepreneurial spirit and started her own consultancy business.
Jane has always been driven by her desire to help others feel confident in their own skin, and she does this by sharing her knowledge, experiences, and practical beauty tips. Through her consultancy, she empowers individuals to embrace their unique beauty, offering tailored guidance that boosts both self-esteem and personal style.
Professional Focus
Specializes in makeup, hairstyling, and beauty consulting.
Provides personalized beauty advice, tips, and techniques to help individuals feel confident in their appearance.
Dedicated to staying up-to-date with the latest industry trends and developments.
Passionate about creating a comfortable and empowering experience for every client.
Education History
University of Craft and Design – Bachelor of Fine Arts (BFA) in Woodworking and Furniture Design
Woodworking Apprenticeships – Extensive hands-on training with skilled craftsmen to refine carpentry and furniture making techniques
Online Courses & Masterclasses – Continued education in advanced woodworking techniques, design principles, and specialized tools
Expertise:
Makeup artistry, hairstyling, and beauty consulting.
Personalized beauty techniques to enhance confidence and self-expression.
Educating clients on how to maintain their beauty routines at home.