
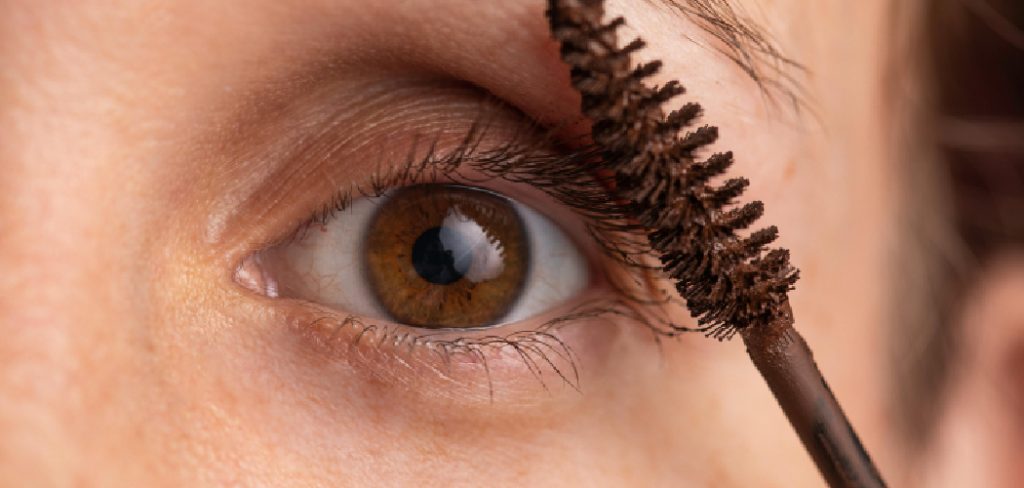
When we think about curling eyelashes, our minds immediately go to the upper lashes. We spend time lifting and shaping them to open up our eyes, but the lower lashes are often completely ignored. This is a missed opportunity for a truly transformative, eye-opening effect. Curling your lower lashes can make your eyes appear larger, rounder, and more defined, creating a balanced, doll-like appearance that mascara alone cannot achieve. While it might sound tricky or even a bit scary, it’s a surprisingly simple technique once you know the right approach. This guide will provide clear, beginner-friendly instructions on how to curl bottom eyelashes safely and effectively.
Curling your bottom eyelashes may seem like an advanced technique, but with the right tools and a little patience, it can easily become part of your routine. It’s a step that enhances your overall look by adding subtle elegance and symmetry to your lashes. Many people overlook this process, yet it’s a small detail that can make a big difference in emphasizing your eyes and achieving a polished finish.
Tools and Materials
To curl your bottom eyelashes, you will need the following tools and materials:
- A lash curler designed specifically for bottom lashes
- A mirror
- Mascara (optional)
It’s important to use a lash curler specifically made for bottom lashes as they are smaller and more delicate than top lashes. Using a regular lash curler can be difficult to maneuver and may result in pulling or damaging your bottom lashes.
7 Step-by-Step Guide on How to Curl Bottom Eyelashes
Step 1: Start with Clean, Dry Lashes
Before you bring any tool near your eye, it is essential to ensure your bottom lashes are completely clean and dry. This means they should be free of any residual makeup, mascara, or natural oils. Oils and leftover product can cause the curler to slip or fail to create a lasting curl. Take a moment to gently cleanse your eye area with a mild, oil-free makeup remover or micellar water, then pat the area dry. Working with a clean canvas not only ensures a better curl but also promotes better hygiene, reducing the risk of eye irritation or infection.

Step 2: Choose the Right Eyelash Curler
Not all eyelash curlers are created equal, especially when it comes to the delicate lower lashes. A standard, full-sized curler is often too large and awkwardly shaped to properly grip the shorter bottom lashes without pinching your skin. The best tool for this job is a smaller, specialized “mini” or “precision” eyelash curler. These curlers have a much narrower head, allowing you to isolate small sections of the lower lash line with greater control and accuracy. This precision is the key to getting a beautiful curl without any discomfort or mishaps.
Step 3: Perfect Your Grip
Your grip on the curler is crucial for control and safety. To curl your lower lashes, you will need to hold the curler upside down. This means the curved part of the curler, which normally follows your upper lid, will now be positioned against your lower lash line. Hold the mini curler between your thumb and index finger, just as you would a standard curler, but inverted. Practice opening and closing it a few times to get comfortable with this new orientation before bringing it toward your eye.
Step 4: Position the Curler Carefully
Look straight into a mirror and tilt your head slightly forward. This angle gives you a clearer view and better access to your lower lash line. With the curler held upside down, carefully bring it to the base of your bottom lashes. Take your time to ensure you are only gripping the lashes and not the delicate skin of your under-eye area. The narrow design of the precision curler is a huge help here. Position it as close to the root of the lashes as you can comfortably get without touching your skin.
Step 5: Use a Gentle Pulsing Motion
Unlike curling your top lashes where you might clamp down firmly, the technique for the bottom lashes requires a much gentler touch. Once the curler is in position at the base of the lashes, apply very light pressure and gently pulse the curler a few times. Squeeze and release in a soft, quick motion for about three to five seconds. Avoid clamping down hard or holding it for a long time. This gentle pulsing technique is enough to create a soft, downward bend in the lashes without creating a harsh, unnatural-looking crimp.
Step 6: Work in Small Sections
Your bottom lashes are not uniform in length and can be sparse in areas. To get the most natural-looking and effective curl, it’s best to work in small sections. Start from the outer corner of your eye, curl that small section of lashes, and then move the precision curler inward. Repeat the gentle pulsing motion on the middle section, and finally, on the inner corner lashes. This methodical, section-by-section approach ensures that every single lash gets curled, resulting in a beautifully fanned-out effect that a single clamp could never achieve.
Step 7: Lock in the Curl with Mascara
A curl is not complete until it’s locked in place. After you have finished curling, it’s time to apply mascara. Choose a mascara with a smaller, thinner wand, as this will give you more precision and prevent smudging on your under-eye area. When applying, use the very tip of the wand and lightly coat the lashes in a downward motion. A light coat is all you need; too much product can weigh down the delicate lashes and undo the beautiful curl you just created, or worse, lead to clumping.
Curling Tool Recommendations
Choosing the right curling tool is key to achieving perfectly curled lashes. Opt for an eyelash curler with a sturdy yet comfortable grip to ensure precision and ease of use. Some top recommendations include the Shu Uemura Eyelash Curler, known for its ability to fit various eye shapes seamlessly, and the Tweezerman Classic Lash Curler, which offers a consistent curl for all lash types. For those looking for a heated option, the Panasonic Heated Eyelash Curler delivers a long-lasting curl without pinching. Keep in mind that regular cleaning and replacing the pads on your curler will ensure optimal results and maintain lash health.

Frequently Asked Questions (FAQs)
Is It Safe to Curl Your Bottom Eyelashes?
Yes, it is perfectly safe to curl your bottom eyelashes as long as you use the correct tools and a gentle technique. The key is to use a mini or precision eyelash curler designed for detail work, as a standard curler is too large and can pinch the skin. Always work with clean lashes and use a light, pulsing pressure rather than a hard clamp.
What Is the Best Curler for Bottom Lashes?
The best tool is a mini or precision eyelash curler. Brands like Tweezerman, Japonesque, and Surratt Beauty make excellent versions. These smaller curlers have a narrow head that allows you to get close to the root of the short bottom lashes with precision and control, which is nearly impossible to do safely with a full-size curler.
How Do I Stop from Pinching My Skin?
To avoid pinching your skin, hold the curler upside down and tilt your head slightly forward while looking in the mirror to get a clear view. Position the curler very carefully, ensuring only the lashes are between the pads. The most important tip is to apply very light pressure. A gentle pulsing motion is all that’s needed to create a curl on the lower lashes.
Should You Curl Your Bottom Lashes Before or After Mascara?
You should always, without exception, curl your eyelashes before applying mascara. Curling lashes after mascara application can cause them to become brittle and break. Mascara can also stick to the curler pads, leading to pulling or yanking out your delicate lashes. Always curl bare lashes first, then apply mascara to set the shape.

Will Curling My Bottom Lashes Make My Eyes Look Smaller?
Quite the opposite! When done correctly, curling the bottom lashes helps to open up the eyes, making them appear larger, rounder, and more defined. It creates a symmetrical, wide-eyed “doll-like” effect by framing the entire eye, rather than just the top half. The key is to create a soft, downward bend, not a harsh crimp.
Conclusion
Curling your bottom eyelashes is a simple yet high-impact makeup artist trick that can elevate your entire look. It’s the key to achieving a perfectly balanced, wide-eyed appearance that makes you look more awake and polished. The secret lies in using the right tool—a precision curler—and a gentle, methodical technique. By working in sections and using a light touch, you can avoid any mishaps and create a beautiful, lasting curl. Now that you have a clear understanding of how to curl bottom eyelashes, you can confidently add this game-changing step to your beauty routine.
About the Author
Jane Hubbard is a passionate beauty expert with a wealth of experience in makeup, hair, and overall beauty techniques. After years of working as a hairdresser specialist, she followed her entrepreneurial spirit and started her own consultancy business.
Jane has always been driven by her desire to help others feel confident in their own skin, and she does this by sharing her knowledge, experiences, and practical beauty tips. Through her consultancy, she empowers individuals to embrace their unique beauty, offering tailored guidance that boosts both self-esteem and personal style.
Professional Focus
Specializes in makeup, hairstyling, and beauty consulting.
Provides personalized beauty advice, tips, and techniques to help individuals feel confident in their appearance.
Dedicated to staying up-to-date with the latest industry trends and developments.
Passionate about creating a comfortable and empowering experience for every client.
Education History
University of Craft and Design – Bachelor of Fine Arts (BFA) in Woodworking and Furniture Design
Woodworking Apprenticeships – Extensive hands-on training with skilled craftsmen to refine carpentry and furniture making techniques
Online Courses & Masterclasses – Continued education in advanced woodworking techniques, design principles, and specialized tools
Expertise:
Makeup artistry, hairstyling, and beauty consulting.
Personalized beauty techniques to enhance confidence and self-expression.
Educating clients on how to maintain their beauty routines at home.