
Are you ready to transform your skincare routine and achieve that coveted, youthful glow? If you have recently purchased the viral plumping cream everyone is talking about, you are likely wondering exactly how to get the best results. Skincare is not just about having the right products; it is about applying them correctly to maximize their potential. This guide is designed to help you navigate your new purchase with confidence.
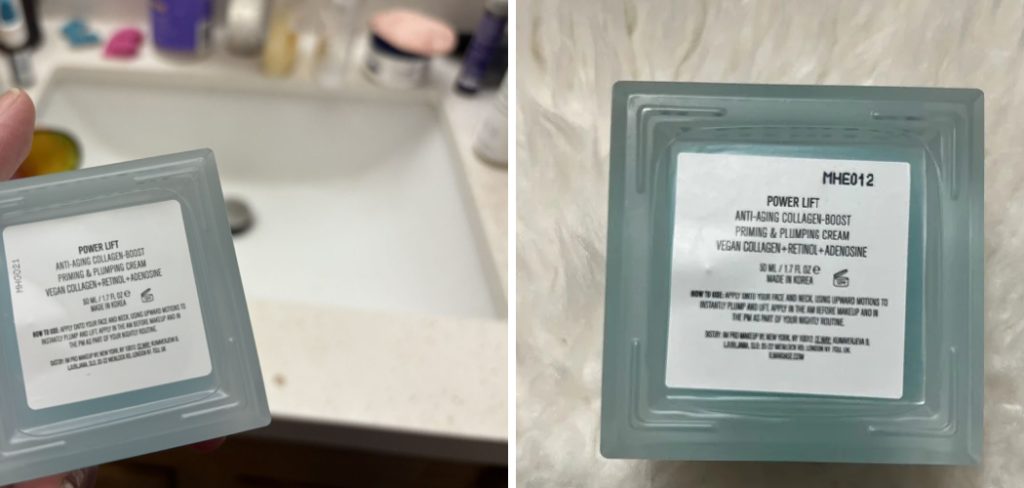
Many beauty enthusiasts struggle with layering serums and creams, often resulting in pilling or reduced efficacy. We are here to simplify that process for you. In this comprehensive guide, we will break down the specific techniques required for application, ensuring your skin receives the full benefit of the product’s hydrating and firming ingredients. By the end of this article, you will be an expert on how to use power lift il makiage to achieve a visibly smoother and more radiant complexion. Let’s dive into the details of elevating your daily regimen.
Why Proper Application Matters for Plumping Creams
Investing in high-quality skincare is the first step toward better skin, but the technique you use to apply it is equally critical. Plumping creams like Power Lift are formulated with potent active ingredients designed to hydrate the skin barrier and smooth out fine lines. If applied to dirty skin or layered incorrectly with incompatible products, these ingredients cannot penetrate deeply enough to work their magic.
Furthermore, the mechanical action of how you apply the product—your touch, the direction of your massage, and the timing—can significantly influence the lifting effect. A rushed application might leave the product sitting on the surface, leading to a sticky residue rather than a silky finish. Understanding the “why” behind the method ensures that you aren’t just wasting expensive product, but actually treating your skin to a rejuvenating experience that mimics a mini-facial at home.
9 Step-by-Step Guide: How to Use Power Lift Il Makiage
Follow these steps carefully to ensure you get the maximum lifting and hydrating benefits from your new skincare favorite.
Step 1: Begin With a Thoroughly Cleansed Canvas
Before you even reach for the bottle, it is imperative that your skin is completely free of dirt, oil, and makeup residues. Applying a high-performance serum or cream over a layer of impurities creates a barrier that prevents absorption, rendering the product less effective. Use a gentle cleanser suited to your skin type to wash your face with lukewarm water. Avoid using water that is too hot, as it can strip your natural oils and cause irritation. Pat your face dry with a clean, soft towel, leaving the skin slightly damp. This slight moisture helps humectants in the following steps bind better to your skin, setting the stage for optimal hydration.
Step 2: Balance Your Skin With a Toner
Once your face is clean, applying a toner is a crucial intermediate step that many beginners skip. A good toner helps to rebalance the pH levels of your skin after cleansing and removes any lingering traces of tap water minerals or cleanser residue. Pour a small amount of toner onto a cotton pad or into the palms of your hands and gently press it into your face. This step primes your pores, making them more receptive to the active ingredients in the plumping cream. Think of your skin like a sponge; a damp sponge absorbs more water than a dry, crusty one. By prepping with toner, you ensure deeper penetration of the subsequent product.
Step 3: Dispensing the Right Amount
One of the most common mistakes people make when learning how to use power lift il makiage is using either too little or too much product. You want to dispense just enough to cover your face and neck without creating a thick, greasy layer that refuses to sink in. Typically, one to two pumps are sufficient for the entire face. Pump the product onto your fingertips rather than directly onto your face. This allows you to warm the formula slightly between your fingers, which can help it melt into the skin more seamlessly upon application. Using the correct amount ensures your bottle lasts longer and your skin doesn’t feel overwhelmed or clogged.
Step 4: Strategic Application Points
Instead of rubbing the product haphazardly all over your face immediately, adopt a more strategic approach for even coverage. Take the warmed product on your fingertips and gently dot it across the key areas of your face: your forehead, both cheeks, your nose, and your chin. This method of distribution ensures that every zone of your face receives an equal amount of the active ingredients. If you just smear it starting from the cheeks, your forehead might miss out on the hydration it needs. This dotting technique is a professional standard that guarantees a uniform application, preventing patchy areas where the skin might feel tight or dry later in the day.
Step 5: The Upward Massage Technique
Now comes the most critical part of the process: the massage. Using the pads of your fingers, gently massage the product into your skin using upward and outward circular motions. Never pull or drag the skin downward, as this can contribute to sagging over time. The goal is to work against gravity. Start from the center of your face and move towards your hairline. This massage stimulates blood circulation, bringing oxygen to the surface, which enhances the “glow” factor. Taking your time with this step not only helps the product absorb fully but also provides a physical lifting effect that complements the formula’s chemical properties.
Step 6: Knowing Makiage on the Neck
Your skincare routine should never stop at your jawline. The skin on your neck and décolletage is thinner and often shows signs of aging faster than the face, yet it is frequently neglected. When you are dispensing the product, ensure you have enough to extend the application down to your collarbone. Use long, gentle, upward strokes from the base of your neck toward the jawline. Treating this area with the same care as your face ensures a consistent texture and tone across your skin. Neglecting the neck can result in a visible contrast between a youthful, hydrated face and a dry, aged neck, so make this step a non-negotiable habit.
Step 7: Allow Time for Absorption
Patience is a virtue in skincare, especially when layering products. After you have massaged the Power Lift into your face and neck, give it a moment to settle. Do not immediately slap on sunscreen or makeup. Wait for about sixty seconds to let the product fully penetrate the epidermis and dry down to a velvety finish. Touching your face during this minute can help you gauge if you used too much; if it feels tacky after a minute, use less next time. This waiting period prevents “pilling,” which happens when wet products ball up under makeup, ruining your foundation application before you even start.
Step 8: Seal It With a Moisturizer
While Power Lift is intensely hydrating, depending on your skin type, you may need to seal it in with a dedicated moisturizer. This step is particularly important for those with dry skin or during the harsh winter months. The moisturizer acts as an occlusive layer, locking in the potent ingredients of the serum so they can work for hours without evaporating. Apply your moisturizer using the same upward motions you used previously. If you have oily skin, you might find the Power Lift is hydrating enough on its own, but for most, this final seal is the secret to long-lasting plumpness and protection against environmental stressors.
Step 9: Consistency Is Key for Results
The final step isn’t about physical application, but rather mental discipline. You cannot expect dramatic, long-term anti-aging results if you only use the product sporadically. To truly see the benefits of how to use power lift il makiage effectively, you must incorporate it into your routine twice daily—once in the morning and once at night. Consistent use allows the ingredients to build up in the skin’s structure, improving elasticity and hydration levels over weeks and months. Treat this routine as a ritual of self-care rather than a chore, and your dedication will be rewarded with visibly healthier, bouncier skin.
Frequently Asked Questions
Can I Use Power Lift Under Makeup?
Yes, absolutely. Power Lift is designed to create a smooth, hydrated canvas that works beautifully as a base for makeup. Its plumping effect can actually help foundation glide on more smoothly and prevent it from settling into fine lines. Just ensure you let it fully absorb before applying primer or foundation.
Is This Product Suitable For Sensitive Skin?
While Power Lift is generally safe for most skin types, sensitive skin can be unpredictable. It contains active ingredients meant to firm and hydrate, which are usually well-tolerated. However, it is always recommended to perform a patch test on your inner arm 24 hours before applying it to your full face.
How Long Does It Take To See Results?
You will likely notice an immediate improvement in hydration and a subtle glow right after the first application. However, for significant changes in skin texture and firmness, consistency is required. Most users report visible long-term improvements in skin elasticity after using the product consistently for about four to six weeks.
Should I Use It In The Morning Or Night?
You can use it both morning and night for the best results. In the morning, it acts as a great defense against dehydration throughout the day. At night, it supports the skin’s natural repair process while you sleep. Using it twice daily maximizes the anti-aging benefits.
Does Power Lift Replace My Moisturizer?
This depends largely on your specific skin type. For those with oily or combination skin, Power Lift might provide enough hydration to act as a standalone moisturizer. However, if you have dry or dehydrated skin, it is best used as a treatment step followed by a heavier cream to lock in moisture.
Conclusion
Achieving that professional-level glow at home is entirely possible when you understand the nuances of application. By following this guide, you have learned the importance of prepping the skin, the correct massage techniques, and the discipline required for lasting results. Skincare is a journey, and using high-quality products like Power Lift correctly ensures you are on the path to success.
Remember, the most expensive cream in the world won’t work if it sits on top of dead skin cells or is wiped away too quickly. Take your time, enjoy the ritual, and stick to the steps outlined above. Now that you know how to use power lift il makiage like a pro, it is time to get in front of the mirror and give your skin the hydration boost it deserves.
About the Author
Jane Hubbard is a passionate beauty expert with a wealth of experience in makeup, hair, and overall beauty techniques. After years of working as a hairdresser specialist, she followed her entrepreneurial spirit and started her own consultancy business.
Jane has always been driven by her desire to help others feel confident in their own skin, and she does this by sharing her knowledge, experiences, and practical beauty tips. Through her consultancy, she empowers individuals to embrace their unique beauty, offering tailored guidance that boosts both self-esteem and personal style.
Professional Focus
- Specializes in makeup, hairstyling, and beauty consulting.
- Provides personalized beauty advice, tips, and techniques to help individuals feel confident in their appearance.
- Dedicated to staying up-to-date with the latest industry trends and developments.
- Passionate about creating a comfortable and empowering experience for every client.
Education History
- University of Craft and Design – Bachelor of Fine Arts (BFA) in Woodworking and Furniture Design
- Woodworking Apprenticeships – Extensive hands-on training with skilled craftsmen to refine carpentry and furniture making techniques
- Online Courses & Masterclasses – Continued education in advanced woodworking techniques, design principles, and specialized tools
Expertise:
- Makeup artistry, hairstyling, and beauty consulting.
- Personalized beauty techniques to enhance confidence and self-expression.
- Educating clients on how to maintain their beauty routines at home.