
Are you tired of using a brush to apply your cream blush? Or you’re on the go and don’t have a brush handy. Worry no more, because you can easily apply cream blush with your fingers!

How to apply cream blush with fingers is a quick and effective way to achieve a natural, radiant look. This technique enables greater control over the application, blending seamlessly into the skin for a soft, dewy finish. Whether you’re getting ready for an event or just enhancing your everyday makeup routine, using your fingers ensures precision and warmth, which helps the product melt effortlessly into your complexion.
With a few easy steps on cream blush how to apply, you can master this method and add a healthy flush of color to your cheeks. Let’s dive into the details!
What Are the Benefits of Using Your Fingers for Blush Application?
- Easy to Use: One of the biggest benefits of using your fingers for blush application is that it’s straightforward. There’s no need for any fancy tools or brushes, making it a great technique for beginners or those who are always on the go.
- Effortless Blending: When you use your fingers to apply blush, you have direct contact with your skin, allowing you to blend the product effortlessly. It also helps achieve a natural look, as opposed to the harsh lines that brushes may sometimes create.
- Multi-Purpose Usage: Another advantage of using your fingers is that they can serve as a multi-purpose tool for applying blush. You can use your index or middle finger to dab the product onto your cheeks, and then use your ring finger to blend it out. Additionally, you can also use your fingers to apply highlighter on the high points of your face for a seamless finish.
- Less Product Waste: Using fingers to apply blush results in less product waste compared to using a brush. With brushes, some of the product may get stuck in between bristles or not transfer well onto the skin. However, with fingers, you have direct contact with your skin and therefore can control how much product you want to apply.
10 Easy Steps on How to Apply Cream Blush With Fingers
Step 1. Choose the Right Shade

Select a shade that complements your skin tone and matches the look you want to achieve. For a natural flush, opt for a shade similar to the color your cheeks naturally turn when blushing. Light pinks and peaches work well for fair skin tones, while warmer coral or deeper berry shades suit medium and darker skin tones. If you’re aiming for a bold or dramatic look, experiment with vibrant or unconventional shades that complement your complexion beautifully. Always test the color on your wrist or jawline to ensure it blends seamlessly with your skin.
Step 2. Prep Your Skin
Begin by cleansing your face to remove dirt, oil, and makeup residue. Follow up with a gentle exfoliator to slough away dead skin cells, leaving your skin smooth and fresh.
Apply a hydrating moisturizer suited to your skin type to ensure a nourished and plump surface. If you plan to wear makeup, adding a primer will create a smooth base and help your makeup stay in place throughout the day. Don’t forget to include sunscreen with at least SPF 30 to protect your skin from harmful UV rays. Prepping your skin properly is essential for achieving a flawless and radiant look.
Step 3. Warm the Product
Before applying the product to your face, take a small amount and warm it up between your fingers. This step helps to activate the product’s ingredients and ensures smoother application. By warming it, the product will spread more evenly, allowing for better absorption into the skin. Gently rub it between your fingertips for a few seconds until it feels soft and ready to use. This simple step can make a noticeable difference in how the product performs on your skin.
Step 4. Find the Right Placement
Once the product is ready for application, it’s essential to apply it to the key areas of your face for maximum effectiveness. Focus on areas where the skin tends to need more attention, such as the forehead, cheeks, nose, and chin.
Start by dotting the product evenly across these areas to ensure balanced distribution. Avoid applying too close to sensitive areas, such as the eyes or lips, unless the product is specifically designed for use in these areas. Proper placement ensures that the product targets the areas that need it most, improving its overall performance.
Step 5. Apply in Small Dabs
Using clean fingertips or a suitable applicator, gently dab the product onto your skin in small, controlled amounts. Avoid rubbing or pulling on the skin, as this can cause irritation or compromise the product’s effectiveness. Instead, use a light tapping motion to ensure even application and absorption. This technique helps the product penetrate the skin more effectively while reducing the risk of overstretching delicate areas. Take your time to cover all the key regions evenly for optimal results.

Step 6. Blend with Gentle Taps
Using your fingertips or a soft applicator, gently apply the product with light taps, focusing on areas that may require extra attention, such as the eyes, nose, or any dry patches. The tapping motion not only aids in the absorption of the product but also stimulates blood circulation, which can promote a healthy and radiant complexion over time.
Be mindful of the amount of product used—less is often more when it comes to skincare, as applying too much can lead to a heavy or greasy feeling. When layering multiple products, allow each layer to fully absorb before proceeding to the next step for optimal results.
Step 7. Layer for Intensity
To enhance the efficacy of your skincare routine, layering products correctly is essential. Start with lighter, water-based formulas such as serums or essences, allowing them to penetrate deeply into the skin. Gradually layer thicker, cream-based products, such as moisturizers, on top to lock in hydration.
For an even more intense treatment, you can repeat the application of your serum or layer different types targeting specific concerns, such as brightening or anti-aging. Always wait a few moments between layers to ensure proper absorption and avoid product pilling. This method ensures your skin receives maximum benefits while creating a barrier of moisture and nutrients tailored to your skin’s needs.
Step 8. Blend the Edges
Blending the edges is a crucial step to achieve a seamless and natural look, especially when applying makeup. Use a soft, clean brush or a damp beauty sponge to gently diffuse any harsh lines where different products meet, such as foundation, concealer, or contour. Focus on areas such as the jawline, hairline, and around the eyes to ensure a seamless transition into your skin tone.
Step 9. Check in Natural Light
Natural light is the ultimate test for how your makeup appears in real life. After finishing your application, step outside or near a window with ample daylight to inspect your work. This helps reveal any uneven blending, mismatched shades, or overly heavy application that may not be visible under artificial lighting. Adjust as needed to ensure your makeup looks flawless and natural in any setting.
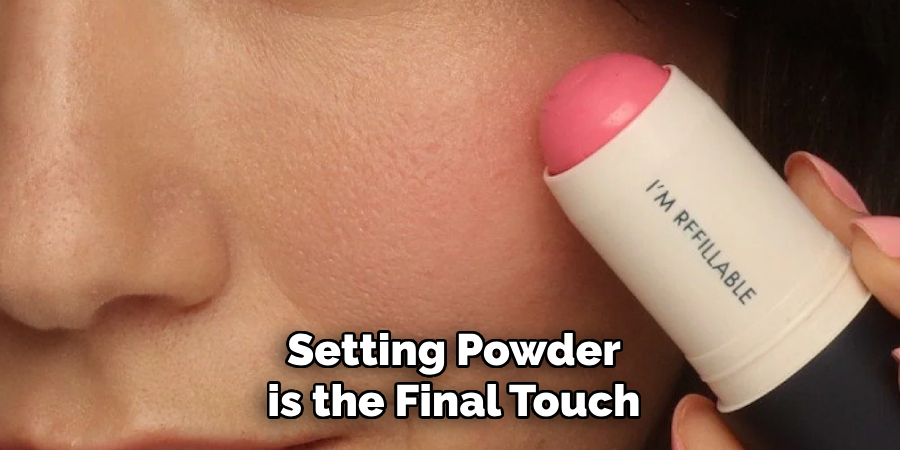
Step 10. Finish with Setting Powder
Setting powder is the final touch that locks in your makeup, reduces shine, and creates a smooth, matte finish. Choose a translucent powder or one that matches your skin tone for the best results. Using a fluffy brush or a powder puff, lightly dust the powder over your face, focusing on areas prone to oiliness, such as the T-zone. Be careful not to apply too much, as this can create a cakey appearance.
By following these steps, you can achieve a flawless and long-lasting makeup look that will stay put throughout the day.
5 Things You Should Avoid
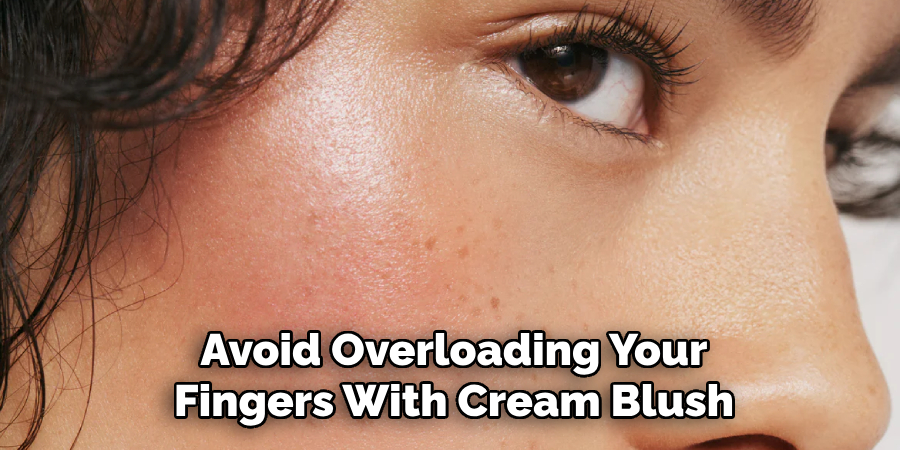
- Using Too Much Product: Avoid overloading your fingers with cream blush, as it can result in an uneven or overly pigmented application. Start with a small amount and build up gradually if needed.
- Skipping Skin Preparation: Failing to prep your skin can lead to patchy results. Make sure your skin is clean, moisturized, and primed to ensure the blush blends seamlessly.
- Not Blending Properly: Rushing through the application process or neglecting to blend can leave visible streaks or harsh lines. Take your time to blend the blush into your skin using gentle, tapping motions.
- Applying in the Wrong Areas: Placing the blush too high, too low, or too close to your nose can disrupt the natural look. Aim for the apples of your cheeks and gently blend upwards toward your temples for a lifted effect.
- Applying Powder Over Cream Blush: Always use cream blush before setting powder. Layering it on top of powdered skin can create a cakey or uneven texture, making it harder to blend.
Conclusion
How to apply cream blush with fingers can be a simple and effective way to achieve a natural, radiant look.
By warming the product with your fingertips and blending thoughtfully, you can ensure seamless application. Avoid common mistakes, such as using too much product or layering powder, to achieve a smooth and balanced finish. Remember that practice makes perfect, so take your time to find the technique that works best for you.
With a little patience, cream blush can become a reliable addition to your makeup routine.