
Are you tired of using strip lashes that never seem to fit your natural lash line? Or do you want a more customizable and subtle look compared to strip lashes? The individual lashes might be the perfect solution for you.
Applying individual lashes can be a game-changer for enhancing your natural beauty and achieving a customized look. Unlike strip lashes, individual lashes give you more control to create the perfect volume and fullness that suits your style.
Whether you’re aiming for a subtle, everyday look or a dramatic finish for a special occasion, mastering the application process is key. With the right tools, techniques, and a bit of patience, you can achieve flawless results that elevate your eye makeup to the next level.
This guide on how to apply individual lashes will walk you through the steps to apply individual lashes like a pro.
What Are the Benefits of Individual Lashes?
Individual lashes, also known as cluster lashes or flare lashes, are small sections of false eyelashes that are applied individually to your natural lashes. Unlike traditional strip lashes, which come in a pre-made band that adheres to the entire lash line, individual lashes allow for more customization and precision. Some benefits of using individual lashes include:
- Natural-looking Results: Since individual lashes are applied one by one, they blend seamlessly with your natural lash line and mimic the appearance of real lashes. This makes them ideal for those who want a subtle enhancement rather than a bold statement.
- Customizable Volume: With individual eyelashes, you have the flexibility to choose how many clusters you want to add. This allows for a more tailored and customizable look, whether you prefer a natural or dramatic style.
- Longer Lasting Results: Individual lashes have a longer lifespan compared to strip lashes since they are applied directly onto your natural lashes. With proper care, individual lashes can last up to 4 weeks.
- No Damage to Natural Lashes: Strip lashes can sometimes cause damage or breakage to your natural lashes if not applied correctly or appropriately removed. Individual lash extensions put no strain on your natural lashes, making them a safer option.
- Less Maintenance: Unlike strip lashes that need to be taken off and reapplied daily, individual lash extensions require minimal maintenance. Once applied, you can simply forget about them and enjoy beautiful, full lashes for weeks.
What Will You Need?
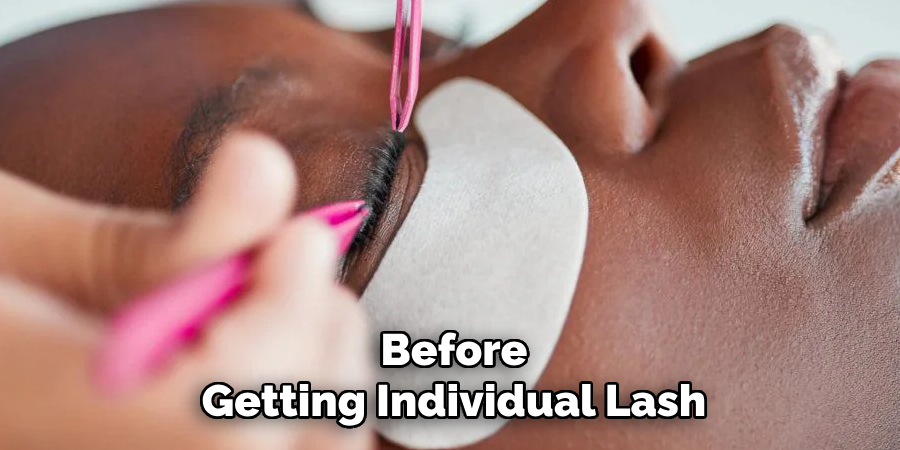
Before getting individual lash extensions, there are a few things you should consider and prepare for.
- Research: It’s essential to do your research before getting individual lash extensions. Look for reputable lash technicians and read reviews from previous clients. This will ensure that you have a positive experience and achieve the desired results.
- Consultation: Before applying individual lash extensions, it’s recommended to have a consultation with your lash technician. During this time, you can discuss your expectations, any concerns or allergies, and decide on the best style for your lashes.
- Clean Lashes: Make sure to clean your lashes before your appointment thoroughly. This will remove any oils or makeup residue that could interfere with the bonding of the extensions.
- Time: The application process can take anywhere from 1.5 to 3 hours, depending on the desired look and the number of lashes being applied.
- Aftercare: Proper aftercare is crucial in maintaining the longevity of your lash extensions. This includes avoiding oil-based products, excessive rubbing or pulling on the lashes, and regular cleansing.
8 Easy Steps on How to Apply Individual Lashes
Step 1. Prepare Your Tools and Workspace:
Start by gathering all the necessary tools to ensure a smooth application process. You’ll need a set of individual lashes, lash adhesive, a pair of tweezers, a lash applicator or spoolie brush, and a magnified mirror for precision.
Ensure your workspace is clean and well-lit to avoid any mishaps or mistakes. Arrange your tools neatly within reach, and if possible, work on a stable surface to keep everything organized. It also helps to have cotton swabs or makeup remover pads handy to correct any adhesive errors. Proper preparation sets the foundation for a flawless and stress-free lash application experience.

Step 2. Clean Your Natural Lashes:
Begin by thoroughly cleaning your natural lashes to ensure they are free from dirt, oil, and any leftover makeup. Use a gentle, oil-free makeup remover or a micellar water solution for the best results. Carefully swipe the remover over your eyelids and lashes with a cotton pad or soft cloth, ensuring you do not tug or pull on the delicate lash area.
This step not only helps to create a clean base for the adhesive to bond properly but also enhances the longevity of your false lashes. After cleaning, pat your eyelids dry with a clean, lint-free cloth and avoid touching your lashes directly with your fingers to maintain cleanliness. Taking the time to thoroughly clean your lashes ensures a secure and polished final look.
Step 3. Select the Right Lashes:
Choosing the right false lashes can make all the difference in achieving a natural or dramatic look that complements your eye shape and overall style. Start by considering the occasion—lightweight, subtle lashes work well for daily wear or professional settings, while voluminous, bold lashes are perfect for special events or evenings.
Additionally, think about your eye shape when selecting lashes. For example, individuals with round eyes may prefer flared styles to elongate the eye shape, while those with almond-shaped eyes can experiment with a variety of lash styles. It’s also important to consider the lash band type—clear bands offer a more seamless look, while black bands can enhance the depth and drama of your eyeliner.
Step 4. Dispense a Small Amount of Adhesive:
Using the proper adhesive is essential for achieving a secure and comfortable lash application. Opt for a high-quality lash adhesive that dries clear for a more natural finish, or choose a black adhesive for a subtle intensity on your lash line. When dispensing adhesive, less is more—apply a thin, even layer across the lash band to prevent excess glue from creating a messy or uncomfortable fit.
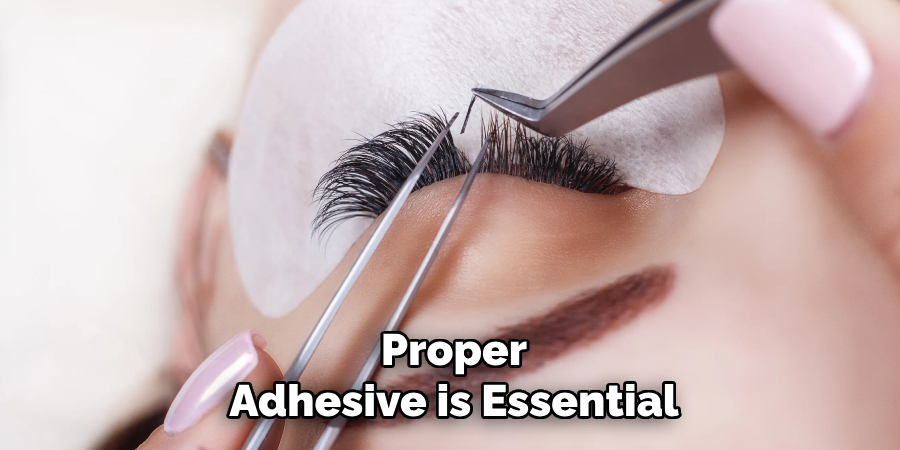
Allow the adhesive to become tacky by waiting 20-30 seconds before applying the lash. This step ensures that the lashes adhere more easily to your natural lash line and stay in place all day. For those with sensitive skin, consider using a latex-free adhesive to avoid irritation or allergic reactions. Always remember to store your adhesive properly, ensuring the cap is tightly sealed to maintain its effectiveness.
Step 5. Pick Up a Lash Cluster:
Using a pair of high-quality tweezers, carefully pick up a single lash cluster by its base. Tweezers provide precision and help ensure you don’t damage the delicate structure of the lash cluster. Hold the lash cluster firmly but gently to prevent it from deforming its shape.
Pay attention to the orientation of the cluster, ensuring the tips are pointed upwards and the base is cleanly aligned for placement. For beginners, using tweezers with a slanted tip can be helpful, as they provide more control and are easier to maneuver.
Step 6. Dip the Lash in Adhesive:
Using your tweezers, carefully dip the base of the lash cluster into the adhesive. Make sure to pick up a small, even amount of glue—too much adhesive can make the application messy and complex, while too little may not secure the lashes correctly.
It’s essential to use high-quality adhesive explicitly formulated for lash application to ensure a firm hold and avoid irritation. After dipping, allow the adhesive a few seconds to become tacky; this step enhances its grip and makes the placement process smoother.
Step 7. Apply the Lash to Your Natural Lashes:
With the adhesive tacky and ready, carefully pick up the lash using tweezers or a lash applicator tool for maximum precision. Position the lash strip as close to your natural lash line as possible, starting from the center. Gently press the lash strip into place, moving outward to secure the edges. Adjust as needed to ensure the strip aligns seamlessly with your natural lashes.
Use the applicator or your fingertips to gently press along the lash band, ensuring it adheres fully and creates a natural look. If necessary, use a small brush or the edge of your applicator to smooth out any excess adhesive and achieve a flawless finish.
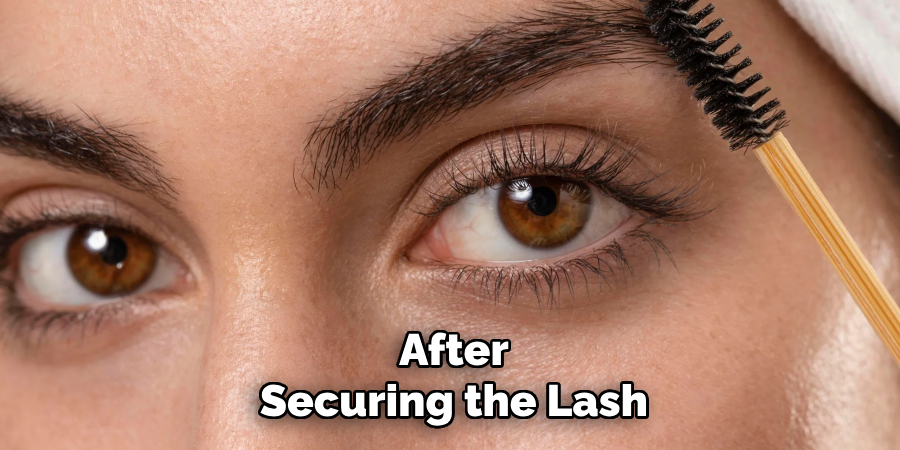
Step 8. Final Adjustments:
After securing the lash strip, take a moment to assess the overall appearance and ensure the lashes look natural and symmetrical. Use a small mirror to check both eyes from different angles, making sure the lash band is aligned correctly with your natural lash line.
If you notice any gaps or lifting at the edges, apply a small amount of adhesive using a precision applicator or a toothpick, then gently press the area into place. To blend the falsies with your natural lashes, use an eyelash curler or lightly pinch them together with your fingers, ensuring a seamless transition. Finally, apply a thin coat of mascara to unify the natural and false lashes for a polished, cohesive finish.
Follow these steps carefully to achieve beautifully applied individual lashes with a seamless finish!
Conclusion
How to apply individual lashes can seem daunting at first, but with practice and patience, you can achieve a flawless, natural-looking result.
The key is to work carefully and in small sections, ensuring that each lash blends seamlessly with your natural lashes. By following the outlined steps—preparing your lashes, applying adhesive precisely, and mixing them well—you can achieve a professional-quality finish for your eyes.
Remember, the process takes time, but the stunning results are worth the effort!
About the Author
Jane Hubbard is a passionate beauty expert with a wealth of experience in makeup, hair, and overall beauty techniques. After years of working as a hairdresser specialist, she followed her entrepreneurial spirit and started her own consultancy business.
Jane has always been driven by her desire to help others feel confident in their own skin, and she does this by sharing her knowledge, experiences, and practical beauty tips. Through her consultancy, she empowers individuals to embrace their unique beauty, offering tailored guidance that boosts both self-esteem and personal style.
Professional Focus
- Specializes in makeup, hairstyling, and beauty consulting.
- Provides personalized beauty advice, tips, and techniques to help individuals feel confident in their appearance.
- Dedicated to staying up-to-date with the latest industry trends and developments.
- Passionate about creating a comfortable and empowering experience for every client.
Education History
- University of Craft and Design – Bachelor of Fine Arts (BFA) in Woodworking and Furniture Design
- Woodworking Apprenticeships – Extensive hands-on training with skilled craftsmen to refine carpentry and furniture making techniques
- Online Courses & Masterclasses – Continued education in advanced woodworking techniques, design principles, and specialized tools
Expertise:
- Makeup artistry, hairstyling, and beauty consulting.
- Personalized beauty techniques to enhance confidence and self-expression.
- Educating clients on how to maintain their beauty routines at home.