
Nose contouring is a makeup artist’s secret weapon for sculpting and defining the face, but its success hinges entirely on one crucial step: blending. You can draw the most perfect lines, but without a seamless blend, the result can look harsh, unnatural, and obvious. The goal is to create subtle shadows and highlights that mimic natural bone structure, not to draw stripes on your nose. Mastering the art of blending is what separates a novice from an expert and is the key to a believable finish.
This guide will break down the entire process into simple, easy-to-follow steps. We will show you exactly how to blend nose contour to achieve a beautifully sculpted, natural look that enhances your features without giving the game away.
Why Blending Is Crucial for Nose Contouring
Blending is arguably the most important step in the entire contouring process. Its purpose is to diffuse the sharp lines of the contour and highlight products, making them melt seamlessly into your skin. When contouring the nose, you are working with a small, central area of the face where any harsh lines are immediately noticeable. Unblended contour can look like two dark stripes, which defeats the purpose of creating a natural-looking shadow.
The goal of nose sculpting is to create an illusion. You are tricking the eye into seeing a different shape—perhaps a slimmer bridge, a more defined tip, or a straighter profile. This illusion is only believable if the shadows and highlights appear to be a natural part of your face. Proper blending softens the transition between the dark contour and the light highlight, ensuring there are no obvious lines of demarcation. It’s the difference between makeup that looks like it’s sitting on your skin versus makeup that looks like it is your skin.
8 Step-by-Step Guide: How to Blend Nose Contour
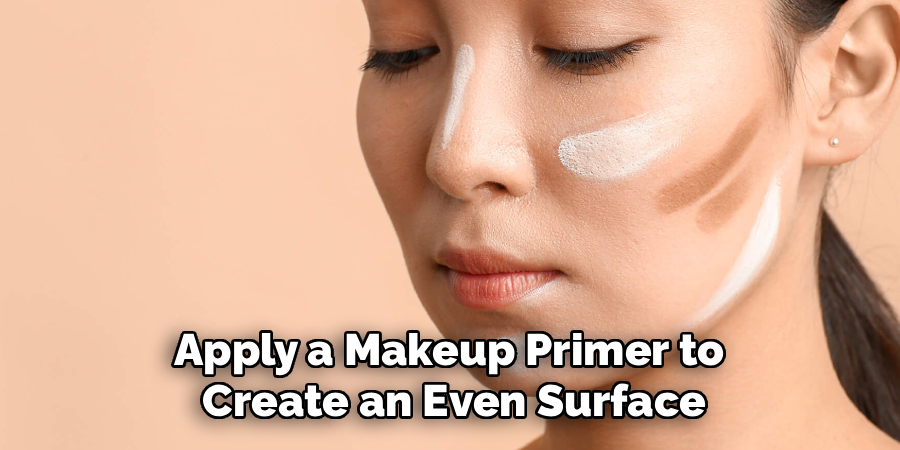
Step 1: Start with a Smooth, Prepped Base
The secret to a great blend starts before you even pick up your contour product. A smooth canvas is essential. After cleansing and moisturizing, apply a makeup primer to create an even surface and give your makeup something to grip onto. Follow this with your regular foundation, making sure it’s applied evenly across your nose and the surrounding areas. This base layer ensures that your contour products won’t cling to dry patches or get lost in oily spots, allowing them to glide on and blend out smoothly for a perfect natural finish.
Step 2: Apply Contour with Precision
How you apply your contour directly impacts how well it blends. For makeup nose contouring, precision is key. Use a small, thin makeup brush to draw two parallel lines down the sides of your nose, starting from the inner corner of your eyebrows. The closer you draw these lines together, the slimmer your nose will appear. Avoid using a large, fluffy brush, as this can place the product too broadly and make blending difficult. A precise application gives you more control over the final shape and makes the subsequent contour blending process much more manageable.
Step 3: Choose the Right Blending Tools
Having the right makeup tools is half the battle. For blending nose contour, your best options are a small, damp beauty sponge, a small, fluffy blending brush, or even your ring finger. A damp sponge is excellent for pressing the product into the skin for an airbrushed effect. A small blending brush allows for more controlled, targeted blending, while the warmth of your fingertip can help melt cream products seamlessly into your skin. Experiment with different tools to see which one gives you the most control and the most desirable finish.
Step 4: Use a Tapping or Stippling Motion
Instead of rubbing or dragging the product, use a gentle tapping or stippling motion to blend. If you are using a damp beauty sponge, gently tap it along the contour lines to soften them. If you are using a brush, use light stippling motions to diffuse the edges. This technique pushes the product into the skin rather than just moving it around, which helps to soften the lines without erasing the definition you’ve created. This is a fundamental technique for learning how to blend nose contour effectively, as it prevents a muddy appearance.
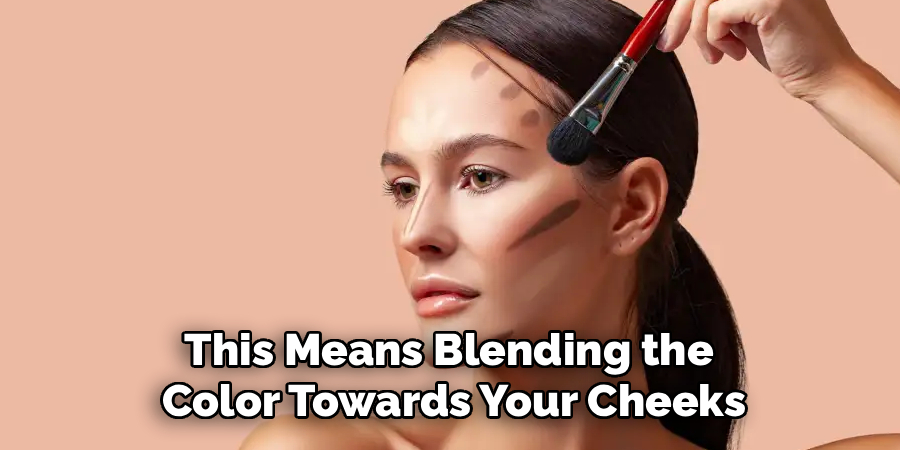
Step 5: Blend Outward, Not Inward
When you begin to blend the contour lines on the sides of your nose, always blend them outward, away from the bridge of your nose. This means blending the color towards your cheeks and the inner part of your eye area. Blending inward will make the bridge of your nose look wider and defeat the purpose of the contour. Blending outward helps the shadow look more natural, as if it is being cast by the bridge of your nose. This directional blending is a professional trick for realistic nose sculpting.
Step 6: Soften the Edges with Your Foundation Brush
After you have blended the contour lines, you might still see a faint edge. A great trick to ensure a truly seamless finish is to take your original foundation brush or sponge (with a tiny bit of leftover foundation on it) and gently tap it along the outer edges of your contour. This helps to marry the contour color with your base makeup, completely erasing any visible lines. This final touch ensures that the shadow looks like it is coming from within the skin, not sitting on top of it.
Step 7: Apply and Blend Your Highlight
Highlighting techniques are just as important as the contour itself. After blending your contour, apply a concealer or highlighter that is one to two shades lighter than your skin tone in a thin line down the center of your nose, stopping before the tip. You can also add a small dot of highlight on the very tip for a lifted look. Blend the edges of this highlight carefully with a small sponge or your finger, making sure it softly merges with the contour lines on either side.
Step 8: Set Your Work with Powder
To lock your beautifully blended nose contour in place, you need to set it with powder. Using a small, fluffy brush, lightly dust a translucent setting powder over the entire area. If you want to intensify the sculpted effect, you can try “baking.” This involves applying a thick layer of translucent powder along the sides of your nose (next to the contour lines) and letting it sit for a few minutes before dusting it away. This technique further sharpens the lines for a very defined look.
Common Contouring Mistakes
While contouring can transform your makeup look, there are a few common mistakes to avoid to achieve the best results. One major error is using a shade that’s too dark or too warm for your skin tone, which can make the contour appear muddy or unnatural. Blending is another critical step—harsh, unblended lines can give an overly dramatic or streaky effect.
Additionally, over-contouring the nose can lead to an uneven or exaggerated appearance rather than a subtle enhancement. It’s also important to use the right tools; brushes that are too large or stiff can make precision difficult, while the wrong product formulas might not work well with your skin texture or other makeup layers. Avoid these pitfalls by choosing the right shades, blending thoroughly, and practicing moderation for a polished, natural contour.

Frequently Asked Questions (FAQs)
What Are the Best Tools for Blending Nose Contour?
The best tools are small and allow for precision. A mini, damp beauty sponge is fantastic for tapping and melting cream products into the skin. A small, fluffy eyeshadow blending brush works wonders for diffusing powder contour. For applying the initial lines, a small, flat, or angled brush offers the most control. Many people also find that the warmth of their ring finger is perfect for blending cream contours seamlessly.
Should I Use Cream or Powder for Nose Contouring?
This often comes down to personal preference and skin type.
- Cream products are excellent for beginners as they are more forgiving and easier to blend. They offer a natural, skin-like finish that is great for dry or normal skin.
- Powder products provide a more matte, defined finish and are ideal for those with oily skin. They have great staying power but require a bit more skill to blend without looking patchy.
How Do I Avoid My Nose Contour Looking Muddy or Patchy?
To avoid a muddy look, always start with a clean, primed base. Use a light hand and build up the product gradually. It’s easier to add more than to take away. Also, make sure you are not using a contour shade that is too warm or orangey; a cool-toned shade mimics natural shadows best. Finally, blend with clean tools to avoid mixing colors.
How Do I Blend the Contour on the Tip of My Nose?
Blending the tip is crucial for a natural look. After drawing a small “U” shape or two small lines around the tip, use a mini damp sponge or your fingertip to gently tap and diffuse the lines. The goal is to create a soft shadow that makes the tip appear more lifted or button-like. Avoid harsh lines by blending the edges until they are barely perceptible.
Should I Blend My Contour Before or After Foundation?
For the most natural finish, it is almost always best to apply and blend your contour after your foundation. Your foundation creates an even canvas for the contour to sit on, which helps it blend more smoothly. Contouring before foundation (underpainting) is a more advanced technique that can yield a very subtle look, but it is generally harder to control for beginners.

Conclusion
Perfecting your nose contour is all about mastering the blend. While the initial placement of your lines creates the map for your new shape, it’s the careful, patient blending that brings the illusion to life, transforming harsh stripes into believable shadows. The key takeaways are to use precise tools, blend outward with a light tapping motion, and ensure a seamless transition between your contour, highlight, and foundation.
Don’t be discouraged if it doesn’t look perfect on your first try; like any makeup skill, it takes practice. Now that you have a detailed guide on how to blend nose contour, you have all the knowledge you need to practice with confidence and achieve a beautifully sculpted, natural-looking result every time.
About the Author
Jane Hubbard is a passionate beauty expert with a wealth of experience in makeup, hair, and overall beauty techniques. After years of working as a hairdresser specialist, she followed her entrepreneurial spirit and started her own consultancy business.
Jane has always been driven by her desire to help others feel confident in their own skin, and she does this by sharing her knowledge, experiences, and practical beauty tips. Through her consultancy, she empowers individuals to embrace their unique beauty, offering tailored guidance that boosts both self-esteem and personal style.
Professional Focus
- Specializes in makeup, hairstyling, and beauty consulting.
- Provides personalized beauty advice, tips, and techniques to help individuals feel confident in their appearance.
- Dedicated to staying up-to-date with the latest industry trends and developments.
- Passionate about creating a comfortable and empowering experience for every client.
Education History
- University of Craft and Design – Bachelor of Fine Arts (BFA) in Woodworking and Furniture Design
- Woodworking Apprenticeships – Extensive hands-on training with skilled craftsmen to refine carpentry and furniture making techniques
- Online Courses & Masterclasses – Continued education in advanced woodworking techniques, design principles, and specialized tools
Expertise:
- Makeup artistry, hairstyling, and beauty consulting.
- Personalized beauty techniques to enhance confidence and self-expression.
- Educating clients on how to maintain their beauty routines at home.