
Melasma can feel like one of the trickiest skin concerns to cover with makeup, especially when you want to maintain a natural, skin-like finish. Because melasma often forms with soft, diffused edges and can appear in different depths across the face, achieving seamless coverage means working with, not against, your skin’s unique patterns. If you’ve searched for the best way to mask uneven pigmentation without cakey layers or obvious makeup lines, learning how to conceal melasma with makeup is the key.
This guide provides practical, pro-level steps for natural-looking results. We’ll break down the science behind melasma, help you prep your skin for makeup that stays put, and explain how to use strategic color correction, concealer layering, and setting techniques to camouflage patches without heavy buildup. Along the way, you’ll learn about selecting the right tools, finding undertone-safe shades, troubleshooting common mistakes, and ensuring your hard work lasts all day. By following these steps, you can approach melasma with confidence and achieve beautiful, even coverage every time.
Melasma 101: Pattern, Depth, and Triggers
Diffuse vs. Clustered Pigmentation
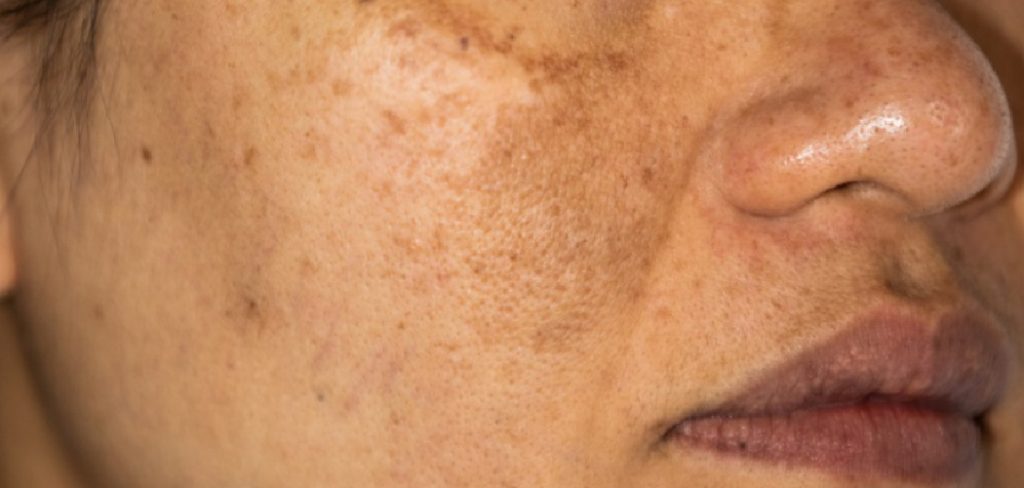
Understanding melasma’s behavior is the first step toward effective coverage. Unlike freckles, which often show up as defined dots, melasma is typically characterized by brown, tan, or greyish patches that have blurry or feathered edges. Some may notice larger, diffuse areas (like across the cheeks or upper lip), while others see more clustered, concentrated pigmentation. These patterns matter because diffuse edges require blending strategies that avoid creating “makeup borders” between dark and lighter skin, and clustered patches may need more focused correction.
Hormonal and Sun Triggers to Know
Melasma is often triggered by hormonal changes—think pregnancy, birth control, or hormone therapy. However, sun exposure is almost always a major culprit. Ultraviolet (UV) and even visible blue light can deepen or worsen melasma, causing it to return quickly even after treatment. Pollution and heat exposure have also been shown to trigger flare-ups. Knowing your triggers not only helps with prevention but also determines how you’ll approach both skincare and makeup routines, especially with SPF and antioxidant layering.
When to Treat vs. When to Cover
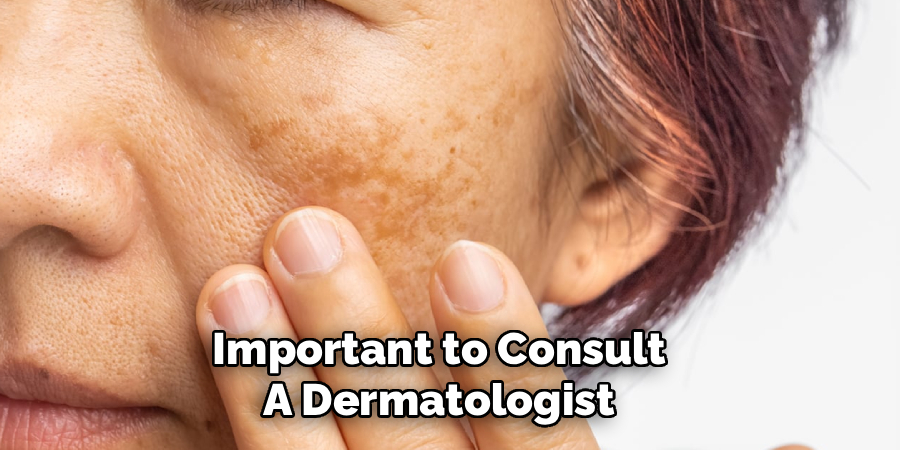
If patches are new, changing rapidly, or you notice irritation, it’s important to consult a dermatologist before only camouflaging the area. Medical and cosmetic treatments (like chemical peels, topical fades, or prescription creams) can reduce stubborn pigmentation over time, but makeup is an empowering choice for immediately boosting confidence while waiting for results. You can combine both approaches for the most complete solution. Whenever you use topical actives, make sure they’re compatible with your chosen makeup routine to avoid irritation or flaking.
Skin Prep That Won’t Disturb Patches
Hydration That Doesn’t Slip
A properly moisturized base can make the difference between flawless and patchy coverage. Choose lightweight, non-greasy hydrators—think water-gel creams or milky serums—that deliver lasting moisture without leaving a slippery surface. Let the moisturizer absorb fully before moving to the next step. If you have drier skin, aim for humectants (like glycerin or hyaluronic acid) that plump without an oil-slick finish.
Gripping, Smoothing Primers
Priming is crucial, especially if you struggle with makeup slipping over melasma patches or settling into fine lines. Use a silicone– or gel-based primer that smooths the skin’s surface and offers a gentle grip for your base products. Avoid heavily mattifying primers, as they can emphasize texture and dryness, but prioritize ones that promise long wear or a blurring effect. Apply in a thin layer, using fingers to gently press primer into areas with visible melasma.
SPF Layering That Won’t Grey Out
Sun protection is critical when dealing with melasma. Choose an SPF rated for broad-spectrum protection (UVA, UVB, HEV) and layer it as the last step in your skincare, before primer. Modern mineral (zinc oxide, titanium dioxide) or chemical sunscreens with sheer finishes won’t leave a white cast or cause makeup to pill—as long as you let each layer settle for 2-3 minutes before continuing. If your sunscreen leaves a slight cast, apply a tinted moisturizer or primer over it to neutralize before foundation.
Base First: Unifying Tone Without Erasing
Light-to-Medium Coverage Foundation
The goal is to gently even the canvas before targeting melasma spots directly. Choose a foundation that matches your skin’s undertone and provides light-to-medium coverage in a thin, buildable formula—liquids and creamy sticks are often ideal. Avoid full-cover, thick foundations unless you need maximum camouflage, since they’re likelier to highlight texture and make patches look flat or unnatural. Apply foundation using a brush, sponge, or fingertips—whichever provides the softest blend on your skin.
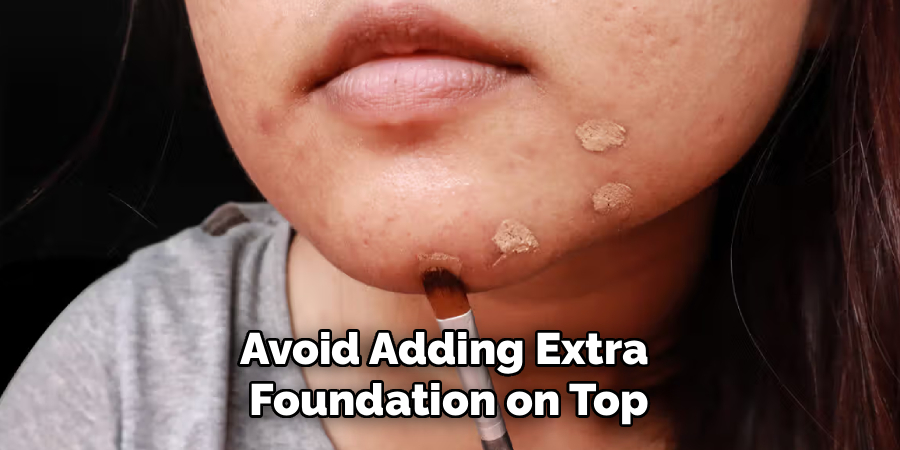
Placement Strategy to Avoid Buildup
Instead of applying foundation in a full-face mask, concentrate the product where you need it most. Typically, this means the center of the face and around areas of melasma. Use dabbing or stippling motions to deposit product without dragging. Feather out the edges toward the hairline and jaw, so you never see an abrupt change from covered to uncovered skin. Avoid layering too much in one session—let the first layer set, then spot-correct as needed.

Shade and Undertone Harmony
Color matching is especially important for melasma-prone skin. Foundations or concealers that are too light will create ashy, grey spots over darker patches. If your melasma is significantly deeper than your base, you may need to mix a small amount of a slightly warmer, deeper foundation shade just for those areas, blending carefully into the surrounding skin. Always observe makeup in natural daylight before moving to the next step to ensure seamless color harmony.
Step-by-Step Guide: How to Conceal Melasma with Makeup
Step 1: Correct with Peach/Orange
Color correcting is a game-changer for helping melasma disappear without heavy layers of foundation. On fair to medium skin, use a peach-toned corrector; for medium to deep or olive complexions, try a corrector with a stronger orange or reddish base. These shades help neutralize the blue-brown hue of melasma, making it easier to hide with less product. Dab a tiny amount of corrector onto the dark patch and gently blend only the edge—don’t cover too far beyond the spot to avoid unwanted color shifting.
Step 2: Conceal in Thin Veils
Once your corrector is merged into the skin, apply concealer right on top using a small brush or fingertip. Choose a creamy, opaque concealer that matches your skin or foundation perfectly—avoid shades too light, as they create a halo effect. Build coverage in thin layers, pressing product in instead of dragging. For clustered patches, apply concealer in a stippling motion; for diffused areas, feather the edges with a clean brush or sponge to blend seamlessly.
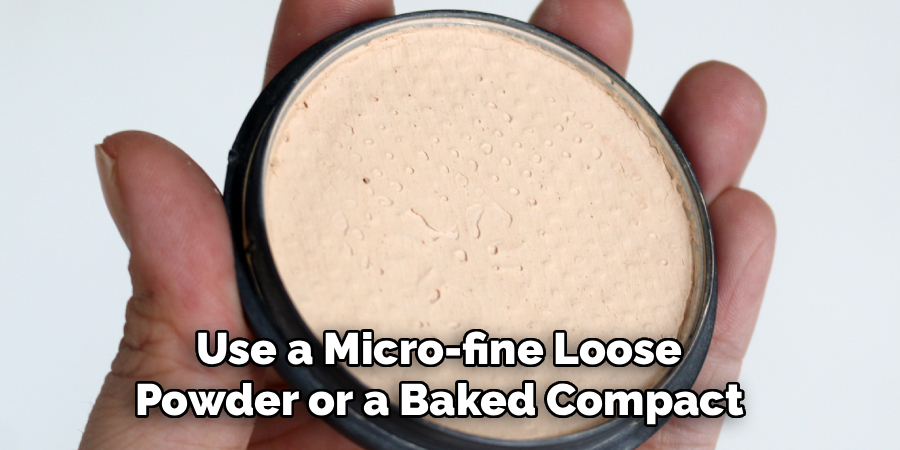
Step 3: Set with Micro-Fine Powder
Setting is essential to lock your work in place without dulling radiance or accentuating texture. Use a micro-fine loose powder or a baked compact powder for a weightless finish. Lightly press powder onto concealed areas with a soft puff or small brush, focusing on the center of the face and high-movement zones (upper lip, under eyes, nose). Avoid sweeping motions, which disturb the product underneath. Let powder “cook” for a few seconds, then dust away any excess.
Step 4: Lock with Transfer-Resistant Spray
A setting spray designed for long wear—and, ideally, transfer resistance—will seal your base and prevent melasma from showing through during the day. Hold the spray at least 10 inches from your face and apply a gentle, even mist. Let it dry naturally; don’t fan or pat. This step not only keeps makeup in place but can also ensure a natural, luminous finish. For extra-hot climates or special events, look for a makeup “fixer” meant for professional, all-day results.
Step 5: Check Under Daylight for Edges
The final check is often the most important. Step into natural daylight (or use a daylight-mimicking mirror) and scan for visible makeup edges, halos, or color mismatches. Gently tap any thick spots with a damp sponge to diffuse, or add a touch more concealer where needed. The goal is seamless integration—your makeup should blend so perfectly that the melasma fades into the background, not the forefront.
Tools and Textures for Diffuse Edges
Small Brushes and Micro-Sponges
Precision tools make all the difference. Use slim, flat concealer brushes or small, pointed sponges to place product only where it’s needed. Flat brushes are ideal for “painting” corrector and concealer just onto patches without overspreading. Micro-sponges blend edges without disturbing the corrector beneath, allowing you to build coverage gradually. Having a variety of small, clean tools on hand helps you maintain full control.
Cream vs. Liquid for Flexibility
Cream products offer the most flexible coverage for melasma, as they adhere well, blend out softly, and allow for easy layering. However, modern liquid concealers and foundations, especially those with “serum” or “weightless” formulas, can also give excellent, natural results. Test what works best on your chosen areas—some people find liquids blend better on large, diffused discoloration, while creams excel in smaller, stubborn clusters. Avoid waxy or overly stiff textures, as they tend to cake.
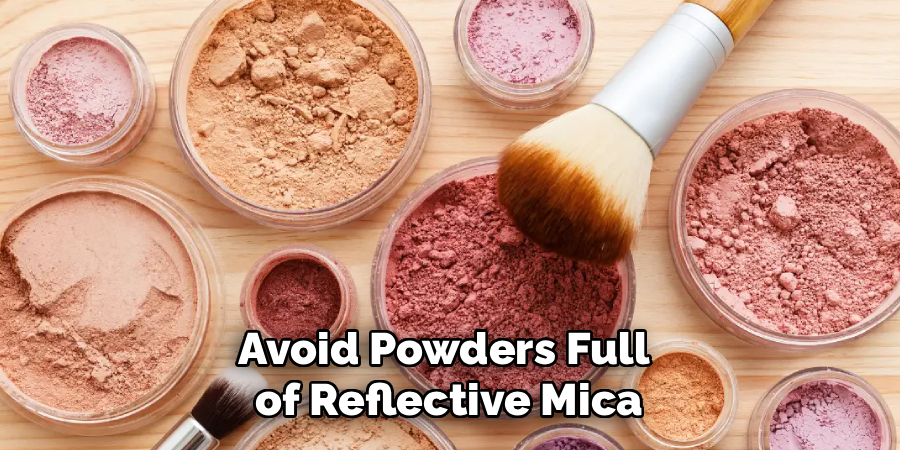
Fine Powders for Minimal Texture
To set, choose the most finely milled powders: translucent loose formulas or high-performance setting powders with a soft-focus effect. Avoid powders full of reflective mica if you struggle with uneven texture, as they can highlight bumps or dry spots. For best results, press powder gently over concealed areas and avoid retouching throughout the day unless necessary to reduce the risk of buildup.
Shade Strategy for Warm vs. Cool Patches
Undertone-Aware Correctors
An accurate color corrector can make melasma vanish naturally rather than turning odd colors under makeup. Warm-toned melasma patches (more red or brown) need peachy to orange correctors. Cool-toned melasma (greyer, bluish, or ashy) can benefit from a corrector with a touch of pink or even salmon. Using the wrong undertone can result in an unnatural or chalky finish.
Blending into Surrounding Skin
Don’t just match the pigment directly—think about the transition between concealer and the rest of your skin. Fine-tune your color choice by dabbing a tiny dot and blending it out into the surrounding area. Check in daylight to be sure it’s undetectable. For large, patchy areas, sometimes using a mix of two shades in a gradient can create the most seamless look.
Avoiding Ashiness and Oxidation
Too-light, too-cool, or too-thick application can create a grey or ashy cast over melasma. Always go slightly warmer than you think you need, and choose formulas that promise “no oxidation”—meaning they won’t turn darker or orange with wear. Where possible, patch test new correctors and concealers for an hour on your arm before using them on your face.
Make It Last: Sweat, Heat, and Transfer
Layer Timing and Pressing Techniques
Making concealer and corrector last all day begins with allowing each layer to set properly. Wait 30 seconds between each product and use gentle pressing rather than rubbing—this “locks” in color. Consider baking (leaving powder on for a few minutes before dusting off) in problem zones for oily skin or humid climates.
Managing Oil Through the Day
Oily skin or a humid climate can break through even long-wear makeup. Blotting sheets, mattifying primers, or a light dusting of powder help absorb oil at mid-day, preventing melasma from seeping through. Avoid adding extra foundation on top—use clean fingers or a small sponge to “pat in” any areas that have separated, preserving your work underneath.
Touch-Ups Without Lifting Layers
If you need a touch-up, choose a small brush to reapply corrector or concealer only where needed, then re-set with a bit of powder. Avoid rubbing or layering on more liquid foundation, as this can lift the makeup already applied and reveal pigmentation. Finish with a quick mist of setting spray to blend everything back together.
Common Mistakes and Fixes
Over-Correcting and Heavy Buildup
It’s easy to think more product means better coverage, but over-applying the corrector or concealer will quickly draw attention to the area. Stick to small amounts, buffed out in sheer layers, repeating only if absolutely needed. If things get cakey, a clean, damp sponge pressed gently over the area can rescue the finish.
Wrong Undertone Leading to Grey Cast
Melasma can turn grey or ashy when too cool or too light a product is applied over the patch. If this happens, warm up the area with a touch of cream bronzer or a warm foundation shade, gently blended just over the edges.
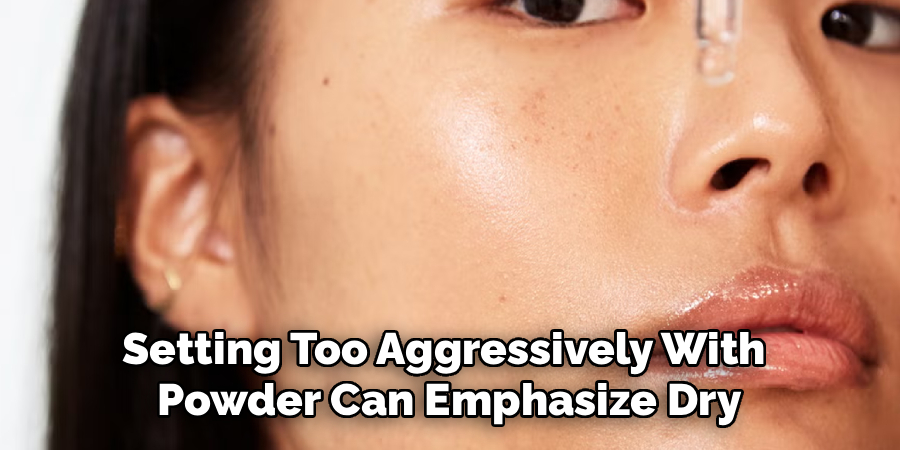
Over-Powdering and Dryness
Setting too aggressively with powder can emphasize dry, raised, or flaky skin, making melasma patches more obvious. Instead, use minimal powder, only on high-movement zones. To revive skin, mist with a hydrating setting spray or gently press a moisturizing balm on top (using clean fingers) for a fresh, radiant finish.
Conclusion
Mastering how to conceal melasma with makeup is all about subtlety, patience, and the right strategy. By embracing color correction, lightweight foundation, strategic concealing, and gentle setting, you can create an even, glowing complexion that lets your natural beauty shine. Remember: choose your undertones with care, add product in thin layers, always check your work in daylight, and prioritize skin health alongside cosmetic results.
With practice, these steps will become second nature, giving you the skills—and confidence—to conceal melasma swiftly and beautifully. For best results, continue educating yourself on new formulas and techniques, and empower yourself to tweak your routine as your skin’s needs evolve.
About the Author
Jane Hubbard is a passionate beauty expert with a wealth of experience in makeup, hair, and overall beauty techniques. After years of working as a hairdresser specialist, she followed her entrepreneurial spirit and started her own consultancy business.
Jane has always been driven by her desire to help others feel confident in their own skin, and she does this by sharing her knowledge, experiences, and practical beauty tips. Through her consultancy, she empowers individuals to embrace their unique beauty, offering tailored guidance that boosts both self-esteem and personal style.
Professional Focus
- Specializes in makeup, hairstyling, and beauty consulting.
- Provides personalized beauty advice, tips, and techniques to help individuals feel confident in their appearance.
- Dedicated to staying up-to-date with the latest industry trends and developments.
- Passionate about creating a comfortable and empowering experience for every client.
Education History
- University of Craft and Design – Bachelor of Fine Arts (BFA) in Woodworking and Furniture Design
- Woodworking Apprenticeships – Extensive hands-on training with skilled craftsmen to refine carpentry and furniture making techniques
- Online Courses & Masterclasses – Continued education in advanced woodworking techniques, design principles, and specialized tools
Expertise:
- Makeup artistry, hairstyling, and beauty consulting.
- Personalized beauty techniques to enhance confidence and self-expression.
- Educating clients on how to maintain their beauty routines at home.