
Are you tired of having a flat or wide nose? Do you want to enhance your features and achieve a more defined nose shape?
Contouring your nose is a simple makeup technique that can enhance your facial features and create the illusion of a more defined structure. Contouring offers a customizable solution that suits various face shapes and styles, whether you want to make your nose appear slimmer, shorter, or more symmetrical. With the right products, tools, and some practice, you can master this technique to complement your overall makeup look.
This guide on how to contour your nose will walk you through the basics of nose contouring, ensuring a polished and natural-looking finish. Let’s get started with some key tips and tricks.
What Are the Benefits of Nose Contouring?
Contouring the nose can offer a range of benefits, including:
- Enhancing Facial Features: By contouring your nose, you can create the appearance of a slimmer and more defined nose shape.
- Balancing Proportions: For those with larger or wider noses, contouring can help to balance out the facial features for a more harmonious look.
- Correcting Imperfections: If your nose has bumps or asymmetry, contouring techniques can help disguise them and create a smoother and more symmetrical appearance.
- Adding Dimension: Contouring adds depth and dimension to your face, making it appear more sculpted and defined.
What Will You Need?
To achieve the perfect contoured nose, you will need a few essential tools and products:
- A Contouring Product: This can be a powder, cream, or liquid formula in a shade that is slightly darker than your natural skin tone. Some popular options include bronzer, matte eyeshadow, or specifically designed contouring palettes.
- A Highlighting Product: This can be a powder, cream, or liquid formula in a shade lighter than your natural skin tone. Popular options include shimmery highlighters or light concealer.
- A Makeup Brush: Choose a small angled brush for precise application and blending.
- Setting Powder: This helps to set and blend the contour and highlight, creating a more seamless look.
10 Easy Steps on How to Contour Your Nose
Step 1. Start with a Clean Base:
Before applying makeup, ensure your skin is clean and prepped. Wash your face with a gentle cleanser to remove dirt or oils. Follow up with your favorite moisturizer to hydrate your skin, creating a smooth base for the makeup.

If desired, apply a primer—this will help your makeup last longer and provide an even surface for contouring. Allow the primer to settle before proceeding to the next step. This preparation is key to ensuring your contouring looks natural and flawless.
Step 2. Identify Your Nose Shape:
Understanding your nose shape is crucial to achieving the most flattering contour. Take a moment to observe your nose in the mirror. Common nose shapes include straight, rounded, button, hooked, or wide. Identifying your nose shape will help you determine where to apply highlights and shadows for the best results.
For instance, if you have a wider nose, you may want to focus on shading the sides to create a slimmer appearance. On the other hand, a straight nose might require minimal contouring, with just a touch of highlight on the bridge to enhance its structure. Recognizing your features is the first step to mastering personalized contouring techniques.
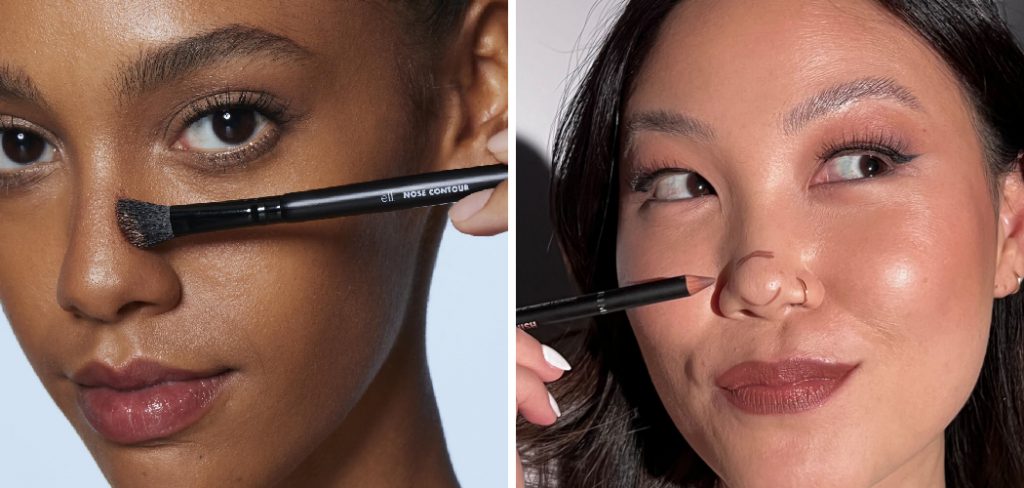
Step 3. Apply Contour Along the Sides:
Use a matte bronzer or contour product one to two shades darker than your skin tone. With a tapered brush or a contour stick, carefully apply the product along the sides of your nose, starting from the inner corners of your eyebrows and extending down toward the nostrils.
Blend the contour thoroughly using a small, fluffy brush or a makeup sponge to avoid harsh lines. This step creates a more defined and sculpted look, subtly enhancing the shape of your nose while maintaining a natural finish.
Step 4. Define the Tip:
To further refine the shape of your nose, apply a small amount of contour product directly to the tip of your nose. Focus on the lower part, creating a subtle shadow that gives the illusion of a more lifted or rounded appearance.

For added precision, use a small detail brush or your fingertip to blend the product gently, ensuring it looks seamless and natural. Remember to use light strokes and gradually build the contour to avoid an overly dramatic effect.
Step 5. Blend Thoroughly:
Blending is crucial to achieving a natural and polished look. Using a clean makeup sponge or a soft blending brush, gently buff out the contour lines on your nose. Focus on smooth, circular motions to seamlessly merge the contour with your foundation or base makeup.
Blend the edges thoroughly to ensure there are no harsh lines, creating a subtle gradient effect. You can lightly apply translucent powder to set the makeup and enhance its longevity if needed. Patience and precision during this step will ensure a flawless finish.
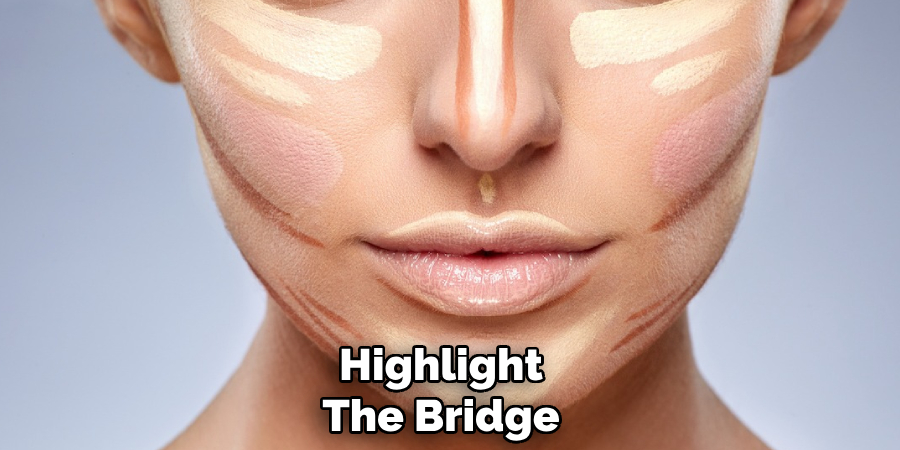
Step 6. Highlight the Bridge:
Using a small, precise brush or your fingertip, apply a highlighter to the bridge of your nose. Focus the product in a straight, thin line down the center, avoiding the tip if you prefer a more elongated look. This step enhances the natural structure of your nose by catching the light, adding a subtle, luminous glow.
Start with a small amount of highlighter and build up as needed to achieve your desired intensity, ensuring it blends smoothly with the surrounding makeup for a seamless finish.
Step 7. Blend the Highlight:
Using a clean makeup sponge or a soft blending brush, gently tap and blend the highlighter into your skin. Be sure to use light, upward motions to diffuse the product evenly and create a natural, radiant finish.
Avoid over-blending, as this can diminish the highlighter’s luminous effect. The goal is to achieve a smooth transition between the highlighter and the rest of your makeup, ensuring the glow looks effortless and refined.
Step 8. Set the Contour and Highlight:
Use a translucent setting powder or a finely milled pressed powder to ensure your contour and highlight stay in place throughout the day. With a soft, fluffy brush, lightly dust the setting powder over the areas you contoured and highlighted.
Be careful not to apply too much, as this can dull the effects of your makeup. For added longevity, consider finishing with a makeup setting spray, lightly misting it over your face to lock in the look and provide a fresh, dewy finish.
Step 9. Refine if Needed:
If you notice any areas where your makeup looks uneven or overly harsh, take a clean blending brush or sponge and gently blend out the edges for a seamless transition. This step ensures a polished, professional-looking finish.
Additionally, you can reapply small amounts of product where necessary to enhance or adjust the overall balance of your look. Refinement is key to achieving a flawless result, so take your time to perfect these final touches.
Step 10. Finish Your Look:
Complete your makeup look by setting it in place with a setting spray or a light dusting of translucent powder to ensure longevity. Take a step back and assess your overall appearance, making any minor adjustments as needed. Add a touch of your favorite perfume or accessory to elevate your style, and you’re ready to confidently head out. Remember, makeup is an expression of your personal style, so wear your look proudly!
By following these steps, you can achieve a flawless makeup look that enhances your natural features and confidence.
5 Things You Should Avoid
- Using the Wrong Shade
Avoid using a contour shade that is too dark or too light for your skin tone. Choosing the wrong color can make your contour look unnatural and overly dramatic. Aim for a shade about two tones darker than your natural skin color for a more seamless effect.
- Harsh Lines
Blending is key when contouring your nose. Avoid harsh, unblended lines, as they can make your contour look obvious and detract from the overall look. Use a blending brush or sponge to soften any lines for a natural finish.
- Ignoring Your Nose Shape
Not all noses are the same, so avoid using a one-size-fits-all contouring technique. Tailor your contour to flatter your unique nose shape, enhancing its natural structure while creating balance with the rest of your features.
- Using Shimmery Products
Avoid using contour products with shimmer for your nose. Shimmery formulations can catch light in unwanted areas and draw attention to imperfections. Stick to matte products for a more refined and realistic contour.
- Overloading on Product
Applying too much product can make your contour appear cakey and unnatural. Start with a light hand and gradually build up the intensity if needed, ensuring that your nose contour blends seamlessly into the rest of your makeup.
Conclusion
How to contour your nose can be a subtle yet powerful way to enhance your facial features when done correctly.
Remember to choose the right shades, use matte products for a natural finish, and apply with a light hand to avoid overloading on product. Blending is key to achieving a seamless look, ensuring the contour complements your overall makeup.
With practice and attention to detail, you can master the art of nose contouring to suit your unique features and style.
About the Author
Jane Hubbard is a passionate beauty expert with a wealth of experience in makeup, hair, and overall beauty techniques. After years of working as a hairdresser specialist, she followed her entrepreneurial spirit and started her own consultancy business.
Jane has always been driven by her desire to help others feel confident in their own skin, and she does this by sharing her knowledge, experiences, and practical beauty tips. Through her consultancy, she empowers individuals to embrace their unique beauty, offering tailored guidance that boosts both self-esteem and personal style.
Professional Focus
- Specializes in makeup, hairstyling, and beauty consulting.
- Provides personalized beauty advice, tips, and techniques to help individuals feel confident in their appearance.
- Dedicated to staying up-to-date with the latest industry trends and developments.
- Passionate about creating a comfortable and empowering experience for every client.
Education History
- University of Craft and Design – Bachelor of Fine Arts (BFA) in Woodworking and Furniture Design
- Woodworking Apprenticeships – Extensive hands-on training with skilled craftsmen to refine carpentry and furniture making techniques
- Online Courses & Masterclasses – Continued education in advanced woodworking techniques, design principles, and specialized tools
Expertise:
- Makeup artistry, hairstyling, and beauty consulting.
- Personalized beauty techniques to enhance confidence and self-expression.
- Educating clients on how to maintain their beauty routines at home.