
The cut crease is a powerful makeup technique that defines the eye, creating a sharp line of contrast that makes your eyeshadow pop. It’s a go-to look for makeup artists and beauty lovers who want to add drama, depth, and a touch of glamour. While it may look complex and intimidating, the cut crease is surprisingly achievable with the right tools, a little patience, and a steady hand. It’s a versatile technique that can be adapted for a soft daytime look or a bold evening statement.
This guide will break down the process into simple, manageable steps. We’ll show you exactly how to do cut crease eyeshadow, from prepping your lids to blending the final look, helping you master this stunning technique with confidence.
Why the Cut Crease Technique Is Popular
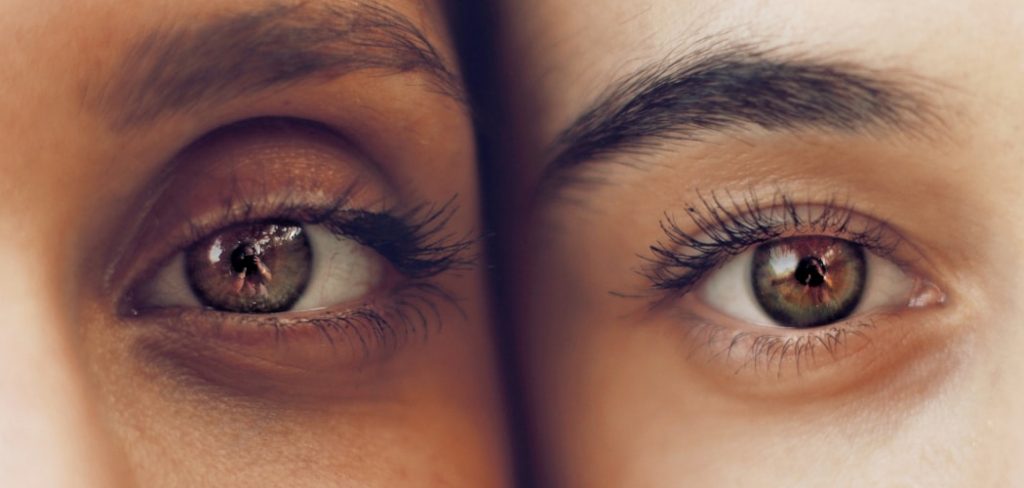
The cut crease has maintained its popularity in the beauty world for good reason. Its primary appeal lies in its ability to dramatically enhance and alter the appearance of the eye shape. By creating a sharp, defined line above the natural crease, it gives the illusion of larger, more open, and more deep-set eyes. This makes it an especially flattering technique for those with smaller or hooded eyes, as it allows you to create a visible crease where one may not naturally be prominent.
Beyond its transformative power, the cut crease is incredibly versatile. It can be a canvas for endless creativity, allowing you to play with contrasting textures—like a matte crease with a glittery lid—and a spectrum of bold eyeshadow colors. Whether you opt for a soft, neutral cut crease for a sophisticated daytime look or a dramatic, smoky version for a night out, the technique adds a polished, professional finish that elevates any makeup application.
8 Step-by-Step Guide: How to Do Cut Crease Eyeshadow
Step 1: Start with a Clean, Primed Base
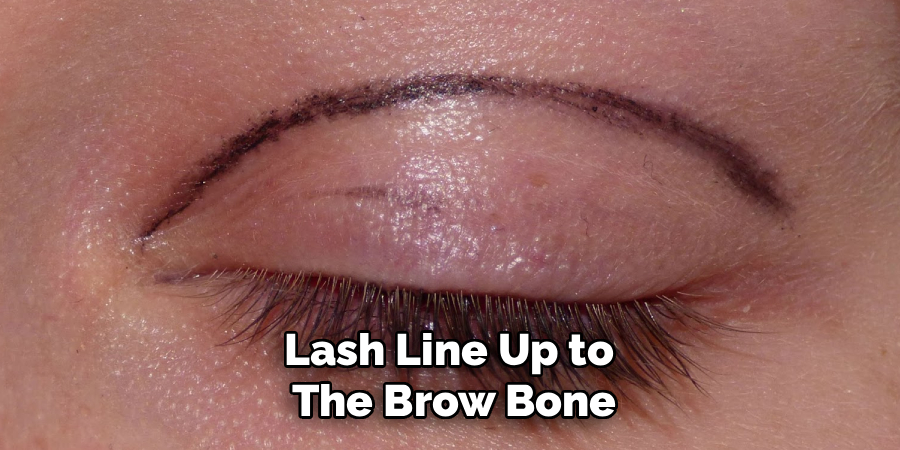
The foundation of any long-lasting eyeshadow look is a well-prepped eyelid. Begin by applying a quality eyeshadow primer across your entire lid, from the lash line up to the brow bone. An eyeshadow primer creates a smooth canvas for your makeup, helps colors appear more vibrant, and, most importantly, prevents your eyeshadow from creasing or fading throughout the day. It gives the eyeshadows something to grip onto, which is essential for the precise lines required in a cut crease. Let the primer set for a minute before moving on to the next step.
Step 2: Apply a Transition Shade
A transition shade is a neutral matte eyeshadow, typically a few shades darker than your skin tone, that helps create a seamless gradient between your crease color and your brow bone highlight. Using a fluffy blending brush, sweep this color into and slightly above your natural crease in a windshield-wiper motion. This step adds initial depth and makes the subsequent blending techniques much easier. It ensures your bold crease color will blend out smoothly, avoiding any harsh or unblended edges, which is key to a professional-looking finish.
Step 3: Define the Crease Line
Now it’s time to begin the “cut.” Choose a deeper matte eyeshadow color for your crease definition. Using a small, dense, or pencil-shaped makeup brush for precision, carefully trace a line directly in your eye’s socket or slightly above it if you have hooded eyes. This line will serve as the guide for your cut crease. Build the color up gradually to control the intensity. Don’t worry about blending it out perfectly just yet; the goal here is to create a sharp, defined line that will be the upper boundary of your cut crease.
Step 4: Carve Out the Crease with Concealer
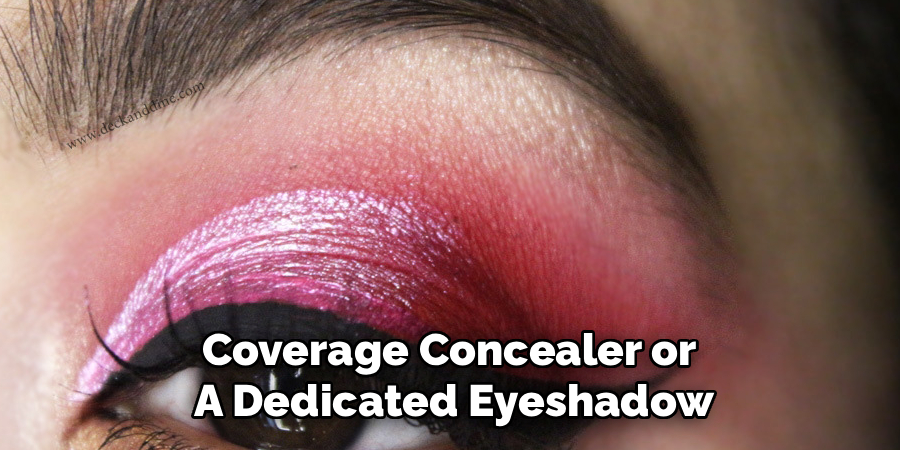
This is the most crucial step for achieving that signature sharp line. Take a flat, synthetic concealer brush and a small amount of a full-coverage concealer or a dedicated eyeshadow base. Looking straight ahead into a mirror, start from the inner corner of your eye and carefully “carve” out your lid space, following just below the dark line you just created. This action of applying a light-colored concealer over the lid cleans up the edge and creates that sharp contrast. Extend the concealer across your lid, stopping at the outer corner.
Step 5: Set the Concealer
Once you have a clean, sharp shape carved out with concealer, you need to set it immediately to prevent it from creasing and to create a perfect base for your lid color. You can do this by patting a translucent setting powder over the concealer with a small, flat brush. Alternatively, for an even more intense color payoff, you can set the concealer with a matte eyeshadow that is either white, cream, or a very light version of the lid color you plan to use. This step ensures the cut area remains bright and creaseless all day.
Step 6: Apply Your Lid Color
Now for the fun part: adding color to your lid. This is where you can get creative with bold eyeshadow colors, shimmers, metallics, or even pressed glitters. Using a flat shader brush or your fingertip (for maximum pigment), press your chosen lid shadow onto the entire area that you just carved out and set with concealer. Applying the shadow with a patting or pressing motion, rather than a sweeping one, will help build up the intensity and prevent fallout. This is a key part of how to do cut crease eyeshadow that truly stands out.
Step 7: Blend and Deepen the Crease
With your lid color in place, you may notice a harsh line between the lid and the crease color. To soften this, take a clean, small blending brush and very gently blend the edge where the deep crease color meets the lighter lid. You can also add a bit more of the dark crease color to intensify the definition and ensure a smooth, professional-looking gradient. Proper blending techniques are essential for making the look seamless, even with the sharp contrast of the cut crease.
Step 8: Add Eyeliner and Mascara
To complete the look and add further definition to your eyes, apply your favorite eyeliner along the upper lash line. A classic winged liner works beautifully with a cut crease, as it elongates the eye and complements the sharp lines of the eyeshadow. After your liner, curl your lashes and apply a generous coat of mascara to both your top and bottom lashes. For an even more dramatic effect, consider applying a pair of false lashes that will add volume and glamour to your finished eye makeup.
Common Mistakes to Avoid
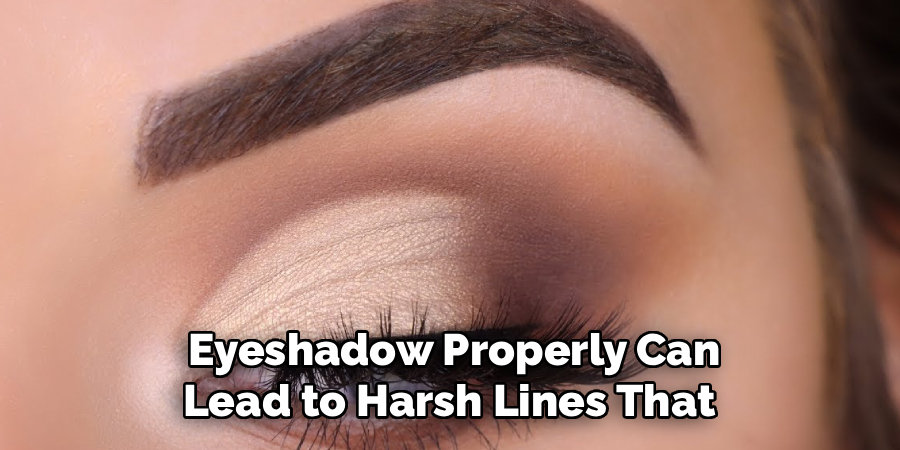
When creating a cut crease look, there are a few common mistakes to avoid to ensure your makeup appears flawless. First, failing to blend your eyeshadow properly can lead to harsh lines that detract from the overall effect. Spend time blending the transition shades thoroughly for a smooth and seamless gradient. Second, using too much product on your brush can cause fallout and make the application uneven—remember, a little goes a long way.
Another mistake is not priming your eyelids before starting; skipping this step can lead to creasing and reduced longevity of your masterpiece. Lastly, avoid mismatching your eyeliner style with the cut crease shape; the two should work together to enhance your eyes rather than compete with each other. Taking these tips into account will help you achieve a polished and stunning cut crease look every time.
Frequently Asked Questions (FAQs)
What Is a Cut Crease Eyeshadow Look?
A cut crease is an advanced makeup technique where a sharp, clean line is “cut” across the eyelid to define the socket of the eye. This is typically done by using a light-colored concealer to create a stark contrast against a darker eyeshadow shade applied in the crease. The result is a look that adds significant depth, dimension, and definition to the eyes, making them appear larger and more open.
Can You Do a Cut Crease on Hooded Eyes?
Yes, absolutely! The cut crease technique is actually very flattering for hooded eyes. The key is to create a “false” crease. Instead of applying the dark shadow in your natural, hidden crease, you should apply it slightly higher, onto the area of the lid that remains visible when your eyes are open. When you carve out the lid space with concealer, do it while looking straight ahead to ensure the beautiful line you create is not hidden when you open your eyes.
What Are the Best Brushes for a Cut Crease?
While you don’t need dozens of brushes, a few specific types will make the process much easier:
- A small, dense brush or a pencil brush for precise application of the dark crease color.
- A flat, synthetic concealer brush for carving out the crease cleanly.
- A fluffy blending brush for applying the transition shade and blending everything together.
- A flat shader brush for packing shadow onto the lid.
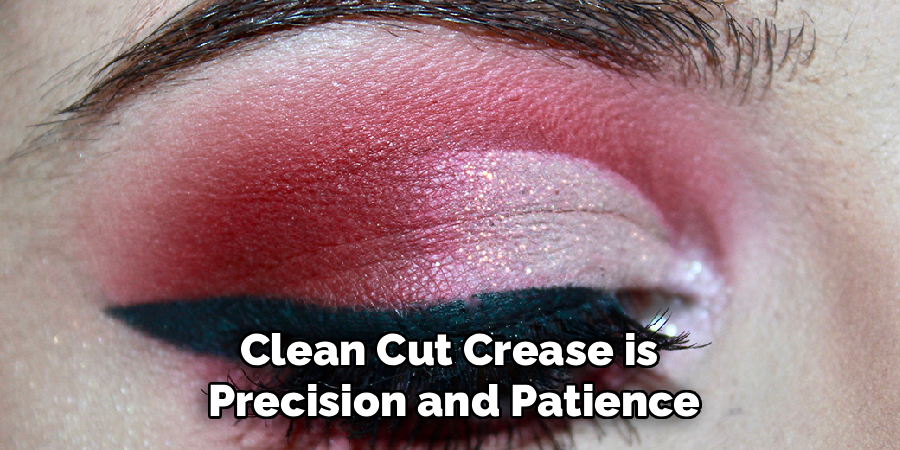
How Do I Make My Cut Crease Look Clean and Not Messy?
The key to a clean cut crease is precision and patience. Use small amounts of product and build them up gradually. When carving the crease, rest your hand on your cheek for stability. After applying concealer, immediately set it with powder to prevent it from smudging or creasing. Using a good quality eyeshadow primer will also help all your products apply more smoothly and stay in place.
Does a Cut Crease Always Have to Be Dramatic?
Not at all! While the cut crease is known for being a dramatic look, it can easily be softened for a more subtle, everyday style. To do this, use soft, neutral tones like browns, beiges, and taupes instead of bold colors. You can also make the line of the cut crease less sharp by gently blending the edge with a clean brush for a “soft cut crease” effect.
Conclusion
The cut crease is a truly transformative makeup technique that, despite its professional appearance, is well within reach for any makeup enthusiast willing to practice. By breaking it down into clear steps—from building a flawless base to the final blend—you can master the art of creating depth, contrast, and definition. The beauty of this look lies in its structure and its versatility, allowing for endless creative expression.
Don’t be afraid to experiment with different colors, textures, and levels of intensity to find what works for you. Now that you have the knowledge of how to do cut crease eyeshadow, it’s time to pick up your brushes and give this stunning technique a try.
About the Author
Jane Hubbard is a passionate beauty expert with a wealth of experience in makeup, hair, and overall beauty techniques. After years of working as a hairdresser specialist, she followed her entrepreneurial spirit and started her own consultancy business.
Jane has always been driven by her desire to help others feel confident in their own skin, and she does this by sharing her knowledge, experiences, and practical beauty tips. Through her consultancy, she empowers individuals to embrace their unique beauty, offering tailored guidance that boosts both self-esteem and personal style.
Professional Focus
- Specializes in makeup, hairstyling, and beauty consulting.
- Provides personalized beauty advice, tips, and techniques to help individuals feel confident in their appearance.
- Dedicated to staying up-to-date with the latest industry trends and developments.
- Passionate about creating a comfortable and empowering experience for every client.
Education History
- University of Craft and Design – Bachelor of Fine Arts (BFA) in Woodworking and Furniture Design
- Woodworking Apprenticeships – Extensive hands-on training with skilled craftsmen to refine carpentry and furniture making techniques
- Online Courses & Masterclasses – Continued education in advanced woodworking techniques, design principles, and specialized tools
Expertise:
- Makeup artistry, hairstyling, and beauty consulting.
- Personalized beauty techniques to enhance confidence and self-expression.
- Educating clients on how to maintain their beauty routines at home.