
Are you wondering how to isolate eyelash extensions on yourself so that you can use them as decoration for items like purses, hats, scrapbooks, or handmade cards? Look no further! You may have heard of professional lash technicians using them for dramatic eyes, but this technique can also be used to help make crafts and décor pieces look spectacular.
Whether you are a beginner or a seasoned expert, this guide will help you safely and successfully isolate lash extensions on yourself.
In this blog post, we’ll tell you exactly how to isolate eyelash extensions so they are safe for decorative projects. With a few simple steps and some craft supplies from your local store (or even pantry), you will be able to create dazzling one-of-a-kind works of art using the stripped eyelashes. Let’s get started and learn how it’s done!
What Will You Need?
Before you get started with the process, make sure that you have all of the necessary supplies:
- Eyelash extensions
- Craft glue
- Scissors
- Tweezers
- Nail file (optional)
- Tweezers
- Cotton swabs
- Nail polish remover (optional)
Now that you have all the necessary supplies let’s get to work!
10 Easy Steps on How to Isolate Eyelash Extensions on Yourself

Step 1. Use Tweezers:
Pick up the lash extensions using a pair of tweezers. You can get a pair at your local drugstore or beauty supply store. If you are using pre-made lash strips, make sure to pick up the whole strip and not just individual lashes.
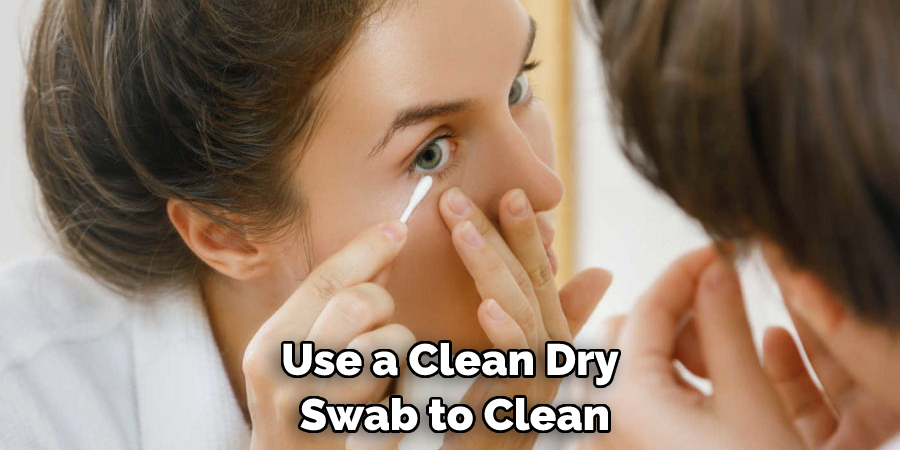
Step 2. Clean Your Strip:
Make sure to remove any dirt or dust from the lash strips with cotton swabs before you start isolating them. Use a clean, dry swab and carefully wipe away any debris. It is important to keep the lashes clean, as this will make it easier to isolate them later.
Step 3. Apply Glue:
Using craft glue, apply a thin layer of adhesive on the backside of each extension. Allow it to dry for 1-2 minutes before moving on to the next step. Be careful not to use too much glue so that it doesn’t create a mess.
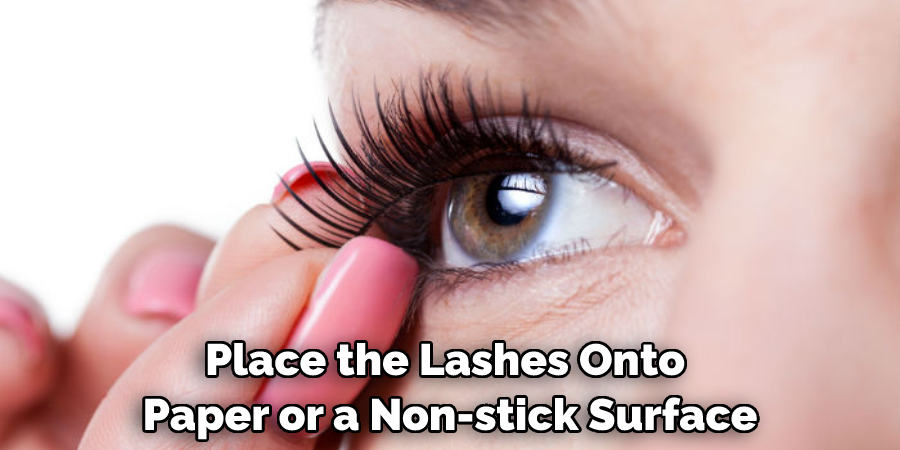
Step 4. Place Lash Strips On Paper:
Once the glue is dry, place the lashes onto paper or a non-stick surface. This will help keep them in place while they are drying and prevent them from sticking to other surfaces when isolated later on. Additionally, it will keep the lashes clean and free of oil or dirt.
Step 5. Cut Extensions Into Smaller Pieces:
Using scissors (or even a nail file if you don’t have any scissors handy), start cutting the extensions into smaller pieces. Ensure to leave enough space between each piece so they can be easily isolated later. Otherwise, they might end up stuck together, making it more difficult to separate.
Step 6. Dip Extensions in Nail Polish Remover:
As an optional step, you can dip the extension pieces in nail polish remover to make them easier to isolate from one another. This will help remove any excess adhesive residue that was left behind during the gluing process. Another option is to use a cotton swab with nail polish remover on it to remove the adhesive residue carefully.
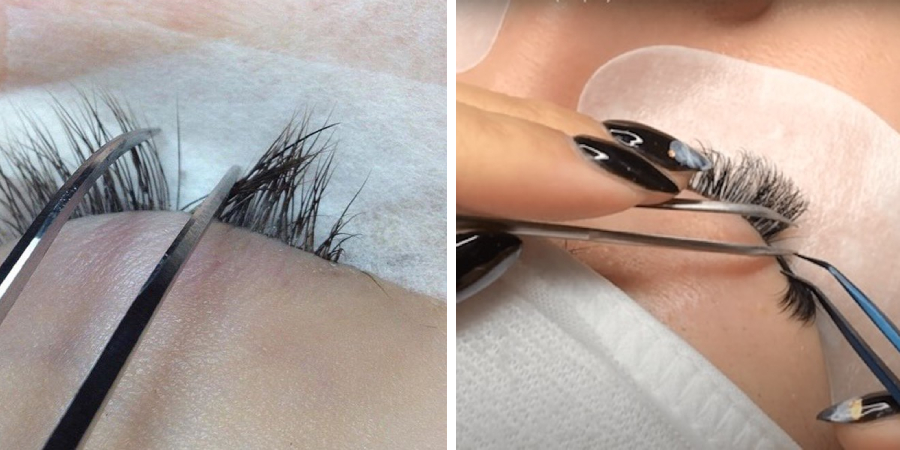
Step 7. Use Tweezers To Isolate Extensions:
Using tweezers, carefully start isolating each lash extension from one another. Make sure to use gentle pressure when doing this so that you don’t damage or break them. If you find yourself having difficulty, try using a nail file or needle-nose pliers to help you out.
Step 8. Apply Glue to the End of Extensions:
Apply a small amount of craft glue to the end of each lash extension. This will help keep them secure in place once they have been isolated. Don’t forget to let the glue dry for 1-2 minutes before moving on to the next step.
Step 9. Allow Extensions To Dry Fully:
Allow the extensions to dry fully before continuing with any further steps. Depending on the type and brand of glue you have used, this can take anywhere from 5 minutes up to an hour or more. Ensure that the glue has dried completely before moving on to the next step.
Step 10. Use Isolated Lashes For Your Projects!
Once your eyelash extensions are fully dry and isolated, you can use them for any craft project of your choosing! They can be used for décor pieces like wall art, scrapbooking, and more. The possibilities are endless!
Congratulations – you have just learned how to isolate eyelash extensions on yourself! With these simple steps and a few supplies, you can easily create your own unique looks for any occasion. So grab those tweezers, and let’s get started!
5 Additional Tips and Tricks
1. Prep your lashes before isolating. Make sure to remove any makeup residue, oil and dirt from the base of your eyelash extensions with a cotton swab dipped in warm water.
2. Use tweezers! Carefully use tweezers to separate each eyelash extension so you can apply mascara directly on one lash at a time.
3. Use a mascara wand to release clumped extensions gently. Start by lightly brushing the lashes with the wand, then use your fingers to separate any extensions that have gotten stuck together carefully.
4. Don’t over-brush your lashes! Brushing too hard can cause lash breakage and damage, so be sure always to brush them gently so they stay healthy and look great.
5. Be patient and take breaks! This process takes time, so don’t rush it! If you start getting overwhelmed or frustrated, take a quick break for snacks or something else relaxing before continuing on with isolating your eyelash Extensions.
Good luck! With these tips in mind, you’ll be able to isolate your eyelash extensions like an expert in no time! You can create unique, beautiful looks that last with practice and patience. Happy isolating!
5 Things You Should Avoid
1. Avoid applying too much glue, as this can cause the eyelash extensions to stick together.
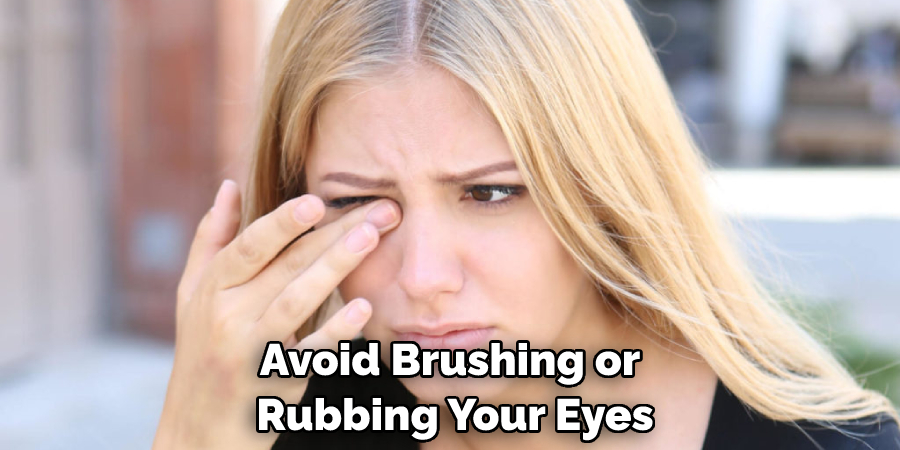
2. Avoid brushing or rubbing your eyes for at least 48 hours after application, as this may cause them to come out prematurely.
3. Don’t use oil-based makeup removers or cleansers on your lashes; these will break down and remove the adhesive used to attach the extensions.
4. Avoid sleeping directly on your back for the first few days post-application, as doing so can make the lashes detach earlier than expected.
5. Stay away from water if possible during the 24–48 hour period immediately following application—exposing your lashes to moisture too soon can weaken the bond of the adhesive and cause them to come out sooner.
These simple tips will help you keep your eyelash extensions looking their best and ensure they last as long as possible! You’ll be able to enjoy voluminous lashes for weeks on end with a few easy precautions.
What Happens if You Don’t Isolate Lash Extensions?
If you don’t isolate lash extensions, the lashes may become stuck together and won’t look as full or defined. Additionally, this can make it harder to apply mascara evenly or cleanly remove your makeup at night. Without isolation, eyelash extensions can start to look clumpy and messy over time, which isn’t a great look!
So take the extra steps to isolate each eyelash extension for a beautiful, lasting result. With proper care and maintenance of your extensions, you’ll be able to enjoy long-lasting volume and length in no time!
Can You Wash Your Lashes With Finger?
Yes, you can wash your lashes with your finger. However, it’s best to use a gentle cleanser specifically designed for eyelash extensions, as it will help maintain the extensions’ longevity and provide gentle cleansing. Make sure to avoid rubbing or tugging on the lashes too harshly, as this may cause them to come out prematurely.
If you want to be extra cautious, you can also purchase a special brush designed for cleaning eyelash extensions. This will help remove any residue and dirt from the base of each lash while being gentle enough not to damage or weaken the adhesive bond that holds them in place.
It’s important to maintain cleanliness when it comes to eyelash extension care, so be sure to do this regularly for the best results.
Conclusion
Isolating your own eyelash extensions is achievable with the right technique and the proper tools. While it can be a bit tricky to get it just right, patience and practice are key to creating a beautiful and balanced look.
When done correctly, your eyelash extensions can give you stunning results for days or weeks. Still, despite all the tips and tricks outlined in this blog post, we recommend leaving any kind of professional eye makeup work to certified experts. Be sure to read up on safety regulations when picking up an isolated eyelash extension kit and removing them as well—or avoid such kits altogether!
Hopefully, the article on how to isolate eyelash extensions on yourself has been helpful to you. Thanks for reading!
About the Author
Jane Hubbard is a passionate beauty expert with a wealth of experience in makeup, hair, and overall beauty techniques. After years of working as a hairdresser specialist, she followed her entrepreneurial spirit and started her own consultancy business.
Jane has always been driven by her desire to help others feel confident in their own skin, and she does this by sharing her knowledge, experiences, and practical beauty tips. Through her consultancy, she empowers individuals to embrace their unique beauty, offering tailored guidance that boosts both self-esteem and personal style.
Professional Focus
Specializes in makeup, hairstyling, and beauty consulting.
Provides personalized beauty advice, tips, and techniques to help individuals feel confident in their appearance.
Dedicated to staying up-to-date with the latest industry trends and developments.
Passionate about creating a comfortable and empowering experience for every client.
Education History
University of Craft and Design – Bachelor of Fine Arts (BFA) in Woodworking and Furniture Design
Woodworking Apprenticeships – Extensive hands-on training with skilled craftsmen to refine carpentry and furniture making techniques
Online Courses & Masterclasses – Continued education in advanced woodworking techniques, design principles, and specialized tools
Expertise:
Makeup artistry, hairstyling, and beauty consulting.
Personalized beauty techniques to enhance confidence and self-expression.
Educating clients on how to maintain their beauty routines at home.