
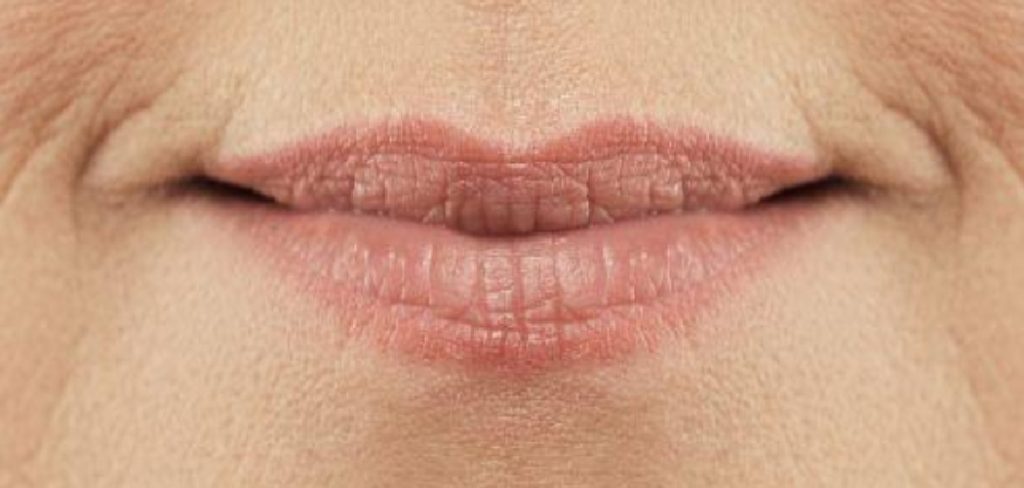
There is nothing quite like the high-shine finish of a perfect lip gloss. It makes lips look fuller, more hydrated, and instantly pulls a makeup look together. However, there is also nothing more frustrating than checking a mirror an hour later only to find that your pristine application has migrated.
The color has settled into the fine lines around your mouth, creating a feathered, messy appearance that looks more like a toddler’s art project than a sophisticated beauty look. It is a common struggle for makeup lovers of all skill levels, from total beginners to seasoned pros.
The good news is that you do not have to sacrifice that beautiful, glassy shine to avoid the mess. With the right preparation and a few professional application techniques, you can lock your look in place for hours. Understanding the mechanics of why products move and learning how to keep lip gloss from bleeding will change your makeup game entirely. By following a specific routine that creates barriers and anchors for the product, you can enjoy the plumping effect of gloss without the constant worry of feathering edges.
Why Lip Gloss Bleeds and How to Prevent It
Before diving into the solution, it is helpful to understand the problem. Lip gloss “bleeds” or “feathers” because of its inherent chemical structure. Unlike matte lipsticks, which contain more wax and pigment to stay solid, glosses are rich in oils, emollients, and polymers designed to be fluid and reflective.
This liquidity allows the product to move. Heat from your skin warms up these oils, making them even runnier as the day goes on. Gravity and the natural movement of your mouth when you talk or eat then encourage the product to slide into the microscopic vertical lines surrounding the lips, known as the vermilion border.
Step-by-Step Guide: How to keep lip gloss from bleeding
Step 1: Exfoliate for a Smooth Canvas
The journey to a flawless, bleed-free lip look begins long before you pick up a gloss wand. Dead skin cells create an uneven surface texture, which prevents your products from adhering correctly to the lip. When your lips are flaky or rough, makeup tends to cling to dry patches and pool in cracks, which accelerates the migration process.
To combat this, you must start with a gentle exfoliation process. You can use a store-bought sugar scrub or make a simple DIY version at home using a mixture of honey and brown sugar. Alternatively, gently buffing your lips with a soft-bristled toothbrush or a warm, damp washcloth works wonders.

Step 2: Hydrate and Prime the Lips
Once your lips are smooth and exfoliated, they will likely feel a bit raw or dry, so hydration is the immediate next priority. Apply a nourishing, non-greasy lip balm to replenish moisture and soften the skin. However, this comes with a crucial caveat: you cannot apply gloss immediately over a thick layer of balm.
If the lips are too slippery from a heavy moisturizer, the gloss will have zero traction and will slide off almost instantly. Apply the balm and let it sit for at least ten minutes while you do the rest of your makeup, allowing the ingredients to fully absorb into the skin.
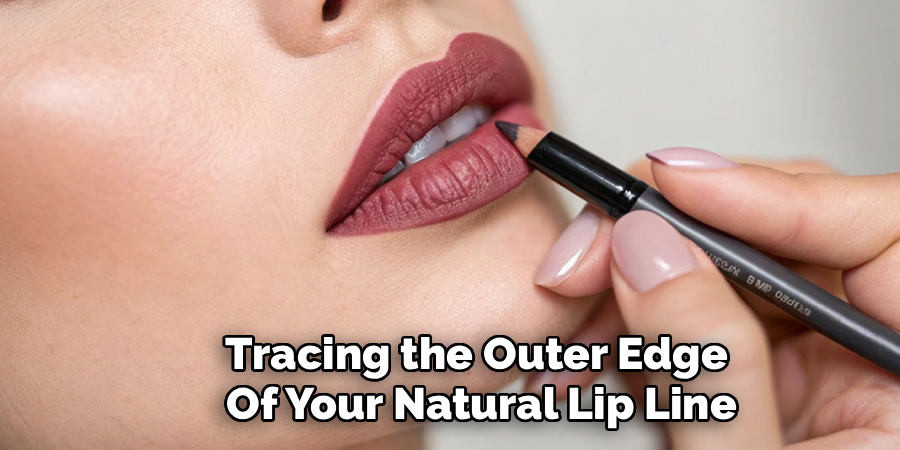
Step 3: Create a Barrier with Lip Liner
Start by tracing the outer edge of your natural lip line. Be precise, as this line dictates the boundary of your makeup. Once the outline is complete, do not stop there; use the side of the pencil to slightly feather the color inward toward the center of the lip. This creates a gradient and ensures that if your gloss wears off, you are not left with a harsh ring around your mouth.
If you want to know how to keep lip gloss from bleeding effectively, you must understand that the liner provides the friction the gloss lacks. For an invisible shield, you can even buy clear or transparent lip liners designed purely for the perimeter to act as a colorless dam against feathering.
Step 4: Apply a Base Layer of Lipstick
While you can certainly apply gloss directly over liner, adding a layer of matte or satin lipstick provides an extra level of security. Gloss is translucent and slippery, but lipstick is opaque and solid. By applying a base coat of lipstick, you are providing a textured surface for the gloss to cling to, rather than just bare skin. Matte formulas are particularly effective for this because they dry down and lock in place, creating a velcro-like effect for the shiny topcoat. This sandwiching technique ensures that even if the top layer of gloss moves slightly, the pigment underneath remains undisturbed.
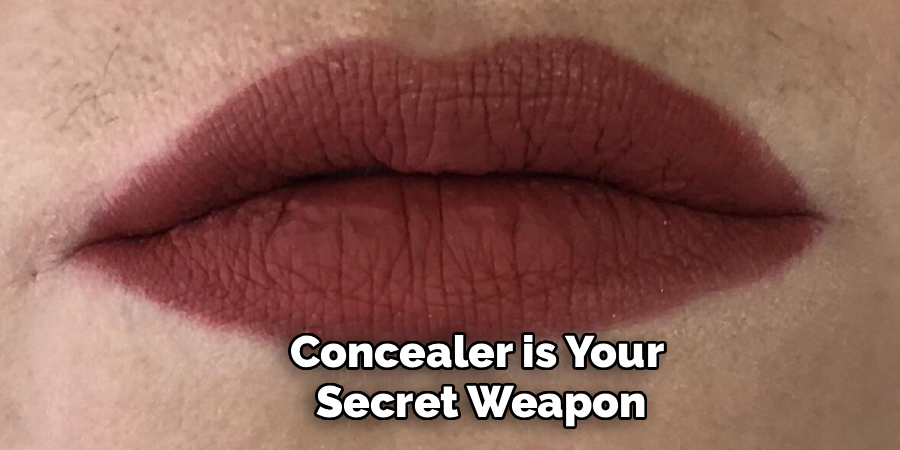
Step 5: How to keep lip gloss from bleeding using Concealer
If you have followed all the previous steps and still find that your gloss likes to wander, concealer is your secret weapon. This technique, often used by professional makeup artists, is sometimes called “reverse lining.” Take a small, flat-angled makeup brush and a tiny amount of high-coverage concealer that matches your skin tone perfectly. carefully trace the skin immediately outside your lip line. This cleans up any mistakes you might have made with your liner, making the edge look razor-sharp, but it also serves a functional purpose.
Step 6: Apply Lip Gloss Strategically
The biggest mistake people make is swiping gloss all over their lips, right up to the very edges, just like they would with a lip balm. This creates a surplus of product in the exact areas where bleeding is most likely to occur—the corners of the mouth and the cupid’s bow. Instead, you need to be strategic with placement. Apply the bulk of the gloss only to the center of your bottom and top lips. Press your lips together gently to distribute the product outward, but stop before the gloss reaches the lip liner.
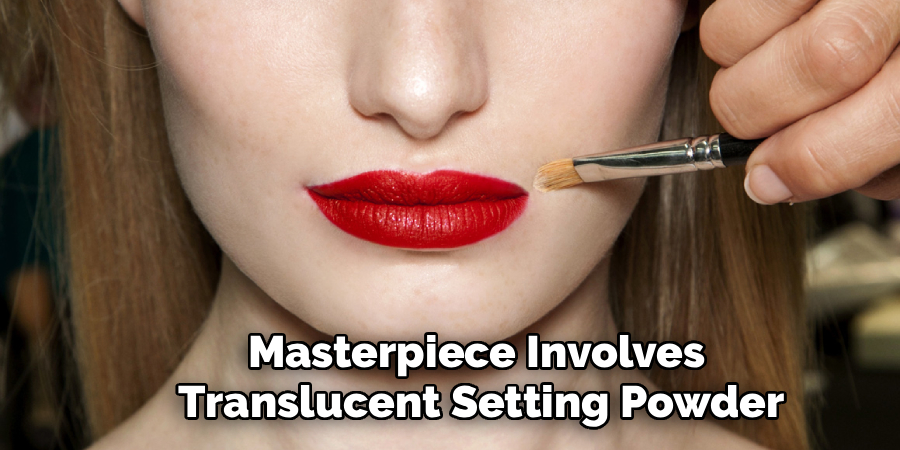
Step 7: Set the Edges with Translucent Powder
The final seal on your smudge-proof masterpiece involves translucent setting powder. This product is designed to absorb oil and lock liquid makeup in place, making it the perfect antidote to bleeding gloss. Take a small, fluffy brush or your finger and dip it into a loose translucent powder. Tap off the excess, and then very lightly dust the powder over the skin surrounding your lips—right over that concealer line you created earlier. This mattifies the skin around the mouth, removing any natural oils that might encourage the gloss to travel.
Frequently Asked Questions
Why Does My Lip Gloss Feather Into Fine Lines?
Feathering occurs primarily because lip gloss is an emollient, oil-based product that becomes more fluid with body heat. The vertical fine lines around the mouth act as channels, and capillary action draws the liquid gloss into these crevices. This is more common with extremely high-shine or non-sticky formulas, as they lack the density to stay put. Dehydrated skin can also exacerbate the issue, as dry skin has more texture and cracks for the product to settle into.
Does Using a Lip Plumper Make Bleeding Worse?
Yes, lip plumpers can sometimes increase the likelihood of bleeding. Most plumpers work by using mild irritants like peppermint, cinnamon, or capsicum to increase blood flow to the lips, causing temporary swelling. This reaction can sometimes cause the area to feel warm and the product to become runnier. Additionally, if the plumper causes a tingling sensation that extends past the lip line, it can irritate the surrounding skin, making it harder for liner and concealer barriers to hold their ground.
Is It Better to Use a Sticky Gloss or a Smooth Gloss?
If your main priority is preventing bleeding, a stickier gloss is generally better. While many people dislike the feeling of hair getting caught in sticky gloss, that tacky texture is exactly what keeps the product adhered to the lips. Smooth, oil-slick style glosses have high slip and very low viscosity, meaning they slide around much easier. A thicker, tackier formula will stay exactly where you place it for a much longer period.
Can I Use Clear Lip Liner if I Don’t Want to Change the Color?
Absolutely. Clear lip liner is a fantastic investment for anyone who loves gloss. It is made of the same waxy ingredients as colored liners, so it provides the same physical barrier against feathering, but it contains no pigment. This makes it universally versatile; you can use it with red, pink, nude, or clear glosses without worrying about color matching. It effectively creates an invisible wall around your lips.
Conclusion
Mastering the art of long-wear lip gloss is less about buying the most expensive products and more about how you layer them. It is the combination of a smooth surface, a waxy barrier, and strategic application that makes the difference between a messy pout and a polished look. By taking the extra time to exfoliate, line, and reverse-line your lips, you create a structure that can withstand the slippery nature of gloss.
Makeup should be fun, not a source of stress or constant mirror-checking. With these techniques in your arsenal, you can confidently rock the highest-shine formulas without fear. Now that you know how to keep lip gloss from bleeding, you can wear your favorite bold, glossy looks to dinner, events, or work knowing that your smile will stay as sharp and beautiful as when you first applied it.
About the Author
Jane Hubbard is a passionate beauty expert with a wealth of experience in makeup, hair, and overall beauty techniques. After years of working as a hairdresser specialist, she followed her entrepreneurial spirit and started her own consultancy business.
Jane has always been driven by her desire to help others feel confident in their own skin, and she does this by sharing her knowledge, experiences, and practical beauty tips. Through her consultancy, she empowers individuals to embrace their unique beauty, offering tailored guidance that boosts both self-esteem and personal style.
Professional Focus
Specializes in makeup, hairstyling, and beauty consulting.
Provides personalized beauty advice, tips, and techniques to help individuals feel confident in their appearance.
Dedicated to staying up-to-date with the latest industry trends and developments.
Passionate about creating a comfortable and empowering experience for every client.
Education History
University of Craft and Design – Bachelor of Fine Arts (BFA) in Woodworking and Furniture Design
Woodworking Apprenticeships – Extensive hands-on training with skilled craftsmen to refine carpentry and furniture making techniques
Online Courses & Masterclasses – Continued education in advanced woodworking techniques, design principles, and specialized tools
Expertise:
Makeup artistry, hairstyling, and beauty consulting.
Personalized beauty techniques to enhance confidence and self-expression.
Educating clients on how to maintain their beauty routines at home.