
Are you tired of constantly losing rhinestones from your beautiful nail designs? Don’t worry, you’re not alone. It can be frustrating to spend time and effort on a stunning manicure only to have the rhinestones fall off shortly after.
Rhinestones can add a touch of glamour and sparkle to any manicure, but keeping them securely in place can be a challenge. Without proper application and care, these tiny gems might fall off, leaving your nails looking incomplete and untidy. Whether preparing for a special occasion or simply wanting to maintain a dazzling everyday look, ensuring your rhinestones stay put is essential.
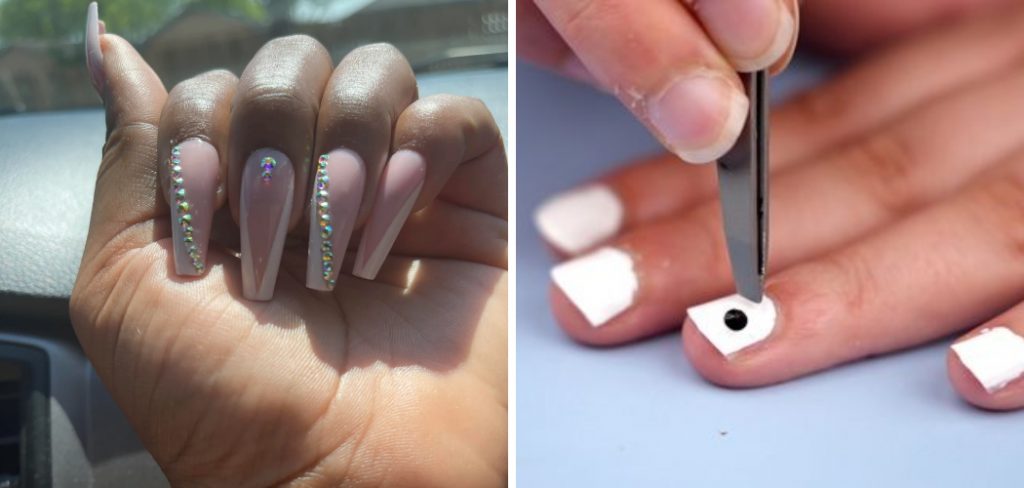
In this guide, we’ll explore various techniques and tips on how to keep rhinestones from falling off nails so that you can enjoy long-lasting, stunning nail art.
What Will You Need?
Before we dive into the techniques, let’s gather all the necessary materials to ensure your rhinestones stay in place. Here are some things you will need:
- A Base Coat: This is crucial for a smooth and even surface for the rhinestones to adhere to.
- Rhinestones: These gems come in different shapes, sizes, and colors to suit your desired look.
- Tweezers or Dotting Tool: These tools make it easier to pick up and place the rhinestones onto your nails.
- Nail Glue or Top Coat: The adhesive properties of nail glue or top coat will help secure the rhinestones onto your nails.
- Small Bowl or Container: This is used to hold and organize the rhinestones while you work on your manicure.
- Toothpick or Wooden Stick: These can be used to apply glue precisely and move around rhinestones if needed.
Once you have all these materials, you can start creating a stunning rhinestone manicure!
10 Easy Steps on How to Keep Rhinestones From Falling Off Nails
Step 1. Prep Your Nails:
Proper nail preparation is the foundation of any long-lasting manicure, especially when applying rhinestones. Start by cleaning your nails to remove any dirt, oil, or leftover polish. This can be done with nail polish remover or an alcohol wipe. Next, trim and shape your nails to your desired length and style, using a nail clipper and file. Your nails must be smooth and free from any rough edges that might catch and lift the rhinestones.

After shaping, gently push back your cuticles with a cuticle pusher to create more nail surface area. This step makes your nails look neat and helps the rhinestones adhere better near the nail bed. Follow up by buffing your nails lightly with a nail buffer to create an even, matte surface. Buffing helps to remove any shine from your natural nails, which allows the base coat and adhesives to grip better. Lastly, wash your hands to get rid of any dust and residue from the filing and buffing process and dry them thoroughly. Now, your nails are prepped and ready for the application of rhinestones.
Step 2. Apply a Base Coat:
The base coat is essential for providing a smooth surface that will help the rhinestones adhere better and stay in place longer. Apply a thin layer of base coat to each nail, evenly covering the entire nail surface. Allow the base coat to dry completely before moving on to the next step. This provides a sturdy foundation and protects your natural nails from any discolouration or damage.
Step 3. Choose Your Rhinestones:
Select the size, shape, and color of rhinestones you want to use for your nail design. Arrange them in a small bowl or container so they are easy to pick up. Planning your design beforehand will make the application process smoother and more efficient.
Step 4. Apply Nail Glue or Top Coat:
Depending on your preference, you can use either nail glue or a thick top coat to secure the rhinestones. If you opt for nail glue, use a toothpick or wooden stick to apply a small amount of glue to the area where you want to place the rhinestone. If you’re using a top coat, apply it to the nail without letting it dry.
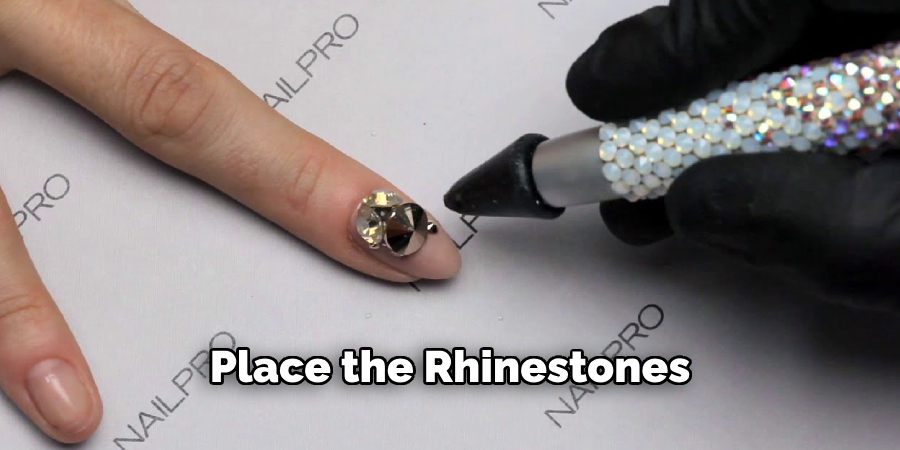
Step 5. Place the Rhinestones:
Once you have applied the adhesive of your choice, it’s time to place the rhinestones onto your nails. Using tweezers or a dotting tool, carefully pick up a rhinestone and gently press it into the adhesive. Ensure that the rhinestone is sitting flush against your nail and not protruding, as this will help it stay in place longer without snagging on anything. Take your time with this step to position each rhinestone precisely where you want it.
For a more intricate design, you may need to strategically place rhinestones of various sizes and shapes. If you’re creating a focal point, consider starting from the centre of your nail and gradually working your way outwards. This can provide a better balance to your design. If your design spans the entire nail or forms a pattern, placing the largest rhinestones first and filling in with smaller ones can create a more cohesive and visually appealing look.
Step 6. Press Down Firmly:
After placing each rhinestone, use the flat end of a toothpick or a clean, blunt tool to press down firmly on the rhinestone for a few seconds. This helps embed it into the adhesive, ensuring a stronger hold. If you’re using nail glue, be cautious not to apply too much pressure, as it can cause the glue to ooze out and create a mess.
Step 7. Add More Adhesive if Needed:
If you notice that some rhinestones don’t seem as secure, you can add a tiny dab of nail glue around the base of the rhinestone. Use a toothpick to apply a small amount without flooding the area. This reinforces the setting and provides extra security.
Step 8. Seal with a Top Coat:
Once all rhinestones are in place and the adhesive has dried, apply a thick layer of top coat over the entire nail, covering the rhinestones. This seals in the rhinestones and adds an extra layer of protection against chipping and lifting. Be sure to thoroughly cover the rhinestones’ edges to lock them in place.
Step 9. Cure Under UV/LED Light:
If you’re using a gel top coat, you must cure your nails under a UV or LED light according to the manufacturer’s instructions. This will help solidify the top coat and secure the rhinestones in place. Ensure each nail is adequately cured before moving to the next to avoid any movement or misplacement of the rhinestones.
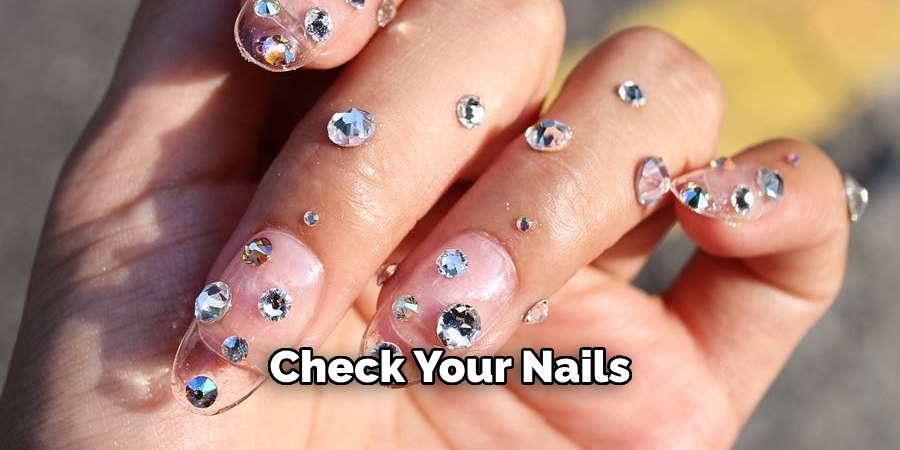
Step 10. Final Touches:
Check your nails for imperfections after curing or allowing the top coat to dry. Gently remove any excess adhesive with a small, soft brush or a cotton swab dipped in nail polish remover. Your finalized manicure should now be dazzling and long-lasting, with rhinestones securely in place. Enjoy the extra sparkle and confidence in knowing your nail art will stay intact through your daily activities or special occasions.
5 Additional Tips and Tricks
- Use a Strong Adhesive: Opt for nail glue designed to attach rhinestones. This type of adhesive provides a stronger bond than regular nail polish, ensuring the rhinestones stay in place longer.
- Avoid Oil-Based Products: Avoid using oil-based lotions or cuticle oils near your rhinestones. These products can weaken the adhesive bond, causing the rhinestones to loosen and fall off.
- Opt for Flat-Back Rhinestones: Flat-back rhinestones can create a larger surface area for glue application, providing a more secure attachment than pointed-back rhinestones.
- Minimize Excessive Force: Be cautious and gentle with your nails to avoid accidentally knocking off the rhinestones. For instance, avoid using your nails to open cans or perform tasks that exert excessive force on the nail surface.
- Check for Loose Stones Regularly: Make it a habit to check your nails for loose rhinestones daily. If you notice any loose stones, carefully remove them and re-apply with fresh glue. This prevents the risk of losing multiple stones at once.
These additional tips and tricks can help prolong the lifespan of your rhinestone nail art and ensure that your designs stay in place for as long as possible.
5 Things You Should Avoid
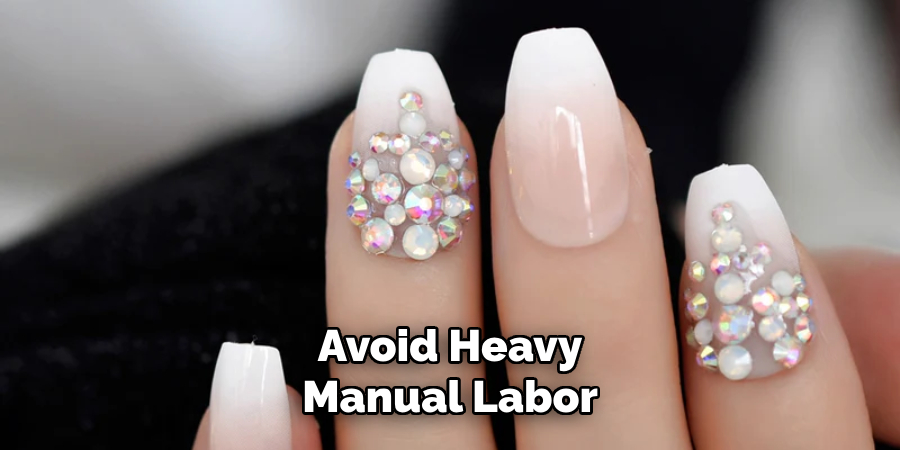
- Heavy Manual Labor: Avoid activities that require heavy hand use, such as gardening, cleaning, or lifting heavy objects. These tasks can put undue pressure on your nails and increase the likelihood of rhinestones coming loose.
- Excessive Water Exposure: Minimize contact with water as much as possible. Prolonged exposure to water, such as boiling water, can weaken the adhesive bond. Consider wearing gloves while doing household chores like washing dishes.
- Harsh Chemicals: Refrain from using harsh chemicals such as bleach, acetone, or other strong cleaning agents directly on your nails. These substances can dissolve the glue and cause the rhinestones to detach.
- Peeling Off Polish: Do not peel off your nail polish to remove your rhinestone design. This can damage your natural nails and cause the rhinestones to fall off prematurely. Use a proper nail polish remover instead.
- Skipping Top Coat: Never skip applying a top coat over your rhinestones. The top coat acts as a sealant, providing an extra layer of protection and helping to secure the rhinestones in place.
By avoiding these common pitfalls, you can extend the life of your rhinestone nail art and keep your nails looking dazzling.
Conclusion
By incorporating the tips and avoiding the pitfalls outlined above, you can effectively extend the life of your rhinestone nail art. Crucial steps include using a strong adhesive specifically designed for rhinestones, steering clear of oil-based products, opting for flat-back stones, and minimizing excessive force.
Additionally, regular checks for loose stones and immediate reapplication of glue when necessary will help maintain your design’s integrity. Avoiding heavy manual labor, excessive water exposure, harsh chemicals, peeling off polish, and skipping the top coat further ensures that your rhinestones stay securely in place.
With these strategies on how to keep rhinestones from falling off nails, you can enjoy dazzling and long-lasting rhinestone nail art, showcasing your style with confidence.
About the Author
Jane Hubbard is a passionate beauty expert with a wealth of experience in makeup, hair, and overall beauty techniques. After years of working as a hairdresser specialist, she followed her entrepreneurial spirit and started her own consultancy business.
Jane has always been driven by her desire to help others feel confident in their own skin, and she does this by sharing her knowledge, experiences, and practical beauty tips. Through her consultancy, she empowers individuals to embrace their unique beauty, offering tailored guidance that boosts both self-esteem and personal style.
Professional Focus
- Specializes in makeup, hairstyling, and beauty consulting.
- Provides personalized beauty advice, tips, and techniques to help individuals feel confident in their appearance.
- Dedicated to staying up-to-date with the latest industry trends and developments.
- Passionate about creating a comfortable and empowering experience for every client.
Education History
- University of Craft and Design – Bachelor of Fine Arts (BFA) in Woodworking and Furniture Design
- Woodworking Apprenticeships – Extensive hands-on training with skilled craftsmen to refine carpentry and furniture making techniques
- Online Courses & Masterclasses – Continued education in advanced woodworking techniques, design principles, and specialized tools
Expertise:
- Makeup artistry, hairstyling, and beauty consulting.
- Personalized beauty techniques to enhance confidence and self-expression.
- Educating clients on how to maintain their beauty routines at home.