
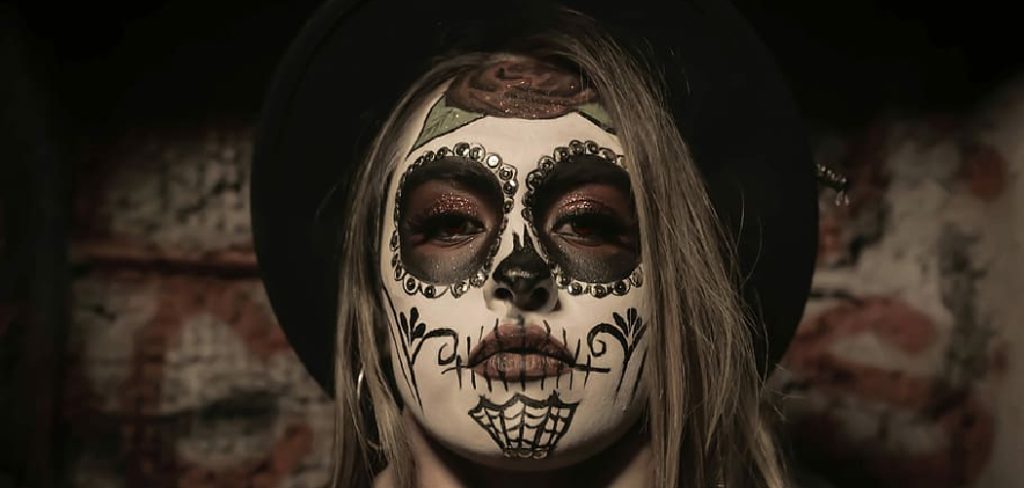
Halloween is the perfect time to experiment with your look, and you don’t always need an expensive costume to make a lasting impression. Sometimes, the most effective scares come from realism. A convincing injury, like a bruised eye, can be the centerpiece of a “rough night” costume, a zombie transformation, or a gritty action hero look.
While professional special effects artists use expensive prosthetics and alcohol-activated palettes, you can achieve cinema-quality results right at home. In this guide, we will show you exactly how to make a black eye with halloween makeup using affordable tools you likely already have in your kit.
Creating a realistic black eye with makeup is all about layering colors, blending correctly, and knowing how bruises naturally change over time. With the right techniques, you can add depth and texture to your makeup to create a lifelike effect. Whether you’re aiming for a fresh punch look or an older, healing bruise, a few simple steps can help you perfect the illusion. By working patiently and paying attention to detail, you’ll be ready to wow friends or audiences with your special effects skills.
Why Choose a Black Eye Look?
The black eye is a staple in special effects makeup for a reason. It is incredibly versatile and tells a story immediately without saying a word. Whether you want to look like you have just stepped out of a boxing ring or survived a zombie apocalypse, a bruise adds an instant layer of grit and toughness to your appearance. Unlike complex latex wounds or zipper-face effects, a black eye relies entirely on color theory and placement. This means it is much more comfortable to wear throughout a party.
Additionally, this look is budget-friendly and time-efficient. You do not need to wait for glue to dry or worry about pieces falling off halfway through the night. It is purely paint and powder. Because bruises are organic and irregular by nature, there is no pressure to be perfectly symmetrical or precise. This makes it an ideal starting point for beginners who are just dipping their toes into the world of special effects makeup.
Step-by-Step Guide: How to Make a Black Eye With Halloween Makeup
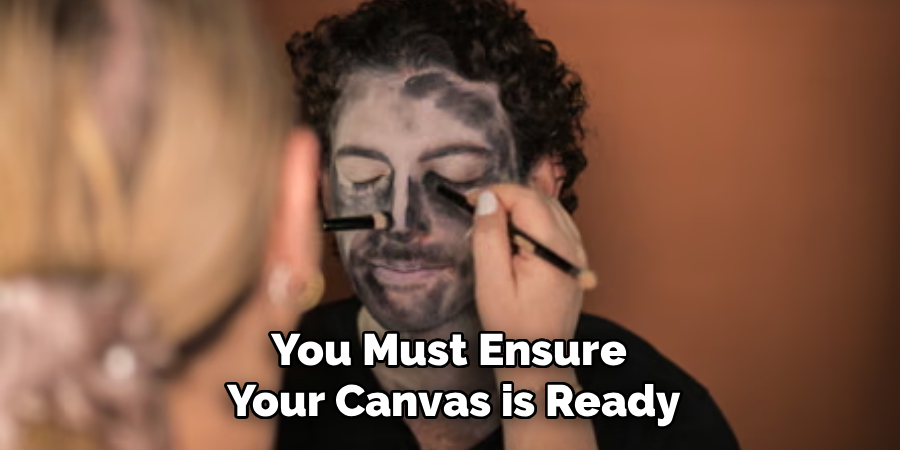
Step 1: Prep the Skin and Canvas
Before you apply a single drop of color, you must ensure your canvas is ready. The skin around the eye is delicate and naturally oily, which can cause makeup to slide around or crease within an hour. Start by washing your face thoroughly with a gentle cleanser to remove any natural oils, sweat, or old moisturizer.
Once your skin is dry, apply a thin layer of matte primer. If you do not have a primer, a light dusting of translucent powder works well to create a dry surface. This step is crucial for longevity. If you are planning to wear foundation for the rest of your face, apply that now, but leave the eye area bare so the bruise colors can stain the skin directly for a more realistic effect.
Step 2: Apply the Red Base
A fresh injury always starts with irritation and blood rushing to the surface, so your first layer should be a muted red or pink. Take a stipple sponge, or use your finger if you don’t have one, and dab a cream-based red makeup around the orbital bone. Avoid painting a perfect circle like a cartoon character.
Real trauma follows the bone structure, so focus the color on the cheekbone, the brow bone, and the inner corner of the eye. Keep the edges soft and diffused. You want this layer to look like it is coming from under the skin rather than sitting on top of it. Use a light hand here; you are building a foundation of inflammation that will peek through the darker colors you add later.
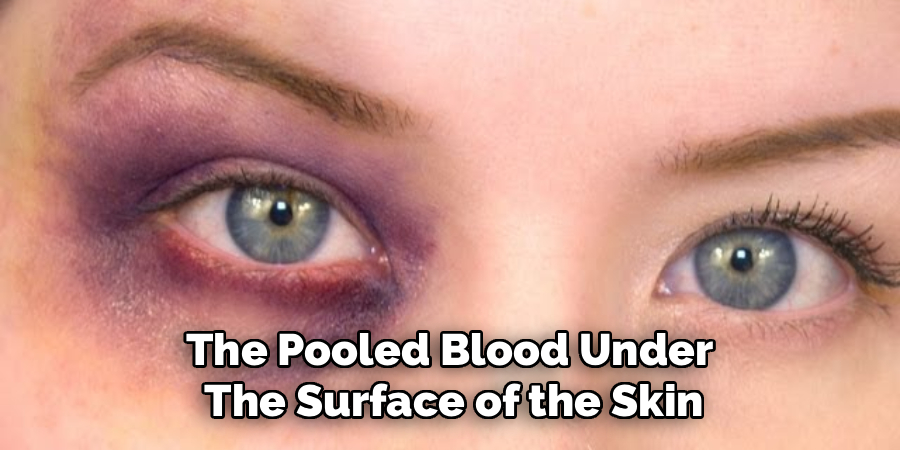
Step 3: Layer the Purple and Blue Tones
Now it is time to add the “bruise” element. Deep purples and dark blues represent the pooled blood under the surface of the skin. Using a smaller brush or your fingertip, concentrate these darker cool tones in the areas of impact, such as the tear duct or the outer corner of the eye. Do not cover the red layer entirely; you want a mottled effect where different colors interact. Learning how to make a black eye with halloween makeup involves mastering this layering technique.
The purple should look patchy and organic. Blend the edges of the purple into the red base so there are no harsh lines. If the purple looks too vibrant, mix in a tiny bit of the red to muddy it up, as real injuries are rarely neon-colored.
Step 4: Add Yellow and Green Highlights
If you want the bruise to look like it has been there for a few hours or days, you need to introduce the colors of healing. As hemoglobin breaks down, bruises turn distinctive shades of mustard yellow and sickly green. Take a small fluffy brush and lightly dust a matte yellow eyeshadow or cream paint around the very outer edges of the bruise. You can also dab tiny spots of olive green into the center of the purple areas.
This creates a “sickly” contrast that tricks the human eye into seeing the injury as authentic. Be very sparing with the green; too much can make you look like a reptile. The goal is to create a gradient where the skin transitions from normal to yellow, then to red, and finally to the deep purple center.
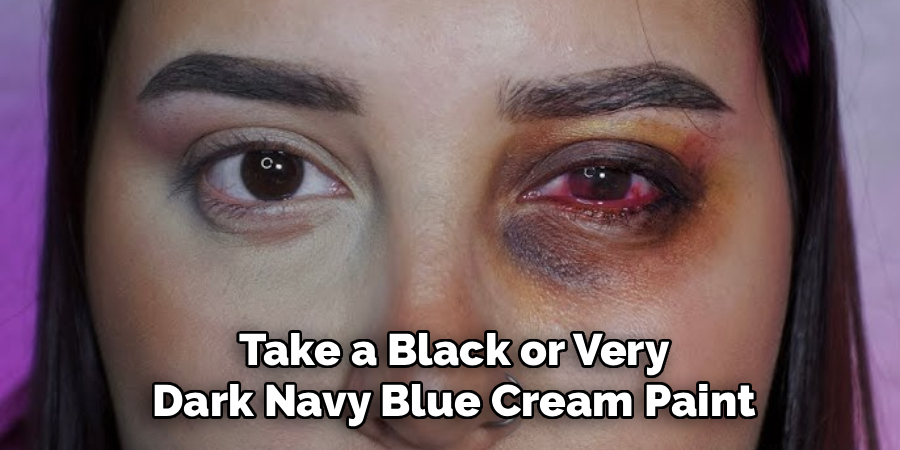
Step 5: Depth with Darker Pigments
To create the illusion of swelling and impact, you need to add depth. Take a black or very dark navy blue cream paint and apply it to the absolute deepest parts of the eye socket or directly on the cut line if you are simulating a split skin injury. Use a fine detail brush for this.
By darkening the crease of the eye or the hollows near the nose, you push those areas back visually, which makes the surrounding puffy areas look like they are protruding forward. This is the difference between a flat painting and a 3D effect. Be careful not to blend this too much, or you will end up with a “smokey eye” fashion look instead of a trauma look. The dark pigment should be concentrated and specific.
Step 6: Texture and Realistic Details
Texture is what separates a novice attempt from a convincing illusion. Real skin has pores, and real injuries often have swelling or abrasion. If the bruise is supposed to be fresh, the skin would likely be tight and swollen. To achieve this, take a small amount of clear lip gloss or petroleum jelly and tap it gently over the highest points of the swelling, usually the brow bone and the fleshy part of the under-eye. This slight shine mimics the tension of swollen skin.
When you are figuring out how to make a black eye with halloween makeup, remembering texture is key. If you want a rougher look, drag a coarse stipple sponge lightly over the area to create tiny capillaries or abrasions, breaking up the smoothness of the makeup.
Step 7: Final Setting and Finishing Touches
You have put in the work, so now you need to make sure it stays put. Cream makeups are notorious for creasing in the fine lines around the eyes. If you opted for a matte, older bruise look, use a translucent setting powder on a fluffy brush and pat it over the entire area. This will dull the colors slightly, making them look even more like they are under the skin.
If you went for the fresh, glossy look in the previous step, avoid powdering the shiny parts. Instead, use a barrier spray or a strong setting spray to lock everything in place. Finally, step back and look at your face in different lighting conditions to ensure the colors blend naturally with your skin tone and don’t look like a sticker.

Frequently Asked Questions
What type of makeup is best for bruises?
For the most realistic results, cream makeup wheels specifically designed for bruises (often called “bruise wheels”) are the industry standard. They blend easily and simulate the texture of skin better than powders. However, if you are on a budget, you can absolutely use matte eyeshadows.
Just ensure the eyeshadows are highly pigmented and matte—shimmer or glitter will immediately ruin the illusion of a real injury. Alcohol-activated paints are another option for professionals, as they are waterproof and extremely durable, but they are more expensive and harder to remove.
How do I make the bruise look swollen without prosthetics?
Illusion is your best friend here. You can create the appearance of swelling using highlighting and contouring techniques. By applying a lighter, matte shade (a few shades lighter than your skin tone) to the “puffy” areas—like the fleshy part under the eye or the brow bone—you bring those features forward.
Conversely, darkening the creases and hollows pushes them back. Adding a touch of shine, like Vaseline, to the highlighted areas reflects light and further enhances the look of tight, swollen skin without using any latex or wax.
Can I use lipstick for the red parts?
You can use red lipstick in a pinch, but proceed with caution. Many lipsticks contain oils and waxes that are not meant for the delicate eye area and can cause irritation or clog pores.
Furthermore, lipstick is designed to be creamy and opaque, which might look too heavy for a bruise. If you must use it, dab a tiny amount on the back of your hand first to warm it up and sheer it out, then apply it with your finger. Avoid getting lipstick directly inside your eye or on the waterline.
How long will this makeup look last?
The longevity of your black eye makeup depends heavily on the products used and how well you prepped your skin. A standard application using eyeshadows or grease paints, set with powder and spray, can easily last 4 to 6 hours at a party. If you are sweating or touching your face frequently, it may fade faster.
To extend the wear time, use a good primer beforehand and carry a small sponge to blot away excess oil throughout the night. Alcohol-activated paints can last all day (12+ hours) and are resistant to sweat and water.
How do I remove the makeup safely?
The skin around the eyes is sensitive, so avoid scrubbing harsh soaps. The best way to remove heavy cream makeup or pigments is with an oil-based cleanser or a dedicated makeup melting balm. Massage the cleanser gently over the area to break down the pigments, then wipe it away with a warm, damp washcloth. If you used alcohol-activated paints, you will need a specialized remover or 99% alcohol (used sparingly) followed immediately by a rich moisturizer, as these products can be very drying to the skin.
Final Thoughts
Creating a realistic injury is one of the most satisfying skills to learn for Halloween. It requires patience and a good eye for color, but the results are always worth the effort. Remember that less is often more; building up thin layers of color will always look more authentic than slapping on a thick coat of paint. Now that you have mastered how to make a black eye with halloween makeup, you can customize the look to fit any character you dream up. Whether you are a classic horror villain or an action star, wear your battle scars with pride.
About the Author
Jane Hubbard is a passionate beauty expert with a wealth of experience in makeup, hair, and overall beauty techniques. After years of working as a hairdresser specialist, she followed her entrepreneurial spirit and started her own consultancy business.
Jane has always been driven by her desire to help others feel confident in their own skin, and she does this by sharing her knowledge, experiences, and practical beauty tips. Through her consultancy, she empowers individuals to embrace their unique beauty, offering tailored guidance that boosts both self-esteem and personal style.
Professional Focus
Specializes in makeup, hairstyling, and beauty consulting.
Provides personalized beauty advice, tips, and techniques to help individuals feel confident in their appearance.
Dedicated to staying up-to-date with the latest industry trends and developments.
Passionate about creating a comfortable and empowering experience for every client.
Education History
University of Craft and Design – Bachelor of Fine Arts (BFA) in Woodworking and Furniture Design
Woodworking Apprenticeships – Extensive hands-on training with skilled craftsmen to refine carpentry and furniture making techniques
Online Courses & Masterclasses – Continued education in advanced woodworking techniques, design principles, and specialized tools
Expertise:
Makeup artistry, hairstyling, and beauty consulting.
Personalized beauty techniques to enhance confidence and self-expression.
Educating clients on how to maintain their beauty routines at home.