
Are you tired of your plain, monotone nails and looking for a way to add some spice? Ombre nails with a sponge is the perfect technique for adding a gradient effect to your nails.
Ombre nails are a stunning nail art trend that features a gradient effect, seamlessly blending two or more colors. This stylish look may seem complicated, but it’s surprisingly easy to achieve at home with the help of a simple makeup sponge. Whether you’re going for a bold, vibrant look or soft, pastel tones, the ombre technique adds a professional touch to your nails without breaking the bank.
With the right tools and a little practice, you can create gorgeous, salon-worthy ombre nails from the comfort of your own home. Let’s dive into how to ombre nails with sponge.
What Are the Benefits of Ombre Nails?
Here are some of the top benefits of ombre nails:
- Easy to Achieve at Home: While getting your nails done at a salon can be costly, learning how to ombre your nails with a sponge allows you to recreate this look at home without incurring significant expenses.
- Customizable: With ombre nails, you have endless possibilities for color combinations and designs. You can create a subtle gradient effect or opt for a bold look with contrasting colors.
- Long-Lasting: The ombre effect on your nails can last for weeks, so you won’t have to worry about constantly touching up your nails.
- Versatile: Ombre nails look great on any nail shape and length, making it a versatile choice for anyone looking to try out this trend.
- Perfect for Any Occasion: Whether you’re going for a casual day look or dressing up for a special event, ombre nails can add the perfect touch of style to any outfit.
What Will You Need?
To achieve the perfect ombre nails, you will need a few essential tools and materials:
- Nail Polish: You can use any nail polish colors of your choice to create the ombre effect. However, it’s recommended to use shades that contrast with each other for a more noticeable look.
- Makeup Sponge: A clean makeup sponge will be used to blend the colors seamlessly.
- Base Coat and Top Coat: These are essential for protecting your nails and ensuring your ombre design lasts longer.
- Nail Polish Remover: In case of any mistakes or smudges, keep some nail polish remover on hand to clean up around your nails.
10 Easy Steps on How to Ombre Nails With Sponge
Step 1. Prepare Your Nails
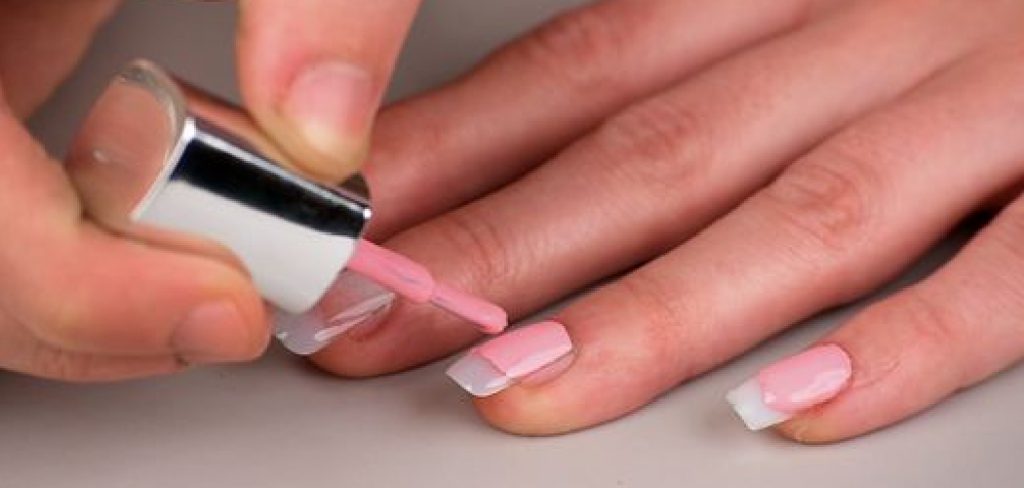
Start by ensuring your nails are clean, dry, and free of any previous nail polish. Use a nail polish remover to eliminate old polish and any natural oils on the nail surface. Next, shape your nails using a nail file to achieve your desired length and style—whether it’s square, round, or almond-shaped. Gently push back or trim your cuticles using a cuticle pusher or nipper for a neater look.

Finish the preparation process by gently buffing the surface of your nails to create a smooth base, which will allow the polish to adhere better. Finally, apply a thin layer of base coat and allow it to dry completely. This will protect your natural nails and help the ombre design stay vibrant and long-lasting.
Step 2. Choose Your Colors
Picking the right colors is crucial for creating a stunning ombre effect. Select two or three shades that blend seamlessly together. For a classic gradient, choose colors within the same family, such as soft pinks transitioning into whites, or deep blues fading into lighter shades of aqua.
For a bold and unique design, opt for complementary colors like purple and yellow, or red and teal, creating a striking contrast. Lay out your selected polishes and test them on a piece of paper or a sample nail to ensure they transition well. Additionally, consider your personal preferences and the occasion—soft pastels work beautifully for a subtle look, while vibrant hues are ideal for making a statement.
Step 3. Apply the Base Color
Select your chosen base color and apply a thin, even coat to each nail. Start from the base of the nail near the cuticle and stroke upwards toward the tip in smooth motions. Avoid overloading the brush with polish to prevent streaks or uneven application. Allow the first coat to dry completely before deciding if a second coat is necessary for a more opaque finish. Patience during this step ensures a flawless foundation for your gradient or nail art design.

Step 4. Prepare the Sponge
To create the gradient effect, use a clean makeup sponge or a specialized nail art sponge. Cut the sponge into a smaller size if necessary to make it easier to handle. Apply two or more polish colors of your choice in horizontal stripes directly onto the flat side of the sponge, ensuring the colors slightly overlap to create a seamless blend. Work quickly to prevent the polish from drying on the sponge before application. This step sets the stage for transferring the gradient design onto your nails.
Step 5. Dab Onto the Nail
Carefully press the painted side of the sponge onto your nail, dabbing gently to transfer the polish. Repeat this motion a few times, ensuring the gradient effect is applied evenly across the nail. You may need to reapply polish to the sponge after each nail to maintain consistent color intensity. Be patient and build up the gradient gradually for the best results. Don’t worry if the polish spreads onto the skin around your nails—this can be cleaned up later.
Step 6, Blend the Colors
Using a thin nail brush or a small sponge, gently blend the colors where they meet to create a seamless gradient effect. Work in small, light strokes to avoid disrupting the polish underneath. If needed, dab a tiny amount of polish on the blending tool to help smooth the transition between shades. Take your time, as this step is essential for achieving a professional and polished look. Once you’re satisfied with the gradient, allow the polish to dry completely before moving to the next step.
Step 7. Clean the Edges
Using a small angled brush or a cotton swab dipped in nail polish remover, carefully clean any excess polish around the edges of your nails. Be precise and steady to avoid removing any polish from the nails themselves. This step ensures a crisp, neat finish and enhances the overall appearance of your manicure. Wipe away any stray polish on your skin or cuticles, and ensure a thorough clean before proceeding to the final steps.
Step 8. Apply a Top Coat
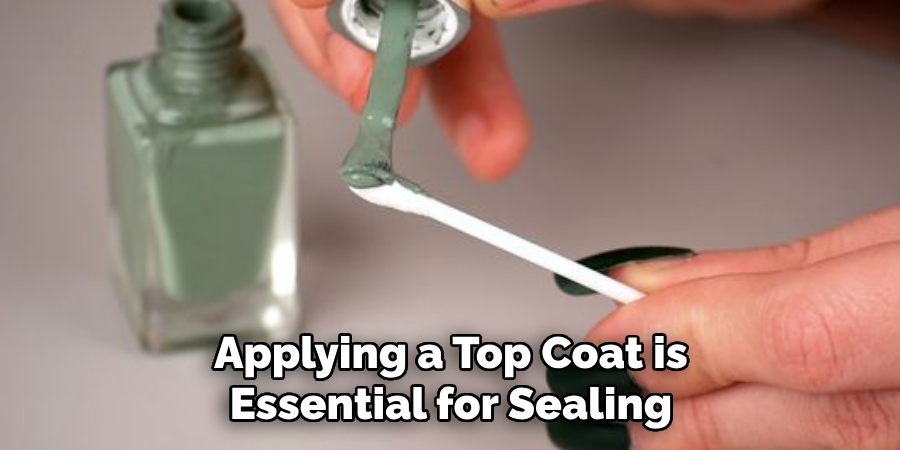
Applying a top coat is essential for sealing and protecting your manicure. Choose a high-quality, glossy top coat to add a beautiful shine and extend the life of your nail polish. Starting at the center of the nail, brush the top coat evenly across the surface, including the edges, to prevent chipping. Allow the top coat to dry completely to achieve a smooth and professional finish. This final layer not only enhances the look of your nails but also ensures your manicure stays flawless for days to come.
Step 9. Repeat for All Nails
Once you’ve perfected the application process on one nail, repeat these steps for all your nails. Take your time to apply each layer—base coat, polish, and top coat—precisely and evenly for a consistent, salon-quality result. Patience is key to ensuring your manicure looks uniform and elegant. Remember to allow each layer to dry properly before moving on to the next nail to avoid smudging or uneven surfaces. By the time you’re finished, you’ll have a beautiful, polished look that’s ready to show off!
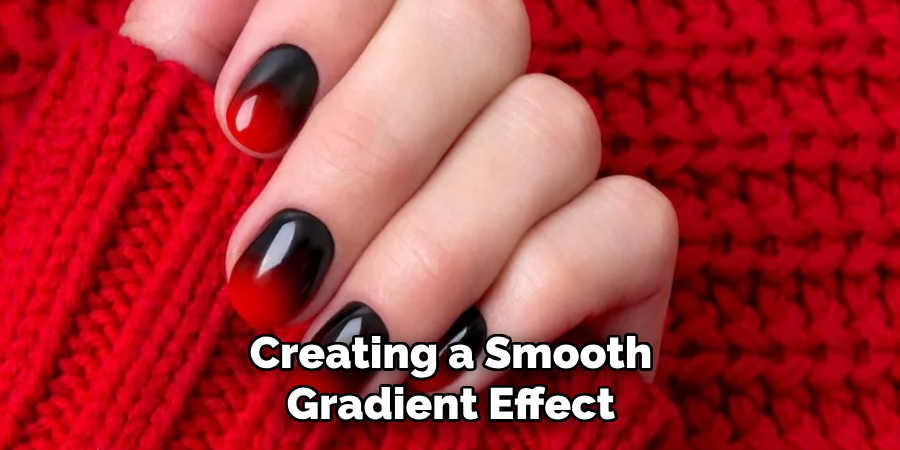
Step 10. Admire Your Ombre Nails
Take a moment to appreciate the effort and creativity you’ve put into your ombre nails. Hold them up to the light to see how the colors blend seamlessly, creating a smooth gradient effect. Whether you’ve chosen bold, vibrant hues or soft, subtle tones, your ombre nails are a reflection of your style. Don’t forget to share your stunning results with friends or on social media to inspire others. Most importantly, enjoy the satisfaction of a job well done and flaunt your beautiful manicure with confidence!
By following these simple steps, you can achieve a flawless ombre manicure at home.
5 Things You Should Avoid
- Using Too Much Nail Polish on the Sponge: Overloading the sponge with polish can cause the colors to blend unevenly or create smudges. Apply just enough polish to cover the sponge surface thinly.
- Skipping Base Coat: Neglecting a base coat can result in uneven application and may compromise the durability of your manicure. Always start with a quality base coat to create a smooth foundation.
- Rubbing the Sponge Too Hard: Applying excessive pressure while dabbing the sponge on your nails can disrupt the gradient effect and even damage the base layer. Use a gentle tapping motion instead.
- Not Allowing Layers to Dry: Applying additional layers before the previous ones dry can smudge the design or create a clumpy finish. Be patient and allow each layer to dry thoroughly.
- Ignoring Cleanup Around the Nails: Failing to clean excess polish around the cuticles can make your manicure look messy. Use a small brush dipped in nail polish remover to clean the edges for a polished look.
Conclusion
Ombre nails created with a sponge can elevate your manicure with a stylish, gradient effect.
By carefully selecting complementary colors, preparing your nails properly, and taking your time to apply the polish in thin layers, you can achieve a smooth and seamless transition. Remember to allow each layer to dry thoroughly and clean up the edges for a flawless finish.
Hopefully, the article on how to ombre nails with sponge has been informative and easy to follow. Experiment with different colors and have fun creating unique ombre nail designs!
About the Author
Jane Hubbard is a passionate beauty expert with a wealth of experience in makeup, hair, and overall beauty techniques. After years of working as a hairdresser specialist, she followed her entrepreneurial spirit and started her own consultancy business.
Jane has always been driven by her desire to help others feel confident in their own skin, and she does this by sharing her knowledge, experiences, and practical beauty tips. Through her consultancy, she empowers individuals to embrace their unique beauty, offering tailored guidance that boosts both self-esteem and personal style.
Professional Focus
- Specializes in makeup, hairstyling, and beauty consulting.
- Provides personalized beauty advice, tips, and techniques to help individuals feel confident in their appearance.
- Dedicated to staying up-to-date with the latest industry trends and developments.
- Passionate about creating a comfortable and empowering experience for every client.
Education History
- University of Craft and Design – Bachelor of Fine Arts (BFA) in Woodworking and Furniture Design
- Woodworking Apprenticeships – Extensive hands-on training with skilled craftsmen to refine carpentry and furniture making techniques
- Online Courses & Masterclasses – Continued education in advanced woodworking techniques, design principles, and specialized tools
Expertise:
- Makeup artistry, hairstyling, and beauty consulting.
- Personalized beauty techniques to enhance confidence and self-expression.
- Educating clients on how to maintain their beauty routines at home.