
Are you tired of the same old lip look? Want to add a little extra oomph to your makeup routine? Look no further than overlining your lips! This quick and easy trick can give the illusion of fuller, plumper lips without any invasive procedures.
How to overline your lips has become a popular makeup technique for achieving fuller, more defined lips without the need for cosmetic procedures. This method involves using makeup products like lip liners and lipsticks to subtly enhance the natural shape of your lips, creating the illusion of added volume. Whether you’re looking to complement your everyday look or glam up for a special occasion, mastering this skill can take your makeup game to the next level.
With the right tools and techniques, overlining can be done effortlessly and naturally to give you a polished, confident appearance.
What Are the Benefits of Overlining Your Lips?
Overlining your lips has several benefits, making it a popular technique among makeup enthusiasts. Some of the main advantages include:
- Gives the Appearance of Fuller Lips: By drawing slightly outside your natural lip line with a lip liner, you can create the illusion of plumper and more voluminous lips. This is especially helpful for those with thinner or asymmetrical lips.
- Enhances Your Natural Lip Shape: Overlining allows you to define and enhance your natural lip shape, making it appear more symmetrical and balanced. This can help give you a more polished and put-together look.
- Allows for Better Lipstick Application: When overlining, you have a larger surface area to work with, making it easier to apply your lipstick evenly and precisely. This can also help prevent feathering or bleeding of the lipstick.
- Can Create Different Lip Shapes: Depending on how you overline your lips, you can create different lip shapes and looks. For example, overlining just the top lip can give a more plump and pouty appearance, while overlining both the upper and lower lips can create a fuller overall look.
- Gives You More Control: Overlining gives you more control over the shape and size of your lips compared to simply using a bold lipstick color. This allows you to customize your lip look to fit your personal style
What Will You Need?
To successfully overline your lips, you will need the following items:
- A lip liner in a shade that matches your natural lip color or your desired lipstick color.
- A lip brush (optional) for blending and creating precise lines.
- A moisturizing lip balm to keep your lips hydrated and smooth.
- Your favorite lipstick or lip gloss to complete the look.
It’s important to choose a high-quality lip liner that glides easily on the lips and doesn’t smudge. You may also want to invest in a good quality lip brush for more precise application.
10 Easy Steps on How to Overline Your Lips
Step 1. Start with Clean and Smooth Lips

Exfoliate your lips gently using a lip scrub or a soft toothbrush to remove any dead skin. This will create a smooth canvas for your makeup, ensuring that the lip products you apply later adhere evenly and look flawless. After exfoliating, apply a moisturizing lip balm to keep your lips hydrated. Allow the balm to sink in for a few minutes before moving to the next step, as this will prevent dryness and help your makeup glide on effortlessly. Smooth, moisturized lips are crucial for achieving the best results when overlining.
Step 2. Choose the Right Shade of Lip Liner
When selecting a lip liner, it’s important to choose a shade that complements your natural lip color or the lipstick you intend to wear. For a natural look, opt for a shade that closely matches your lips. If you’re wearing a bold or vibrant lipstick, select a liner that matches the lipstick or is slightly darker to enhance definition and create a seamless blend. A well-matched lip liner not only defines your lips but also prevents the lipstick from feathering or smudging, ensuring a polished and long-lasting finish. Always test the shade on your hand or lips, if possible, to confirm it works well with your overall look.
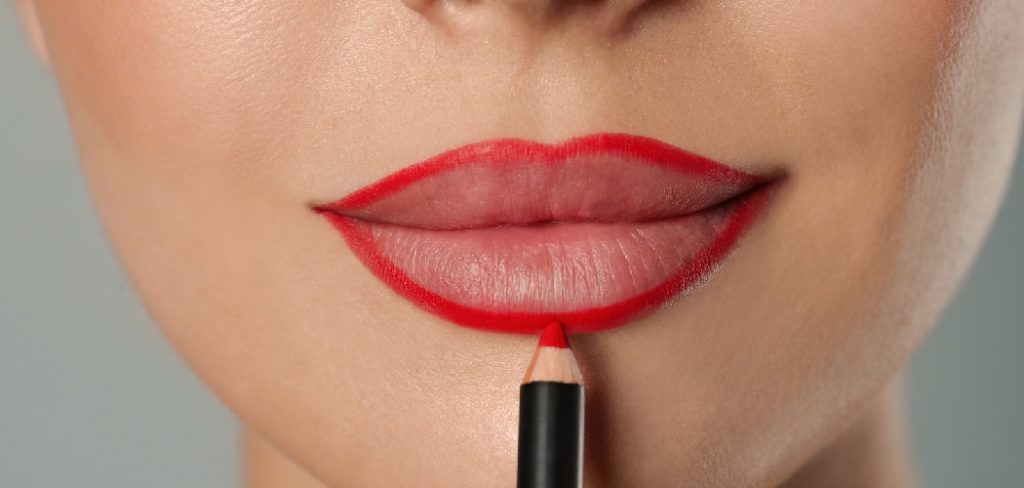
Step 3. Outline the Cupid’s Bow
To outline the Cupid’s bow, begin by locating the natural peaks at the center of your top lip. Using your chosen lip liner, draw an “X” shape that connects the highest points of the Cupid’s bow. This will help define the curve and create symmetry. Be sure to use light, precise strokes to avoid overlining. Once the “X” is complete, softly trace the edges of your top lip from the Cupid’s bow outward to the corners of your mouth, ensuring smooth and even lines on both sides. This step enhances the overall shape of your lips and prepares you for the next phase of your lip makeup application.
Step 4. Define the Lower Lip
To define the lower lip, start by identifying the center point of your lower lip. Using the same lip liner, draw a small guiding line at this midpoint. Then, gradually trace the natural outline of your lip, moving outward toward the corners. For a balanced look, ensure that the lines on either side are equal in thickness and follow the natural curve of your lip. Keep your strokes light and steady to avoid harsh lines. This step ensures precision and creates a refined base for your lip makeup.
Step 5. Connect the Corners
Once you’ve outlined your lips, gently connect the lines at the corners of your mouth. Use short, light strokes to fill in any gaps, ensuring a seamless transition between the upper and lower lip lines. This step helps create a cohesive and polished look, providing a perfect base for your lipstick or gloss application. Take your time to refine the corners for an even and symmetrical finish.
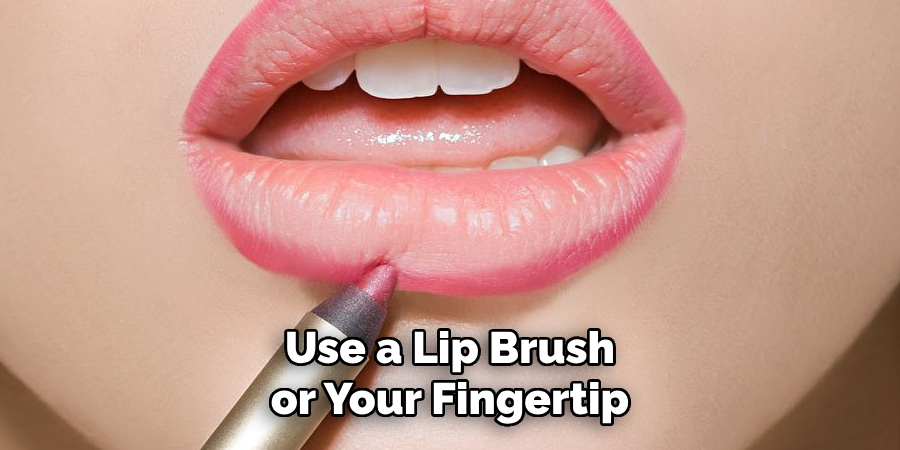
Step 6. Blend the Lip Liner
After outlining and connecting the corners, use a lip brush or your fingertip to gently blend the lip liner inward toward the center of your lips. This blending softens harsh lines and creates a more natural gradient, ensuring the transition between the liner and your lipstick or gloss is seamless. Blending also helps your lip color last longer and prevents the liner from appearing too stark. Aim for an even and smooth finish across your lips.
Step 7. Fill in Your Lips
Using your chosen lipstick or lip color, carefully fill in your lips, starting from the center and working outward towards the edges. Use a lip brush for precise application or apply directly from the tube, depending on your preference. Make sure to evenly distribute the product, paying attention to any areas where the lip liner was blended. For a more vibrant look, apply an additional layer of lipstick, blot lightly with a tissue, and reapply to lock in the color. Finish off by checking for an even and flawless application.
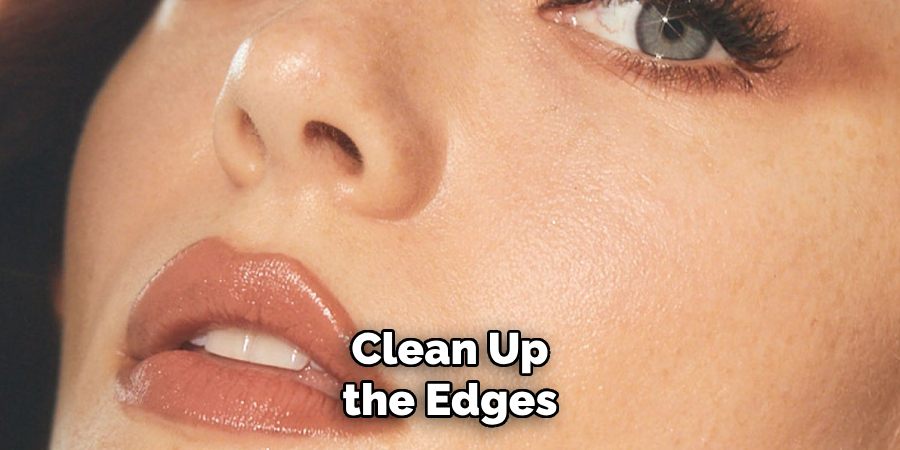
Step 8. Perfect the Edges
Use a small, flat brush and a bit of concealer or foundation to clean up the edges of your lips for a sharp and defined look. Carefully trace around the outside of your lips to correct any smudges or uneven lines, blending the product seamlessly into your skin. This step helps enhance the overall precision of your lip makeup and creates a professional, polished finish. For extra definition, you can also lightly dust translucent powder around the lip contour to set the concealer and prevent feathering.
Step 9. Add a Hint of Gloss
To complete your lip look, apply a small amount of lip gloss to the center of your lips. This step adds a touch of shine and creates the illusion of fuller, plumper lips. Choose a clear gloss or one that complements the color of your lipstick for a cohesive finish. Use a lip brush or the included applicator to apply the gloss precisely, ensuring it doesn’t bleed outside your lip line. Remember, a little goes a long way—too much gloss can feel sticky or overpower the look. Gently press your lips together to evenly distribute the gloss and enjoy your radiant, glossy lip finish!
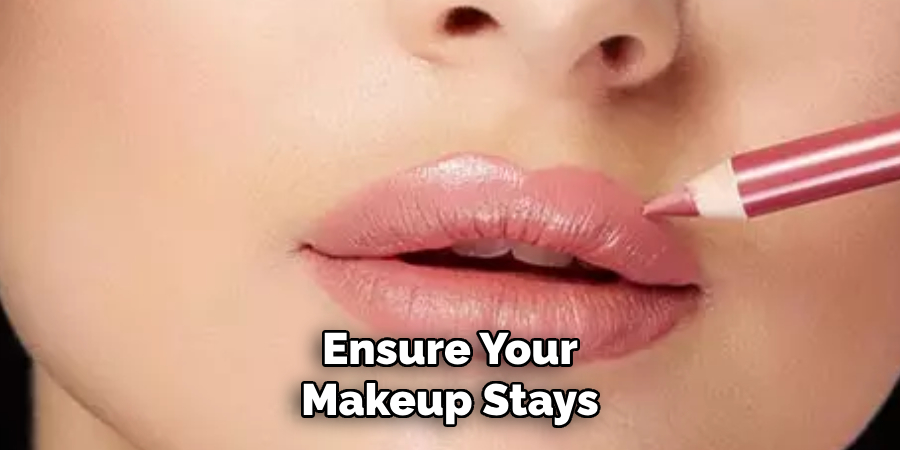
Step 10. Set Your Look
To ensure your makeup stays in place all day, setting your look is a crucial final step. Use a setting spray or a light dusting of translucent powder based on your preference and skin type. Setting spray helps lock in your makeup, adding a natural, long-lasting finish without altering the colors or textures you’ve created. Hold the spray about 8–10 inches away from your face and mist evenly, avoiding over-saturation. If you prefer powder, use a fluffy brush to gently dust it across your T-zone and other areas prone to shine.
By following these steps and incorporating your personal preferences, you can easily achieve a flawless makeup look that lasts all day.
Conclusion
How to overline your lips can be a simple yet effective way to enhance their natural shape and create the appearance of fuller lips. Start by exfoliating and moisturizing your lips to create a smooth base.
Use a lip liner that matches your lipstick or is slightly darker to carefully trace just outside your natural lip line, focusing on the center for added volume while blending seamlessly at the corners. Fill in the lips with the liner for a long-lasting base, then apply your chosen lipstick. To complete the look, add a touch of gloss to the center of your lips for added dimension.
With practice and the right techniques, you can achieve a polished and natural overlined lip look effortlessly.
About the Author
Jane Hubbard is a passionate beauty expert with a wealth of experience in makeup, hair, and overall beauty techniques. After years of working as a hairdresser specialist, she followed her entrepreneurial spirit and started her own consultancy business.
Jane has always been driven by her desire to help others feel confident in their own skin, and she does this by sharing her knowledge, experiences, and practical beauty tips. Through her consultancy, she empowers individuals to embrace their unique beauty, offering tailored guidance that boosts both self-esteem and personal style.
Professional Focus
- Specializes in makeup, hairstyling, and beauty consulting.
- Provides personalized beauty advice, tips, and techniques to help individuals feel confident in their appearance.
- Dedicated to staying up-to-date with the latest industry trends and developments.
- Passionate about creating a comfortable and empowering experience for every client.
Education History
- University of Craft and Design – Bachelor of Fine Arts (BFA) in Woodworking and Furniture Design
- Woodworking Apprenticeships – Extensive hands-on training with skilled craftsmen to refine carpentry and furniture making techniques
- Online Courses & Masterclasses – Continued education in advanced woodworking techniques, design principles, and specialized tools
Expertise:
- Makeup artistry, hairstyling, and beauty consulting.
- Personalized beauty techniques to enhance confidence and self-expression.
- Educating clients on how to maintain their beauty routines at home.