
Are you tired of spending hours in the salon getting your hair braided? Looking for a more comfortable and less time-consuming alternative? Knotless braids may be the perfect choice for you. Not only do they look stunning, but they are also gentler on your scalp and can last longer than traditional braids.
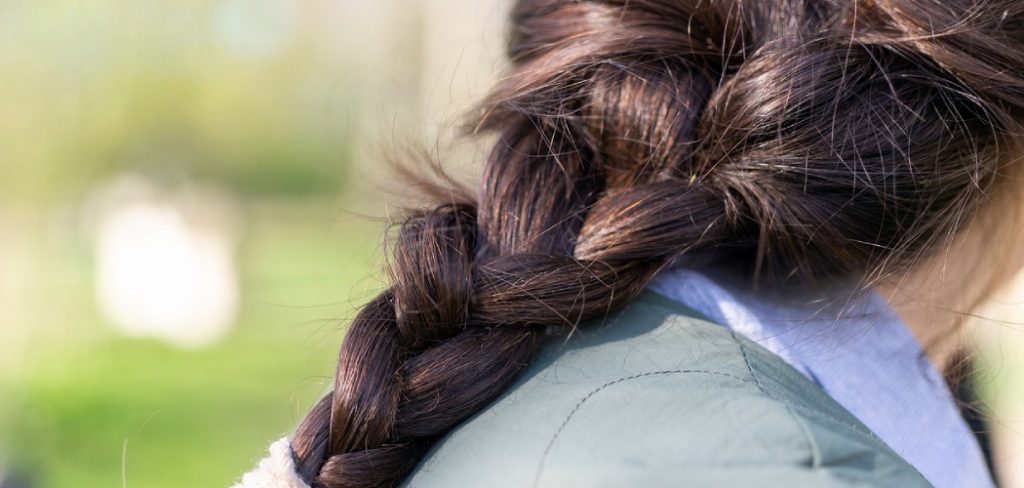
Preparing your hair correctly before getting knotless braids ensures a comfortable and long-lasting style. By taking the time to cleanse, moisturize, and protect your hair properly, you can create a solid foundation for your braids, promoting healthy hair growth and minimizing damage.
In this guide, we’ll walk you through the step-by-step process of how to prep hair for knotless braids, so you can achieve a stunning and protective hairstyle that lasts. Let’s dive in!
What Are the Benefits of Knotless Braids?
Before we dive into the prep process, let’s first understand why knotless braids are gaining popularity.
- Gentler on Your Scalp: Traditional braids can be tight and painful, especially at the hairline. With knotless braids, the hair is gently fed into each braid without using a knot, reducing tension and scalp irritation.
- Natural-Looking: Since there is no visible knot or extension at the base of each braid, knotless braids have a more natural appearance that blends seamlessly with your hair.
- Longer Lasting: Knotless braids are installed using a feed-in method, where small sections of hair are gradually added to each braid, making them more secure and long-lasting than traditional braids.
Now that you know the benefits of knotless braids, let’s move on to the prep process.
What Will You Need?
Before you begin, make sure you have the following items on hand:
- Wide-tooth comb
- Shampoo and conditioner
- Leave-in conditioner or hair oil
- Hair clips or bands
- Hair moisturizer or braid spray (optional)
Once you have all the necessary items, follow the steps below to prep your hair for knotless braids.
10 Easy Steps on How to Prep Hair for Knotless Braids
Step 1: Detangle Your Hair
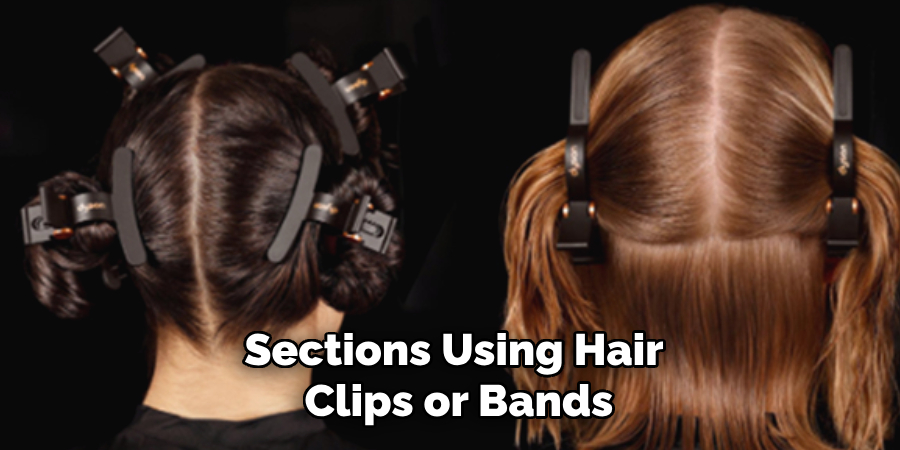
Before starting knotless braids, it is crucial to ensure that your hair is free from tangles and knots. This will make the braiding process more manageable and prevent unnecessary breakage or damage. Start by dividing your hair into sections using hair clips or bands. This will make it easier to work on one section at a time. Then, gently use a wide-tooth comb to detangle each section from ends to roots.
Step 2: Shampoo and Condition Your Hair
Cleanse your hair thoroughly with a moisturizing shampoo to remove any product buildup or dirt. Focus on your scalp and gently massage it to promote blood circulation. Rinse out the shampoo and follow up with a deep conditioning treatment. This will help nourish and hydrate your hair, preparing it for braiding.
Step 3: Moisturize Your Hair
After shampooing and conditioning, restoring moisture to your hair is essential. Apply a leave-in conditioner or moisturizing cream to hydrate and nourish your strands. Focus on the ends and mid-lengths of your hair, as these areas tend to be more prone to dryness. Additionally, consider using lightweight oil such as argan or jojoba oil to seal the moisture and add extra shine.
Moisturizing your hair before braiding will help prevent breakage and keep your hair healthy throughout the knotless braiding process. Remember to use products suitable for your hair type and avoid overloading your hair with heavy products that may weigh it down.
Step 4: Trim Your Ends
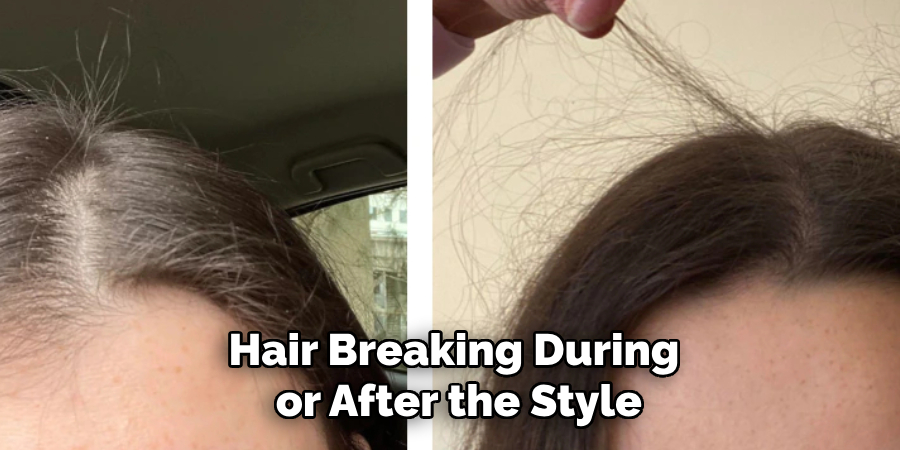
Before getting knotless braids, it’s a good idea to trim any split or damaged ends. Trimming your ends ensures that your hair is in its healthiest state before being braided, which helps reduce the risk of your hair breaking during or after the style is installed. Use sharp hair scissors and carefully snip off any frayed or split ends. If you’re unsure about trimming your hair, consider visiting a professional stylist to ensure an even and precise trim. Healthy ends will also make your braids look neater and last longer.
Step 5: Dry Your Hair Thoroughly
It’s important to dry your hair completely before braiding. Braiding wet hair can lead to discomfort, increased breakage, and even mold growth within the braids. Use a microfiber towel to pat your hair dry and minimize frizz gently. Use a blow dryer on a low to medium heat setting to ensure your hair is dehydrated. Remember to use a heat protectant product if using heat tools to avoid any unnecessary damage.
Step 6: Stretch Your Hair
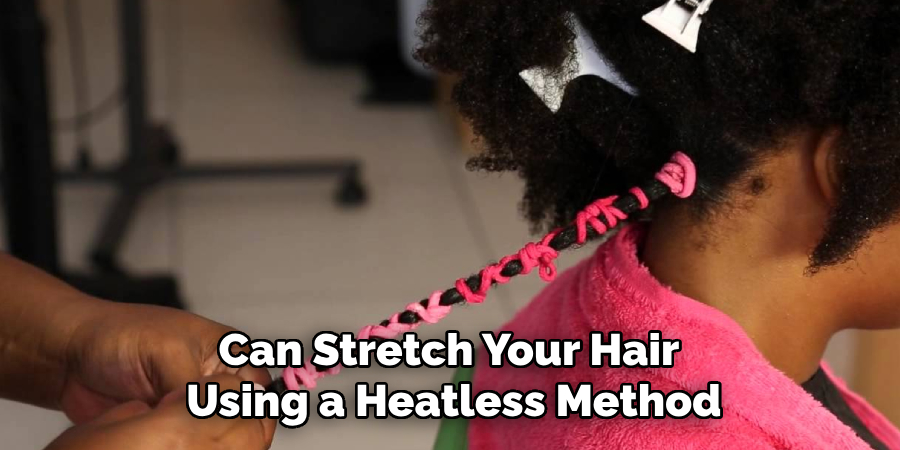
Consider stretching your hair beforehand to make the braiding process easier and achieve a smoother outcome. This step is especially useful for natural hair textures or curls. You can stretch your hair using a heatless method, such as braiding or twisting it overnight, or by using a blow dryer with a comb attachment for a gentle stretch. Well-stretched hair helps the braider create clean and uniform sections, producing a polished finish for your knotless braids.
Step 7: Protect Your Scalp
Your scalp is the foundation for your braids, so it’s crucial to prepare it properly. Apply a lightweight oil or scalp serum to moisturize and nourish your scalp. Look for products that have soothing ingredients like tea tree oil or peppermint oil to help reduce any potential itchiness or irritation. Avoid applying too much product to prevent buildup during the braiding process. A healthy scalp will ensure your knotless braids feel comfortable and minimize the risk of irritation.
Step 8: Divide Your Hair into Sections
Dividing your hair into sections is crucial in achieving neat and uniform knotless braids. Start by parting your hair down the middle from forehead to nape, creating two equal sections. Secure one section with a hair clip or band to keep it out of the way. Take the remaining section and create a horizontal parting from ear to ear, dividing it into two smaller sections: the top section and the bottom section.
Secure the top section with a hair clip or band, leaving the bottom section loose for now. Now, divide the loose bottom section vertically into smaller sub-sections, depending on the size and thickness of the braids you desire. Use hair clips or bands to keep these sub-sections separate and manageable.
Step 9: Prep Each Section Before Braiding
Before braiding each section, apply a small amount of moisturizer or braid spray to the length of your hair. This will help reduce friction and prevent any tangles during braiding. You can also use this opportunity to detangle each sub-section with a wide-tooth comb or your fingers.
Step 10: Be Gentle
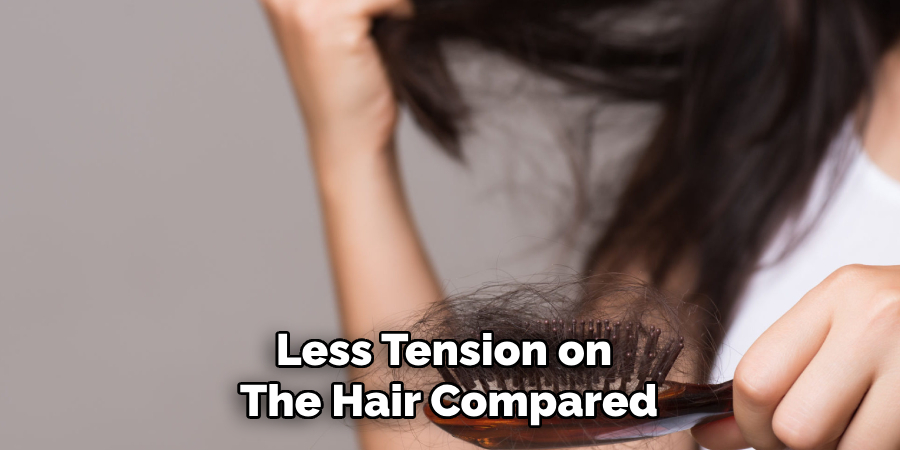
Lastly, it’s essential to be gentle when braiding your hair. Knotless braids require less tension on the hair compared to traditional box braids, so avoid pulling too tight while braiding. Pulling too tightly can cause unnecessary breakage and strain on your scalp. Remember to take breaks in between sections if needed and ensure that your braids are comfortable and not causing any pain. Be patient and gentle throughout the process to achieve beautiful, healthy knotless braids.
By following these steps, you can ensure that your knotless braids are not only stylish but also healthy for your hair.
5 Things You Should Avoid
- Skipping Detangling: Avoid braiding tangled or knotted hair, as it can lead to breakage and discomfort during the braiding process. Take the time to thoroughly detangle your hair using a wide-tooth comb or detangling brush before starting.
- Neglecting Moisture: Dry and brittle hair is more prone to breakage, so it’s essential to moisturize your hair before braiding. Avoid skipping moisturizing products like leave-in conditioners or oils to ensure your hair stays hydrated and protected.
- Tight Braiding: While a secure braid is essential, avoid braiding too tightly, as it can cause tension on the scalp and lead to hair breakage. Opt for a firm, but not overly tight, grip when braiding to maintain hair health.
- Using the Wrong Hair Accessories: Be cautious of using hair accessories that can cause damage, such as metal or rubber bands. Instead, opt for soft and hair-friendly alternatives like fabric-covered hair ties or elastic bands specifically designed for braiding.
- Neglecting Scalp Care: A healthy scalp is crucial for healthy hair growth. Avoid neglecting scalp care when prepping for knotless braids. Regularly cleanse and moisturize your scalp to keep it free from buildup and nourished.
By avoiding these common mistakes, you can ensure a smoother and healthier hair preparation process for knotless braids, promoting the longevity and overall health of your hair.
Conclusion
Knotless braids are a great protective style option for all hair types. They offer versatility, ease of maintenance, and less tension on the hair compared to traditional box braids.
By following these ten steps and avoiding common mistakes, you can ensure that your knotless braids not only look amazing but also promote healthy hair growth. Remember to be gentle with your hair, moisturize regularly, and take breaks when needed.
Hopefully, the article on how to prep hair for knotless braids has been a helpful guide for achieving beautiful and healthy braids. Happy braiding!
About the Author
Jane Hubbard is a passionate beauty expert with a wealth of experience in makeup, hair, and overall beauty techniques. After years of working as a hairdresser specialist, she followed her entrepreneurial spirit and started her own consultancy business.
Jane has always been driven by her desire to help others feel confident in their own skin, and she does this by sharing her knowledge, experiences, and practical beauty tips. Through her consultancy, she empowers individuals to embrace their unique beauty, offering tailored guidance that boosts both self-esteem and personal style.
Professional Focus
- Specializes in makeup, hairstyling, and beauty consulting.
- Provides personalized beauty advice, tips, and techniques to help individuals feel confident in their appearance.
- Dedicated to staying up-to-date with the latest industry trends and developments.
- Passionate about creating a comfortable and empowering experience for every client.
Education History
- University of Craft and Design – Bachelor of Fine Arts (BFA) in Woodworking and Furniture Design
- Woodworking Apprenticeships – Extensive hands-on training with skilled craftsmen to refine carpentry and furniture making techniques
- Online Courses & Masterclasses – Continued education in advanced woodworking techniques, design principles, and specialized tools
Expertise:
- Makeup artistry, hairstyling, and beauty consulting.
- Personalized beauty techniques to enhance confidence and self-expression.
- Educating clients on how to maintain their beauty routines at home.