
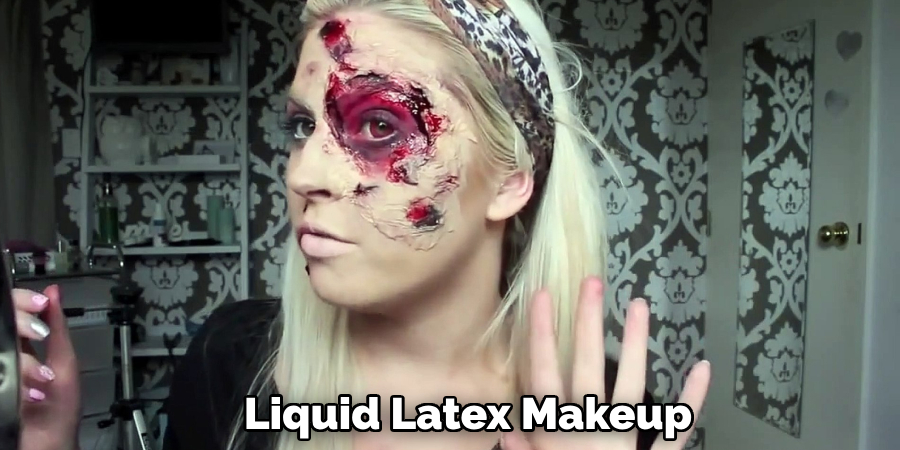
Liquid latex makeup is a versatile tool widely used in theatrical productions, special effects, and cosplay to create stunning visual transformations. Whether you’re crafting realistic scars, wrinkles, or unique textures, liquid latex allows for endless creative possibilities. It’s favored by professionals and hobbyists alike for its flexibility, ease of application, and ability to mimic skin-like textures.
In this guide on how to use liquid latex makeup, we will explore the steps needed to effectively use liquid latex makeup, ensuring safe and impactful results. If you’re looking for creative liquid latex makeup ideas, this guide will inspire you with unique designs for special effects and costume looks.
Why Liquid Latex Makeup?
Liquid latex makeup is a type of water-based, air-dry liquid rubber commonly used in the entertainment industry. It’s non-toxic and safe for use on the skin, making it an excellent choice for creating realistic special effects on actors or for personal transformations.
Unlike traditional prosthetics, which are often pre-made and require adhesive to apply, liquid latex can be easily molded and shaped directly onto the skin. This allows for more precise control over the desired effect and eliminates the need for additional adhesives.
Another advantage of using liquid latex is its ability to stretch and move with the skin, making it ideal for creating dynamic effects such as fake wounds or wrinkles. It can also be colored using a variety of mediums, including makeup, pigments, and dyes, making it a versatile tool for any creative project.
Needed Materials
To get started with liquid latex makeup, you’ll need a few essential materials:
Liquid Latex:
This can be found at most costume or theatrical supply stores and is available in a variety of colors. Clear liquid latex is also available, which can be colored using pigments or makeup.
Setting Powder:
Used to set and mattify the liquid latex once it has dried. This prevents it from being sticky or shiny, allowing for a more realistic finish.
Makeup Brushes:
Small, disposable brushes are ideal for applying liquid latex as they can be discarded after use and prevent cross-contamination with other products.
Mixing Palette and Spatula:
These are optional but useful for creating custom colors or mixing in other mediums such as glitter or pigments.
8 Step-by-step Guides on How to Use Liquid Latex Makeup
Step 1: Prepare Skin
Before applying liquid latex, it’s essential to properly prepare the skin to ensure the best results and to avoid irritation. Start by cleansing the area where you plan to apply the liquid latex to remove any dirt, oil, or makeup. Use a gentle cleanser and pat the skin dry with a clean towel.
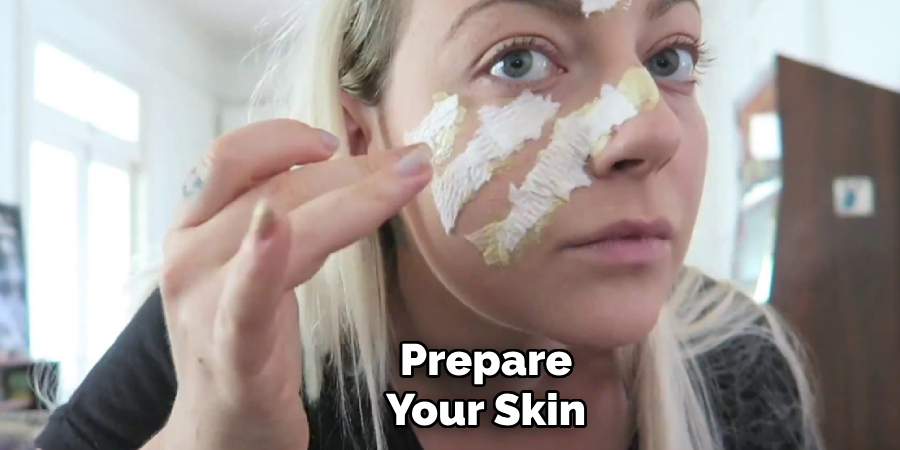
Once the skin is clean, apply a thin layer of petroleum jelly or a barrier cream to protect sensitive areas, such as around the eyes or on body hair. This step not only helps prevent discomfort during the removal process but also creates a smoother surface for the liquid latex application. Proper preparation is key to achieving a flawless finish and maintaining skin safety.
Step 2: Test for Allergies
Before fully applying liquid latex, it is crucial to test for potential allergic reactions. To do this, apply a small amount of liquid latex to a discreet area of skin, such as the inner wrist or behind the ear. Allow it to dry completely, and then leave it on for at least 15–20 minutes. Watch for any signs of irritation, such as redness, itching, or swelling.
If no adverse reaction occurs, proceed with your application. However, if you experience any discomfort or allergic symptoms, rinse the area thoroughly with warm water and discontinue use. This precautionary step ensures the safety and comfort of your skin while working with liquid latex.
Step 3: Apply a Base
Once the skin is prepared and allergy testing is complete, it’s time to apply a base layer of liquid latex. Pour a small amount of liquid latex onto your mixing palette or directly onto a disposable makeup brush. Using smooth, even strokes, apply a thin layer of liquid latex to the desired area. Work methodically, ensuring that you cover the surface evenly without leaving gaps or clumps.
If you’re aiming for a specific texture or effect, you can use tools like a sponge, stippling sponge, or spatula to create patterns or build-up. Allow this base layer to dry completely before proceeding—this can take a few minutes to several minutes, depending on the thickness and the humidity of your environment. Once dry, the base will provide a stable foundation for layering or additional detailing.
Step 4: Add Details
With the base layer dry, you can now begin to add details and create your desired effect. Use small amounts of liquid latex on a brush or sponge to build up layers and textures. For example, for fake scars or wounds, you can use a stippling technique with liquid latex to create a raised, skin-like texture. For wrinkles or aged skin effects, try stretching the skin gently and then applying thin lines of liquid latex in the creases.
Experiment with different tools and techniques to achieve unique effects! It’s also important to remember that less is more when it comes to liquid latex – it’s always easier to add more than remove excess once it’s dried.

Step 5: Allow to Dry
Once you have achieved the desired effect, allow the liquid latex to dry completely before moving on to the next step. The drying time can vary depending on factors such as humidity and thickness, so it’s essential to be patient and avoid touching or disturbing the liquid latex while it dries.
If you need to speed up the drying process, you can use a hairdryer set on low or cool settings. However, be careful not to apply too much heat, as it can cause the liquid latex to shrink or warp.
Step 6: Apply Setting Powder
Once the liquid latex is completely dry, use a powder brush or puff to lightly dust, setting powder over the area. This will help to set and mattify the liquid latex, creating a more realistic finish and preventing any stickiness. Be sure to pat gently rather than rubbing the powder into the skin – this could disturb or remove some of your hard work!
If you’re using colored liquid latex, you can also use a matching setting powder to enhance and intensify the color. Alternatively, if you want to change or adjust the color, you can use makeup products like eyeshadows or foundations on top of the setting powder for more control.
Step 7: Add Finishing Touches
Once the setting powder is applied, you can add any finishing touches with other makeup products as desired. Use colors and textures that complement your liquid latex effects – for example, fake blood for wounds or body paints for full-body creations.
You can also experiment with layering different materials over the liquid latex to create unique effects. Try using tissue paper or cotton balls for a textured appearance, or use sequins and rhinestones for a glamorous look.
Step 8: Removal
When it’s time to remove your liquid latex makeup, start by gently peeling away edges and loosening any areas with your fingers. Avoid pulling too hard or tugging on the skin – this can cause irritation or damage. If you apply petroleum jelly as a barrier cream, this should make the removal process easier and more comfortable.
Following these steps on how to use liquid latex makeup will help you achieve professional-looking results while also ensuring the safety and comfort of your skin. With practice and experimentation, you can create endless possibilities and bring any character or costume to life!

Tips and Tricks
- Mix liquid latex with other products for unique effects – experiment with mixing in colored makeup or glitter for added dimension.
- Use small brushes or tools for precise detailing and control when applying liquid latex.
- Use caution when working around hair – try using tape or petroleum jelly as a barrier to protect it from the liquid latex.
- For added durability, apply a layer of clear nail polish on top of your finished liquid latex design. This will help prevent cracking and peeling.
- Always do a patch test before applying liquid latex to larger areas of the skin to check for any potential allergies.
- To create realistic-looking fake wounds, add red food coloring or gel blood over dried layers of liquid latex.
- Experiment with different textures and techniques by using household items like bubble wrap or lace as stencils when applying liquid latex.
- Don’t be afraid to get creative and mix different colors of liquid latex – you can create custom shades by combining colors on your mixing palette.
Frequently Asked Questions
Q1: Is Liquid Latex Safe to Use on the Skin?
A: Yes, liquid latex is generally safe to use on the skin. However, it is essential to do a patch test before applying it to larger areas of the skin and follow proper allergy testing procedures. If you have sensitive skin or any known allergies, it’s best to consult with a dermatologist before use.
Q2: Can Liquid Latex Be Used for Special Effects Makeup?
A: Yes, liquid latex is commonly used in special effects makeup to create realistic-looking wounds, scars, and other textures. It can also be used for full-body creations and prosthetics.
Q3: How Long Does It Take for Liquid Latex to Dry?
A: The drying time of liquid latex can vary depending on factors such as humidity, thickness, and application method. Generally, it takes a few minutes to several minutes for each layer to dry completely. Using a hairdryer on low or cool settings can help speed up the drying process.
Conclusion
Using liquid latex for makeup and special effects can unlock a world of creativity and transform your projects into visually stunning masterpieces. By following the steps on how to use liquid latex makeup outlined above and incorporating the tips and tricks, you can achieve professional-quality results while ensuring safety and comfort. Practice is key, so don’t hesitate to experiment with different techniques, colors, and textures to refine your skills.
Whether you’re designing realistic wounds for a film or creating imaginative body art for a costume party, liquid latex is a versatile and essential tool for bringing your artistic vision to life. Always remember to prioritize skin care and proper removal to maintain a safe and enjoyable experience. With patience and creativity, your possibilities are limitless!
About the Author
Jane Hubbard is a passionate beauty expert with a wealth of experience in makeup, hair, and overall beauty techniques. After years of working as a hairdresser specialist, she followed her entrepreneurial spirit and started her own consultancy business.
Jane has always been driven by her desire to help others feel confident in their own skin, and she does this by sharing her knowledge, experiences, and practical beauty tips. Through her consultancy, she empowers individuals to embrace their unique beauty, offering tailored guidance that boosts both self-esteem and personal style.
Professional Focus
- Specializes in makeup, hairstyling, and beauty consulting.
- Provides personalized beauty advice, tips, and techniques to help individuals feel confident in their appearance.
- Dedicated to staying up-to-date with the latest industry trends and developments.
- Passionate about creating a comfortable and empowering experience for every client.
Education History
- University of Craft and Design – Bachelor of Fine Arts (BFA) in Woodworking and Furniture Design
- Woodworking Apprenticeships – Extensive hands-on training with skilled craftsmen to refine carpentry and furniture making techniques
- Online Courses & Masterclasses – Continued education in advanced woodworking techniques, design principles, and specialized tools
Expertise:
- Makeup artistry, hairstyling, and beauty consulting.
- Personalized beauty techniques to enhance confidence and self-expression.
- Educating clients on how to maintain their beauty routines at home.