
Are you seeking an easy and efficient way to achieve a flawless contoured look? Look no further than the NYX Wonder Stick!
The NYX Wonder Stick is a versatile and easy-to-use makeup tool designed to help you contour and highlight your face effortlessly. With its dual-ended design, this stick features a creamy contour shade on one end and a brightening highlighter on the other, allowing you to sculpt and define your features in just a few simple steps. Whether you’re a makeup beginner or a seasoned pro, the NYX Wonder Stick is a must-have for achieving a seamless, natural-looking finish.
In this guide on how to use NYX wonder stick, we’ll walk you through the steps to use this product and enhance your makeup routine with ease.
What Are the Benefits of Using NYX Wonder Stick?
The NYX Wonder Stick has become a cult-favorite among beauty enthusiasts for its many benefits and versatility. Here are some of the top reasons why you should add this product to your makeup collection:
- Dual-ended Design: The stick’s dual-ended design makes it a convenient and compact option for on-the-go touch-ups. You no longer have to carry multiple products for contouring and highlighting, as the Wonder Stick has both in one sleek package.
- Easy Application: The creamy texture of the contour shade glides effortlessly onto the skin, making it easy to blend and build up as desired. The highlighter end provides a sheer, luminous finish that adds a subtle glow to the high points of your face.
- Versatility: The Wonder Stick can be used for contouring and highlighting, as well as creating a flawless base. The darker shade can conceal imperfections and add dimension to the face, while the lighter shade can be used as a concealer or even an eyeshadow base.
- Wide Shade Range: The Wonder Stick comes in various shades to cater to different skin tones. Whether you have fair, medium, or deep skin, there is a shade that will work for you.
What Will You Need?
To use the Wonder Stick, you will need a few basic items:
- The Wonder Stick: Of course, you will need to have the product itself. It is available in drugstores and online.
- A Makeup Sponge or Brush: You can use a damp makeup sponge or a brush to blend the product. Both work well, so it’s just a matter of personal preference.
- Foundation: If you want an all-over flawless base, it is recommended to start with foundation before using the Wonder Stick.
- Setting Powder: It is important to set your contour and highlight with a translucent powder to ensure that they stay in place all day.
10 Easy Steps on How to Use NYX Wonder Stick
Step 1. Prep Your Skin:
Preparing your skin is crucial to ensure smooth application and a natural-looking finish. Start by cleansing your face to remove dirt, oil, or leftover makeup. Follow this with a lightweight moisturizer suited to your skin type to provide hydration and create a soft base for makeup application. For added longevity, apply a primer to blur pores, even out skin texture, and help the Wonder Stick blend seamlessly.
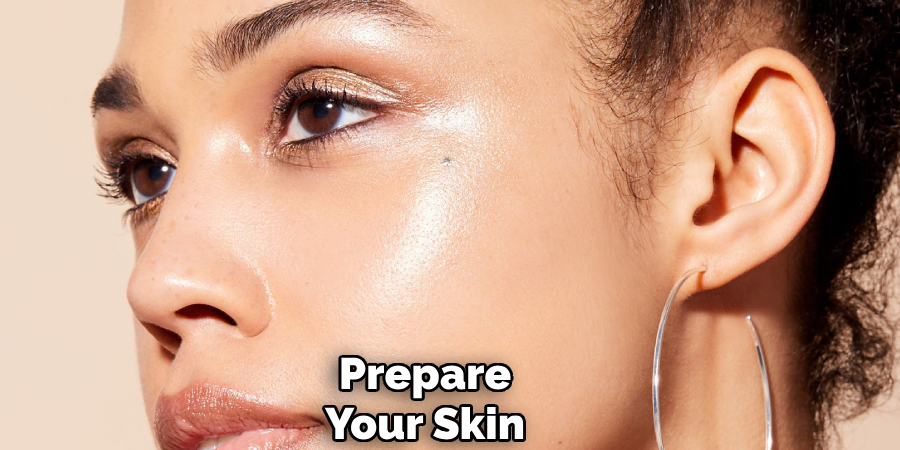
Allow the moisturizer and primer to fully absorb into your skin before moving on to the next step. This preparation not only improves the performance of the Wonder Stick but also helps achieve a flawless and professional-looking result.
Step 2. Apply Foundation:
Choose a foundation that matches your skin tone and complements your skin type. Apply the foundation evenly across your face using a makeup sponge, brush, or clean fingertips. Start in the center and blend outwards, focusing on areas that need additional coverage, such as redness or uneven texture.
Be sure to blend well along the jawline and neck to avoid any noticeable lines. For a natural finish, use light layers and build up coverage only where required. This step creates a smooth canvas that enhances the overall effectiveness of the Wonder Stick, ensuring a polished and cohesive look.
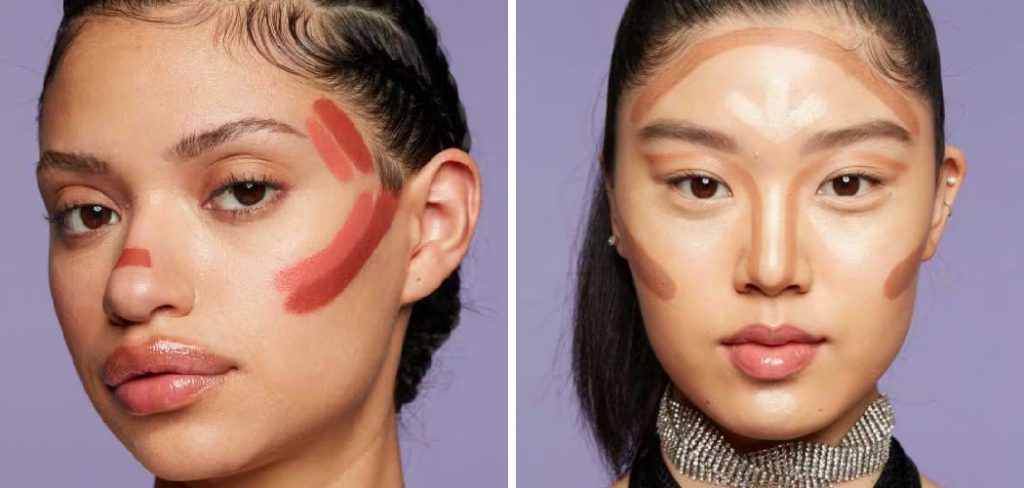
Step 3. Identify Your Features:
Locate the areas of your face you want to contour and highlight. Typically, contouring is done on the hollows of your cheeks, along the jawline, the sides of the nose, and the hairline. Highlighting focuses on areas like the center of the forehead, down the bridge of the nose, the tops of the cheekbones, and the cupid’s bow.
Step 4. Apply the Contour Shade:
Using the contour shade of the Wonder Stick, draw lines along the areas you wish to define. For the hollows of your cheeks, softly glide the contour shade from the beginning of your ear towards the corner of your mouth, stopping about halfway to create a natural effect. Along the jawline, carefully trace the product under your jaw to enhance the appearance of a sharper, more sculpted line.
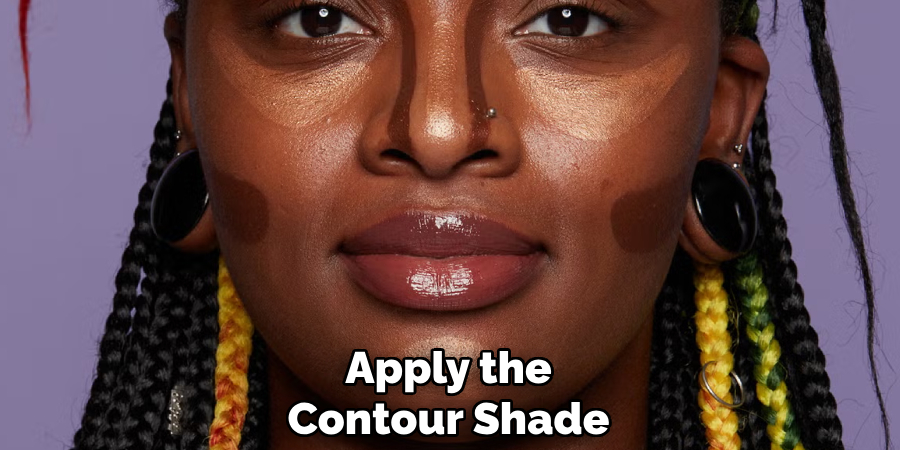
On the sides of your nose, apply a thin and precise line running from the inner corner of your eyebrows down to the nostrils to create the illusion of a slimmer nose. Lastly, blend the product gently along your hairline to add depth and balance to your face shape. Be sure to use light strokes for a seamless and natural application.
Step 5. Apply the Highlight Shade:
To enhance the high points of your face, select a highlight shade that complements your skin tone. Focus on areas where light naturally hits, such as the tops of your cheekbones, the bridge of your nose, the center of your forehead, and your cupid’s bow. Using a small brush or your fingertips, gently apply the highlight in these areas for a radiant, glow-like effect.
For a subtle pop, you can also add a small amount to the inner corners of your eyes and just beneath your brow bones. Be sure to blend the highlight seamlessly into your skin or foundation to avoid visible lines and ensure a natural, luminous finish.
Step 6. Blend the Contour:
Blocking your contour properly is essential to achieve a flawless and natural look. Using a dense blending brush, a makeup sponge, or your fingers, blend the contour lines along your cheekbones, jawline, and hairline in gentle circular or upward motions. Be sure to soften any harsh lines, ensuring the contour seamlessly melds with your foundation.
A gradual, well-blended transition between contoured areas and your natural skin tone will create a subtle, sculpted effect without appearing heavy or overly defined. Take your time to build up the intensity as needed, keeping the overall finish balanced and even.
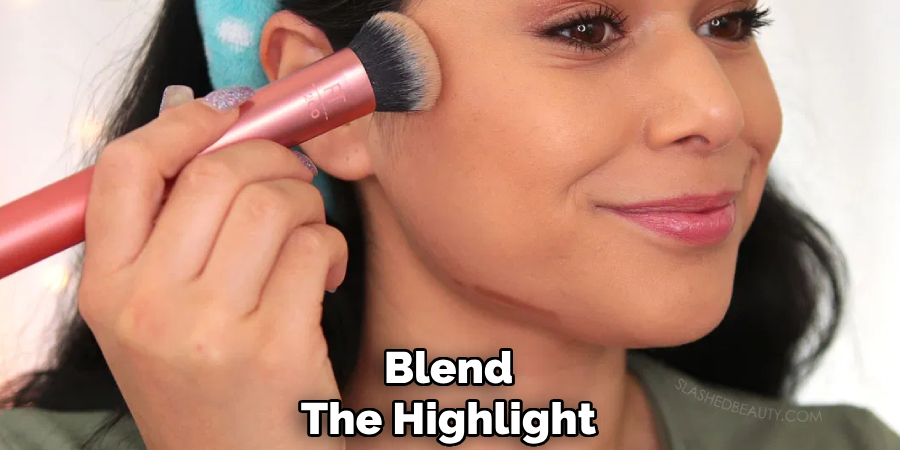
Step 7. Blend the Highlight:
Using a clean makeup brush or sponge, gently blend the highlighter applied to the high points of your face, such as the tops of your cheekbones, the bridge of your nose, the cupid’s bow, and the brow bone. Use soft, tapping, or sweeping motions to diffuse the edges, ensuring the highlighter integrates with your foundation and contour.
The goal is a natural glow that enhances your features without harsh streaks or patches. Take care not to overblend, as you still want the areas to catch the light beautifully.
Step 8. Set with Translucent Powder:
To lock your makeup in place and reduce shine, lightly dust a translucent powder over your face. Focus on areas that tend to get oily, such as the T-zone, while avoiding excessive application on areas where you applied highlighter to preserve the glow. Use a fluffy brush or a makeup sponge to press the powder into the skin for a smooth, airbrushed finish.
Step 9. Add Finishing Touches:
Complete your look by adding those final details that tie everything together. Apply a setting spray to ensure your makeup lasts throughout the day or night, giving your skin a fresh and natural finish. If desired, add a shimmer to the inner corners of your eyes or beneath your brow bone for an extra pop.
Check that your brows are perfectly groomed and touch up any areas that need slight adjustments. Finally, apply a lip gloss or lipstick to complement your look, and you’re ready to shine!
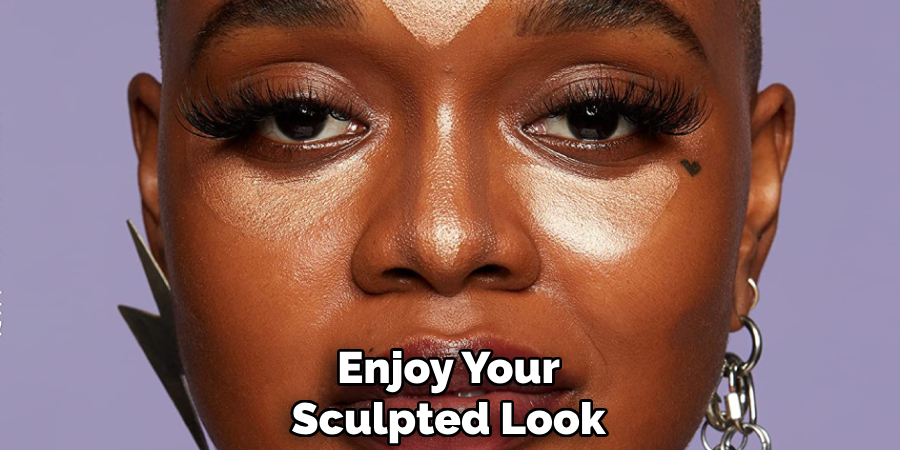
Step 10. Enjoy Your Sculpted Look:
Take a moment to admire your beautifully sculpted makeup look, which highlights your hard work and attention to detail. Whether you’re stepping out for a special occasion or simply enhancing your natural beauty, feel confident and radiant. Remember, makeup is an art form and a tool for self-expression—wear it proudly and enjoy the confidence it brings!
By following these simple steps, you can make the most out of the NYX Wonder Stick and effortlessly achieve a flawless, sculpted look.
Conclusion
The NYX Wonder Stick is a versatile, user-friendly product that simplifies contouring and highlighting.
Its dual-ended design allows for precise application, making it suitable for beginners and makeup enthusiasts. By selecting the right shade and blending thoughtfully, you can achieve a beautifully sculpted look that enhances your features. With practice and creativity, the NYX Wonder Stick can become an essential tool in your makeup routine, helping you express your unique style effortlessly.
Hopefully, this guide on how to use NYX wonder stick has provided you with all the information you need to get started using the NYX Wonder Stick.
About the Author
Jane Hubbard is a passionate beauty expert with a wealth of experience in makeup, hair, and overall beauty techniques. After years of working as a hairdresser specialist, she followed her entrepreneurial spirit and started her own consultancy business.
Jane has always been driven by her desire to help others feel confident in their own skin, and she does this by sharing her knowledge, experiences, and practical beauty tips. Through her consultancy, she empowers individuals to embrace their unique beauty, offering tailored guidance that boosts both self-esteem and personal style.
Professional Focus
- Specializes in makeup, hairstyling, and beauty consulting.
- Provides personalized beauty advice, tips, and techniques to help individuals feel confident in their appearance.
- Dedicated to staying up-to-date with the latest industry trends and developments.
- Passionate about creating a comfortable and empowering experience for every client.
Education History
- University of Craft and Design – Bachelor of Fine Arts (BFA) in Woodworking and Furniture Design
- Woodworking Apprenticeships – Extensive hands-on training with skilled craftsmen to refine carpentry and furniture making techniques
- Online Courses & Masterclasses – Continued education in advanced woodworking techniques, design principles, and specialized tools
Expertise:
- Makeup artistry, hairstyling, and beauty consulting.
- Personalized beauty techniques to enhance confidence and self-expression.
- Educating clients on how to maintain their beauty routines at home.