
Are you tired of seeing pimple patches advertised everywhere but not really knowing how to use them? Look no further, as this guide will provide you with a step-by-step breakdown on how to use pimple patch for clearer skin.

Diy pimple patch is an easy and effective way to address breakouts quickly and discreetly. These small, adhesive patches are designed to cover blemishes, protect them from dirt and bacteria, and help draw out impurities. Perfect for different skin types, they work best when placed on clean, dry skin and left on for several hours or overnight.
With proper use, pimple patches can speed up the healing process and reduce redness, making them a go-to solution for clearer skin. Let’s take a closer look at how pimple patches work and some tips for using them effectively.
What Are the Benefits of Pimple Patches?
Pimple patches offer several benefits for those struggling with acne or occasional breakouts. Here are some of the main advantages of using pimple patches:
- Protects and Covers Blemishes: Pimple patches act as a barrier between your pimple and external factors, such as dirt, bacteria, and makeup. This not only helps prevent further irritation or infection but also allows your skin to heal without interference.
- Draws Out Impurities: Many pimple patches contain ingredients such as hydrocolloids that work to draw out impurities from clogged pores. This can help speed up the healing process and reduce inflammation.
- Reduces Redness and Swelling: By absorbing excess fluid and oil from the pimple, pimple patches can help reduce redness and swelling. This can make your pimple look less noticeable and feel less painful.
- Promotes Faster Healing: Pimple patches create a moist environment around the affected area, which helps promote faster healing. They also prevent scabbing and minimize the risk of scarring.
- Convenient to Use: Pimple patches are small, discreet, and easy to use. You can wear them overnight or throughout the day without anyone even noticing. They also come in various sizes to fit different types of pimples.
What Will You Need?
Before using pimple patches, it’s essential to gather all the necessary tools for proper application. Here are some things you will need:
- Pimple patches of your choice (hydrocolloid or medicated)
- Facial cleanser
- Towel or facial tissue
- Tweezers (optional)
- Moisturizer (optional)
Once you have all the tools, you can begin using your pimple patches.
10 Easy Steps on How to Use Pimple Patch
Step 1. Clean Your Face
Begin by thoroughly cleansing your face with a gentle facial cleanser to remove dirt, oil, and makeup. This step ensures a clean surface for the pimple patch to adhere effectively. Use lukewarm water to avoid irritating your skin, and gently massage the cleanser onto your face.
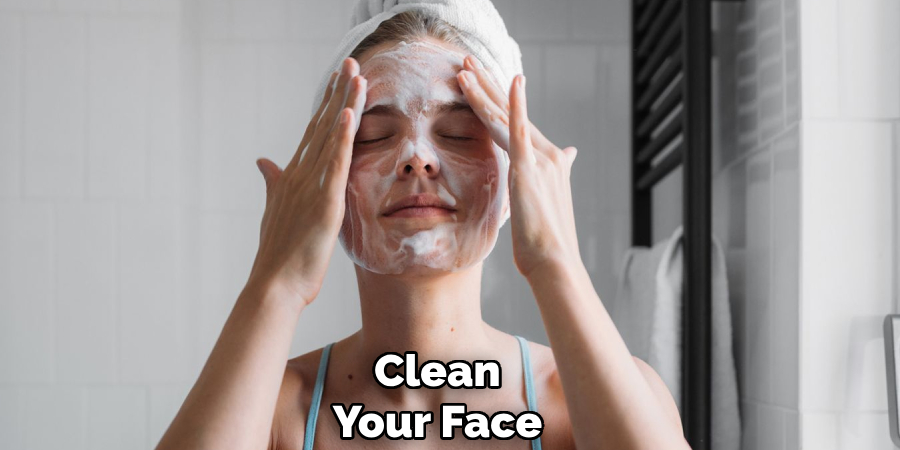
Rinse thoroughly and pat your skin dry using a clean towel or facial tissue. Ensure your skin is completely dry before proceeding to the next step, as moisture can compromise the adhesive properties of the patch and impact its effectiveness.
Step 2. Avoid Applying Extra Products
Once your face is clean and dry, it’s important to avoid applying any additional products, such as serums, moisturizers, or oils, to the area where you intend to use the pimple patch. These products can create a barrier between your skin and the patch, preventing it from sticking properly and reducing its effectiveness.
Keeping your skin free from any extra layers ensures that the patch can adhere securely and allow its active ingredients to work directly on the blemish. If you’re completing your skincare routine, apply other products to the rest of your face, but leave the affected area untouched until after removing the patch. This step helps maintain the patch’s functionality and ensures the best results.
Step 3. Select the Right Size
Choosing the right size for your patch is crucial for optimal coverage and effectiveness. Acne patches come in various sizes to accommodate blemishes of different dimensions. Selecting a patch that fully covers the blemish ensures that the active ingredients can target the affected area while protecting it from external irritants, such as dirt and bacteria.
If the patch is too small, it may not provide adequate coverage, leaving parts of the blemish exposed and reducing its healing potential. On the other hand, using an overly large patch can overlap with healthy skin unnecessarily, which might make it less comfortable or wasteful. Assess the size of the blemish carefully before applying the patch, and choose an option that perfectly fits or slightly exceeds the diameter of the blemish for the best results.
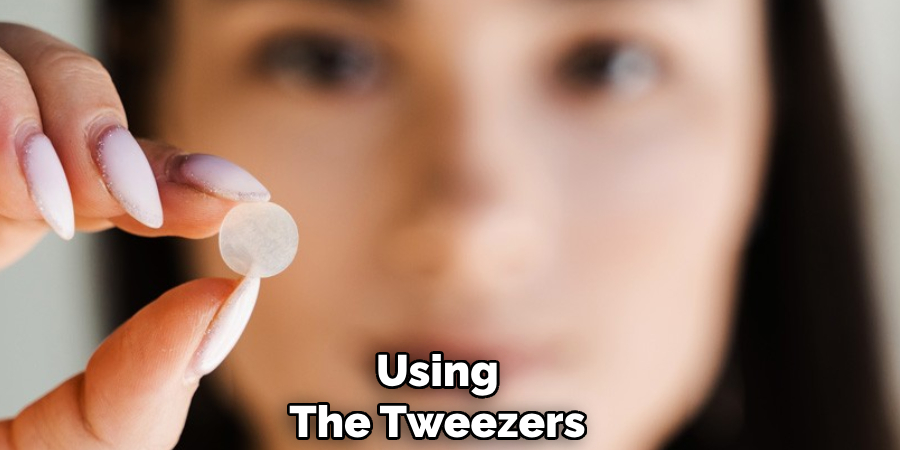
Step 4. Use Tweezers
Using tweezers ensures that the blemish patch is applied with precision and that the adhesive remains clean and effective. Begin by sanitizing the tweezers with rubbing alcohol to remove any potential bacteria or residue. Carefully peel the patch off its backing using the tweezers, being cautious not to touch the adhesive side with your fingers.
This minimizes contamination and helps the patch adhere properly to the skin. Once applied, gently press down on the edges of the patch to secure it in place. Proper use of tweezers not only promotes hygiene but also improves the patch’s overall performance.
Step 5. Apply the Patch
To apply the patch effectively, first identify a clean, dry area of skin, free from lotions or oils, as these can interfere with adhesion. Position the patch on the desired spot, ensuring that it lies flat against the skin without any wrinkles or air bubbles. Smooth the patch gently from the center outward to ensure it is completely secured and enhances its effectiveness.
Avoid rubbing it excessively, as this could compromise the adhesive. Once applied, check that the edges are firmly attached to ensure the patch remains in place throughout its usage.
Step 6. Leave It On
Leave the patch on for the duration specified in the product instructions, typically ranging from several hours to a full day, depending on its intended purpose. Avoid exposing the patch to excessive moisture, such as during activities like swimming or prolonged bathing, as this could weaken the adhesive or reduce its effectiveness.
If discomfort or irritation occurs, remove the patch immediately and consult the product guidelines or a healthcare professional. Be mindful to periodically check that the patch remains securely in place to ensure optimal results.
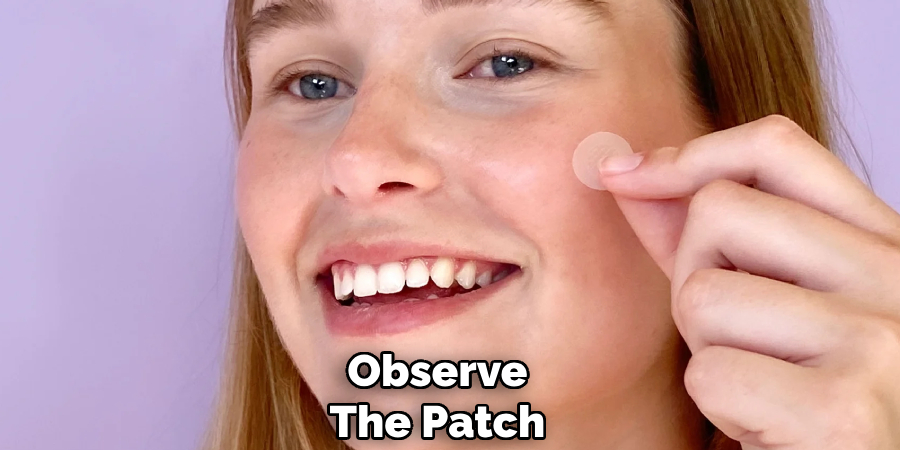
Step 7. Observe the Patch
Regularly monitor the patch during the recommended application period to ensure it remains secure and intact. If you notice the patch beginning to peel or shift, take the necessary measures to adjust or replace it according to the product instructions.
Pay attention to how your skin reacts to the patch; signs of redness, swelling, or irritation may indicate sensitivity. Consistent observation will help maintain the patch’s effectiveness and its proper application throughout the usage duration. Always follow the manufacturer’s guidelines to achieve the intended results.
Step 8. Remove Gently
When it’s time to remove the patch, do so carefully to avoid discomfort and prevent skin irritation. Begin by peeling the edges slowly, ensuring you do not tug or pull too forcefully, as this can harm the skin’s surface. If the patch feels resistant, consider using a small amount of warm water or an oil-based cleanser around the edges to loosen the adhesive gently. Once the patch is removed, inspect the area for any residue or signs of irritation, such as redness or sensitivity.
Clean the skin with mild soap and water to remove any remaining adhesive and pat dry with a soft towel. Keeping the application area clean and moisturized can help maintain healthy skin and prepare it for future patch applications if needed. Always discard the used patch responsibly, following the product’s disposal instructions.
Step 9. Cleanse Again
After discarding the used patch and inspecting the skin, cleanse the area again to ensure it is free from any lingering residue or product. Use a gentle cleanser and lukewarm water to wash the skin gently. Avoid harsh scrubbing to prevent irritation. Once clean, gently pat the area dry with a fresh, soft towel. This step helps maintain proper hygiene and prepares the skin for optimal recovery or the following application, if necessary.
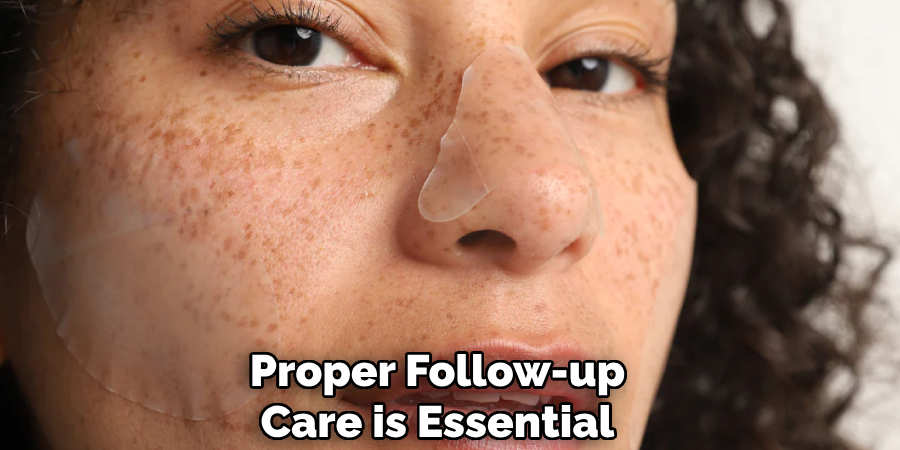
Step 10. Follow-Up Care
Proper follow-up care is essential to ensure the skin remains healthy and to maximize the treatment’s effectiveness. Monitor the area for any signs of irritation, redness, or discomfort, and address these promptly. Apply a soothing moisturizer or a prescribed topical treatment as recommended to support the skin’s healing process. Maintain a consistent skincare routine and protect your skin from excessive sun exposure by using sunscreen as needed.
If concerns persist or worsen, consult a healthcare professional for further guidance. Regular care and attention are key to achieving the best results.
By following these simple steps, you can effectively use pimple patches to tackle blemishes and support healthier skin!
Conclusion
How to use pimple patch can be a straightforward and effective way to manage blemishes when used correctly.
By selecting a patch that suits your skin type and applying it to clean, dry skin, you can target breakouts directly without unnecessary irritation. Consistency is key, as well as following the recommended steps for application and removal. Remember always to pair pimple patches with a gentle skincare routine and to avoid picking at blemishes.
With proper use, pimple patches can contribute to clearer, healthier skin over time.
About the Author
Jane Hubbard is a passionate beauty expert with a wealth of experience in makeup, hair, and overall beauty techniques. After years of working as a hairdresser specialist, she followed her entrepreneurial spirit and started her own consultancy business.
Jane has always been driven by her desire to help others feel confident in their own skin, and she does this by sharing her knowledge, experiences, and practical beauty tips. Through her consultancy, she empowers individuals to embrace their unique beauty, offering tailored guidance that boosts both self-esteem and personal style.
Professional Focus
- Specializes in makeup, hairstyling, and beauty consulting.
- Provides personalized beauty advice, tips, and techniques to help individuals feel confident in their appearance.
- Dedicated to staying up-to-date with the latest industry trends and developments.
- Passionate about creating a comfortable and empowering experience for every client.
Education History
- University of Craft and Design – Bachelor of Fine Arts (BFA) in Woodworking and Furniture Design
- Woodworking Apprenticeships – Extensive hands-on training with skilled craftsmen to refine carpentry and furniture making techniques
- Online Courses & Masterclasses – Continued education in advanced woodworking techniques, design principles, and specialized tools
Expertise:
- Makeup artistry, hairstyling, and beauty consulting.
- Personalized beauty techniques to enhance confidence and self-expression.
- Educating clients on how to maintain their beauty routines at home.