
Are you tired of the same old brown and neutral eyeshadow looks? Want to add a bold pop of color to your makeup routine? Red eyeshadow is the perfect solution for you!
Red eyeshadow makeup can be a bold and striking choice, but when applied correctly, it can elevate your makeup look with sophistication and flair. While many are intimidated by the idea of using such a vivid color, red eyeshadow is surprisingly versatile and works well across different skin tones and styles. From subtle accents to dramatic statements, mastering the art of wearing red eyeshadow allows you to create unique and stunning looks for any occasion.
This guide on how to wear red eyeshadow will walk you through tips and techniques to ensure your red eyeshadow looks flawless and complements the rest of your makeup perfectly.
What Are the Benefits of Wearing Red Eyeshadow?
- Makes a Bold Statement: Red eyeshadow is not for the faint of heart. It instantly creates a bold and daring look that will turn heads.
- Adds Depth and Dimension: Adding red to your eyeshadow palette can bring depth and dimension to your eye makeup. The warm tones of red add warmth and dimension, making your eyes appear more vibrant and sultry.
- Complements Different Skin Tones: Contrary to popular belief, red eyeshadow is not limited to certain skin tones. With the right shade, red can complement a wide range of skin tones, from fair to dark.
- Versatile for Any Occasion: Whether you’re going for a casual daytime look or a bold evening statement, red eyeshadow can cater to any occasion. You can create a subtle look for everyday wear or amp it up with a darker shade for a special event.
- Enhances Eye Color: Red eyeshadow has the power to improve your natural eye color. It makes blue eyes appear brighter, green eyes more intense, and brown eyes warmer.
What Will You Need?
To achieve a flawless red eyeshadow look, you will need the following items:
- A high-quality red eyeshadow palette with various shades of red to choose from
- An eye primer to help the eyeshadow stay in place and prevent creasing
- An angled brush for precise application on your eyelids
- A blending brush for creating a seamless gradient effect
- Eyeliner and mascara to complete the look
Once you have these items, you can start creating your perfect red eyeshadow look. But before we get into the steps, let’s discuss some tips and tricks to ensure your red eyeshadow look turns out perfectly.
9 Easy Steps on How to Wear Red Eyeshadow
Step 1. Prepare Your Eyelids
To ensure your red eyeshadow stays vibrant and lasts all day, it’s essential to properly prepare your eyelids. Start by cleansing your eyelids to remove any oil, dirt, or leftover makeup. This creates a clean base for your eyeshadow application. Next, apply a high-quality eye primer to your lids. The primer acts as a barrier between your skin and the eyeshadow while enhancing the vibrancy of the color and preventing creasing or smudging. Lightly set the primer with a translucent powder to provide a smooth, even surface for blending. Taking this step will help your red eyeshadow not only stay in place but also achieve a professional and polished finish.

Step 2. Set the Primer
Using a fluffy brush, gently dust a translucent setting powder over the primer. This step helps to lock the primer in place and creates an even, matte base for your eyeshadow. Make sure to apply the powder evenly and avoid excessive product buildup, as this could affect the blending of your red eyeshadow. A correctly set primer ensures smoother application and longer-lasting wear.
Step 3. Apply a Base Shade
Once the primer is set, apply a neutral or skin-toned base shade over your entire lid. This step not only creates a smooth canvas for your red eyeshadow but also makes blending easier and helps the colors transition more seamlessly. Use a fluffy shader brush to sweep the base shade lightly across your lid, ensuring it covers from the lash line to just below the brow bone. The base color provides a subtle layer of pigment that enhances the vibrancy of your red eyeshadow, making it pop while maintaining a natural gradient. Taking time to lay down this foundational shade is key to achieving that professional, flawless finish.
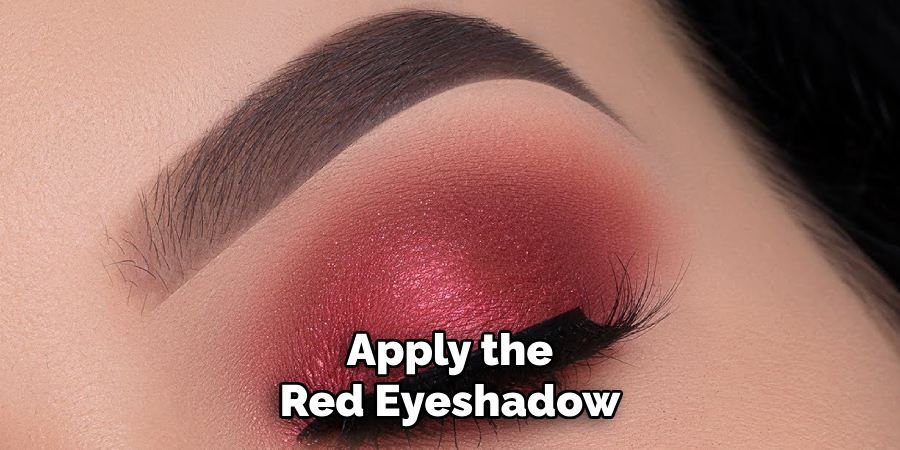
Step 4. Apply the Red Eyeshadow
Using a flat eyeshadow brush, pick up the red eyeshadow and gently tap off any excess product to prevent fallout. Start by patting the color onto the center of your eyelid, gradually building up the intensity as needed. This technique ensures an even and vibrant application while maintaining control over the pigment. Once the color is concentrated on the lid, use a clean, fluffy blending brush to diffuse the edges of the red eyeshadow softly.
Blend it outward towards the crease to create a seamless transition between the red and your base shade. If you want to add depth, consider layering a deeper red or burgundy hue in the outer corner of your eye, blending it carefully into the red for a gradient effect. Remember to work slowly and build the color gradually to avoid harsh lines, ensuring a polished and professional look.
Step 5. Blend, Blend, Blend
Blending is the key to achieving a flawless and well-executed eyeshadow look, so don’t rush this step. Use small, circular motions with your blending brush to ensure the colors merge seamlessly without any visible edges or streaks. If you notice any uneven patches, go back and lightly apply a bit more color, blending it as you go. It’s helpful to keep a clean, fluffy brush handy to soften transitions further and diffuse any harsh areas. You can also use a neutral or skin-toned shade to help smooth out the edges, if needed. Remember, patience and precision go a long way in creating a perfectly blended eye makeup look that stands out for its sophistication and balance.
Step 6. Add Dimension
To add dimension to your eye makeup, focus on incorporating depth and contrast through the strategic use of darker and lighter shades. Start by using a slightly darker color in the crease of your eyelid to create a shadow effect. Use a small, pointed brush to apply this shade with precision and blend it thoroughly to avoid harsh lines. If you want to deepen the definition further, you can layer an even darker shade onto the outer corner of the lid and blend it into the crease for a seamless transition. This technique adds intensity and makes the eyes appear more sculpted.
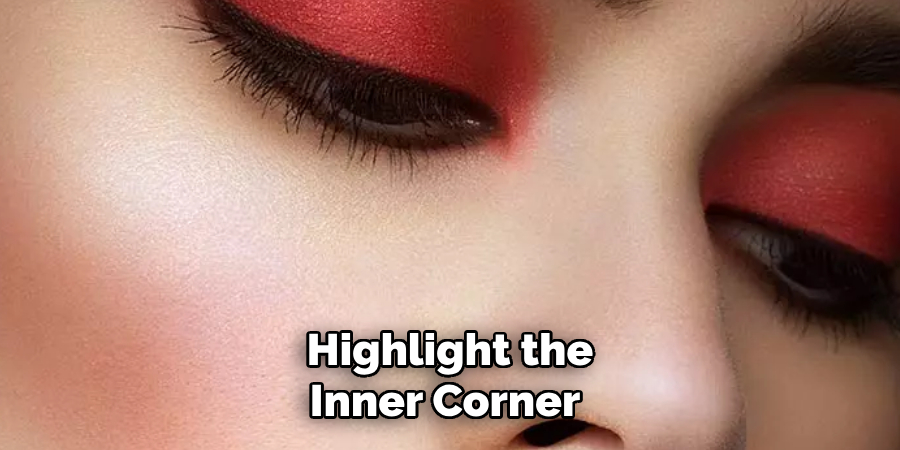
Step 7. Highlight the Inner Corner
To enhance the brightness and make your eyes pop, highlighting the inner corner is a key step. Use a small, precise brush or even your fingertip to apply a light, shimmery shade, such as a champagne, pearl, or soft gold, directly to the inner corner of your eyes. This not only adds a subtle glow but also creates the illusion of wider, more awake eyes. For a more dramatic effect, you can layer the highlight with a slightly brighter or metallic shade, ensuring it catches the light beautifully. Blending the highlight gently into the surrounding areas will create a cohesive and polished look. This little touch can elevate your entire eye makeup, making it look well-defined and radiant.
Step 8. Line Your Eyes
Using eyeliner can dramatically enhance the shape and definition of your eyes, drawing attention to them and complementing your overall makeup look. Start by selecting the type of eyeliner that suits your preferences and skill level—whether it’s pencil, gel, or liquid eyeliner. For a natural, everyday look, a thin line along the upper lash line can subtly define your eyes. If you’re aiming for a more striking or dramatic appearance, opt for a winged eyeliner or cat-eye style, extending the line outward for added flair. Make sure to use small, controlled strokes to ensure precision, and keep your hand steady for even application.
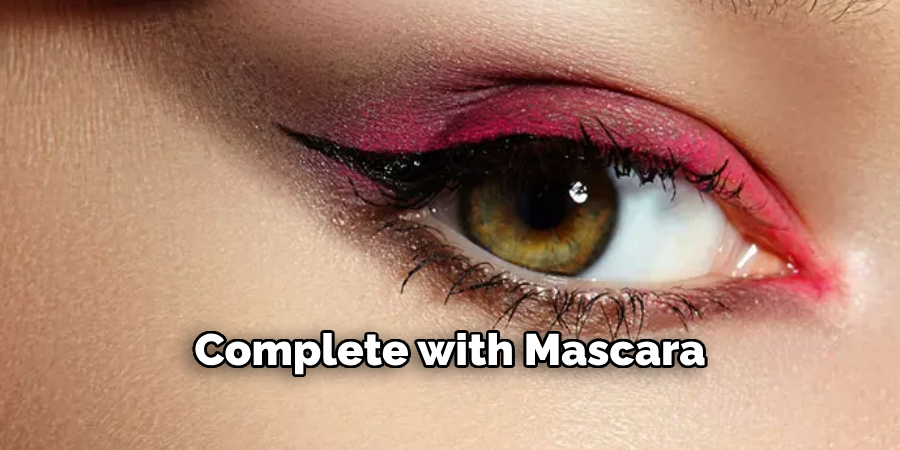
Step 9. Complete with Mascara
Mascara is the final touch that ties your entire eye makeup look together. It adds volume, length, and definition to your lashes, enhancing the overall appearance of your eyes. To apply mascara effectively, start by gently curling your lashes with an eyelash curler for an added lift. Then, using your mascara wand, begin at the roots of your upper lashes and wiggle it upwards in a zig-zag motion to coat each lash and prevent clumping evenly. For a more dramatic effect, apply multiple coats, allowing each layer to dry before adding the next.
Now you’re ready to rock your stunning red eyeshadow look! Whether you’re going for a bold statement or a subtle touch of color, confidence is your best accessory.
Conclusion
How to wear red eyeshadow can be a bold and empowering choice when done thoughtfully.
The key is to balance the vivid intensity of the color with complementary tones and careful blending. Whether pairing it with neutral shades, a glowing complexion, or striking eyeliner, it’s all about creating a harmonious look. Always consider the occasion, and remember that makeup is an art form that allows you to express your unique style.
With practice and confidence, red eyeshadow can elevate any look and make a standout statement.
About the Author
Jane Hubbard is a passionate beauty expert with a wealth of experience in makeup, hair, and overall beauty techniques. After years of working as a hairdresser specialist, she followed her entrepreneurial spirit and started her own consultancy business.
Jane has always been driven by her desire to help others feel confident in their own skin, and she does this by sharing her knowledge, experiences, and practical beauty tips. Through her consultancy, she empowers individuals to embrace their unique beauty, offering tailored guidance that boosts both self-esteem and personal style.
Professional Focus
- Specializes in makeup, hairstyling, and beauty consulting.
- Provides personalized beauty advice, tips, and techniques to help individuals feel confident in their appearance.
- Dedicated to staying up-to-date with the latest industry trends and developments.
- Passionate about creating a comfortable and empowering experience for every client.
Education History
- University of Craft and Design – Bachelor of Fine Arts (BFA) in Woodworking and Furniture Design
- Woodworking Apprenticeships – Extensive hands-on training with skilled craftsmen to refine carpentry and furniture making techniques
- Online Courses & Masterclasses – Continued education in advanced woodworking techniques, design principles, and specialized tools
Expertise:
- Makeup artistry, hairstyling, and beauty consulting.
- Personalized beauty techniques to enhance confidence and self-expression.
- Educating clients on how to maintain their beauty routines at home.