
Contouring is the process of using bronzer and blush to sculpt your face and create the illusion of a thinner, more defined jawline and cheekbones. While contouring is typically used on people with leaner faces, it can also be used to contour a fat face. We’ll show you how to contour a fat face using bronzer and blush in this post.
We’ll also give you tips for avoiding common pitfalls when contouring a fat face. So, if you’re looking for ways to make your face look thinner, read on!

There are a few reasons why it’s important to contour a fat face. First, contouring can help to create the illusion of a thinner face. Second, contouring can help to define your features and give your face more shape. Finally, contouring can help make you look more awake and put together.
Things You’ll Need
- Bronzer
- Blush
- Foundation
- Concealer
- Powder
- Kabuki brush
- Blush brush
- Angled brush
How to Contour a Fat Face Step by Step Guide
Step 1: Apply Foundation
The first step in how to contour a fat face is to apply your foundation. There are many different types of foundations, so choose one that matches your skin tone well. You can also use concealer in place of foundation for this step. Just make sure the product matches your skin tone. After applying foundation, set the product with a little bit of powder. This will help the contour a fat face steps that follow to stay put and blend well throughout the day.
Step 2: Apply Concealer
To make your face look thinner, apply a peach or pink-toned concealer to the areas of your jawline where you’d like it to appear more prominent. Then blend with a q-tip or clean fingers. You can also use an expert sculpting brush for more control. To apply concealer, use your fingers to dot it on under your eyes and around your nose. Then blend with a brush or your finger.

Here Are Some Quick Tips:
- Always pat or tap your face dry to avoid pulling the skin
- Use a powder puff for extra protection from makeup buildup
- Buff any excess makeup off with a bib before applying moisturizer; this will stop it from being too greasy and clogging your pores
Step 3: Powder
Apply some loose powder to your jawline (don’t forget the neck area) with a big powder brush. The peach or pink undertones in the concealer will remove any redness, while the powder will set it for longer wear! There are a few different types of powder that you can use to contour your face. A translucent powder is the best option to avoid adding any color to your skin. If you’re looking for a bit more coverage, try using a matte powder that is darker than your natural skin tone.
Step 4: Contour
To make your face appear thinner, contour along with your temples and jawline (extending slightly along the neck), blending the color out with an expert sculpting brush. If you’re using a powder, tap the excess off before applying.
1. Apply matte bronzer along the high points of your face to make it appear thinner
2. Apply a matte blush (in the same color family as your bronzer) to the apples of your cheeks for a more chiseled effect.
3. Use loose powder in an off-white or peach tone to highlight under your eyes, around your nose, and on your chin.
4. Set with translucent powder or an off-white powder
*Use a q-tip to blend out any harsh lines or edges
5. Use translucent powder to dust over the sculpted areas of your face for extra hold
Step 5: Add Blush
If you’re looking for extra oomph, add a coral or peach-toned blush to the apples of your cheeks. This will make sure your face appears more angular and, in turn, slimmer!
Step 6: Highlight
Next, apply your highlighter on top of your cheekbones, extending it onto the eye’s brow bone and inner corner. If you’re using a cream, pat on sparingly with your ring finger or expert sculpting brush.
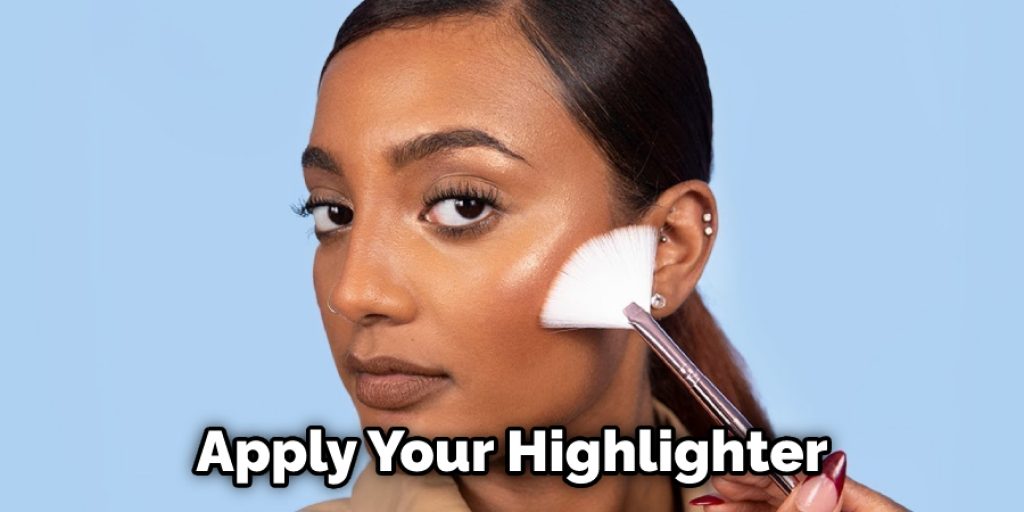
The best way to use a highlight is to apply it to the areas you want to appear brighter and more luminous, such as the cheekbones, brow bone, and inner corner of the eye. You can use a cream or powder highlighter, depending on your preference. If you’re using a cream highlighter, pat it on sparingly with your ring finger or expert sculpting brush. If you’re using a powder highlighter, tap the excess off before applying.
Step 7: Makeup
Finish by using an aluminizing (liquid or cream only) highlighter on the brow bone and inner corner of the eye, extending out towards the temple. You can also apply the same color to the lower lash line with an eyeliner brush for more definition around your eyes. Finally, apply mascara, but avoid using too much, which can age you more than contour.
For the rest of your makeup, stick to matte colors very close to your skin tone, with some shine on the center of the lips and cheekbones only. Do not use shimmer on the eyes or brow bone to make your face look plump and less defined.
Step 8: Finish
Finish your look by applying pinky nude lipstick to the center of the lips. Apply just enough so you can see it. Add more or less as necessary until you get the desired effect! Keep your eyebrows looking natural; there’s no need to fill them in unless they’re very sparse. A transparent mascara will add some definition but avoid using too much as it can make your face appear more round.
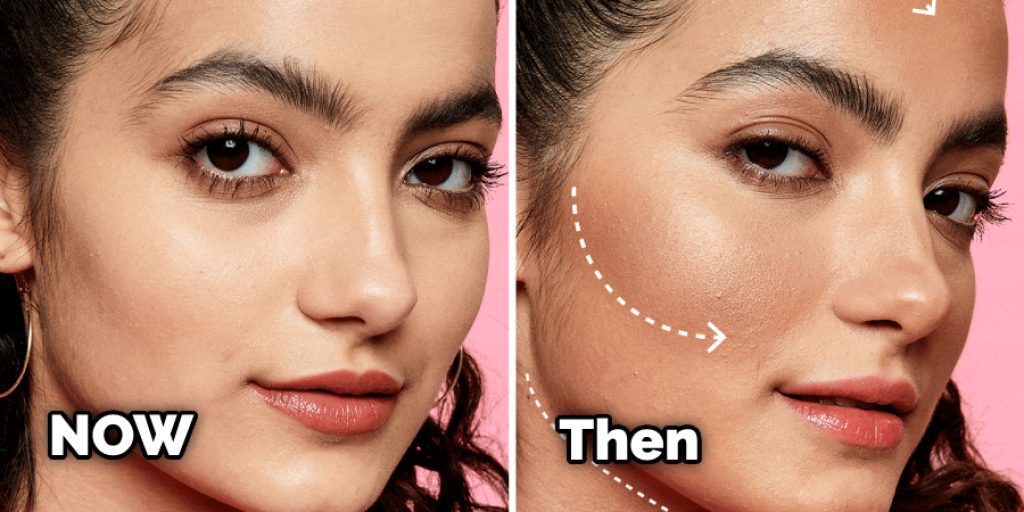
The other thing to consider for this project is how to make your face look thinner overall. You can do this by using a bronzer that is two shades darker than your natural skin tone and applying it in a V shape along your face. Please start at the top of your forehead, sweep it down towards your cheekbones and jawline, and then blend well. Keep reading for more information about how to contour a fat face.
What About the Recovery?
Gluten-free diets are all the rage right now, and for a good reason: they can be helpful for people who have celiac disease or gluten sensitivity. But what about the recovery? Here’s everything you need to know.
Going gluten-free is a big change, but it can be incredibly beneficial for those who have celiac disease or gluten sensitivity. You will feel better when you’re on a gluten-free diet, but you’ll also likely see some improvements in your overall health. However, transitioning to a gluten-free lifestyle can be difficult, especially initially. Here are a few tips to help make the transition easier.
1. Educate Yourself About Gluten
The best way to start transitioning to a gluten-free lifestyle is to educate yourself about how much gluten is in your favorite products. You can do this by reading the labels of everything you eat, checking them for the “gluten-free” label, or looking up recipes online to find out how they’re made. This is an important step because it will help you understand how much gluten you’re truly consuming.
2. Find a Gluten-Free Substitute for Your Favorite Treats
Finding a substitute for your favorite foods is another way to make transitioning easier. Some people swear by using alternative flours when baking, while others prefer rice flour instead of wheat flour. You can also try substituting xantham gum for gluten when baking: this is a great option for those who don’t like how xantham gum tastes.
3. Don’t Give Up on Your Favorite Foods and Drinks
While you may want to give up certain foods and drinks, such as beer or bread, you should never force yourself to quit eating or drinking something you enjoy. If you have a serious addiction to food or drink, even if it does contain gluten, consider speaking with your doctor about coping with these cravings in non-destructive ways.
4. Get Plenty of Gluten-Free Sleep
While sleep deprivation can affect how we feel overall, sleep is especially important when adapting to a new lifestyle. Getting the right amount of sleep will help your body and mind recover from daily stress, which is a major contributor to how you feel physically and emotionally.
Are There Any Risks?
While contouring and highlighting can help you achieve a thinner face, some risks are associated with these procedures. One risk is that you may not be getting all the nutrients your body needs if you’re not eating gluten-containing foods. So you’ll need to make sure you’re eating a well-rounded diet full of fruits, vegetables, and lean protein to make up for the nutrients you’re missing.

Another risk is that you may inadvertently consume gluten if you’re not careful about reading labels and checking ingredients. This can be dangerous for celiac disease or gluten sensitivity, as even small amounts of gluten can cause serious health problems. Finally, it’s important to note that not all gluten-free products are healthy. Just because a product is labeled, “gluten-free” does not mean it’s healthy.
Frequently Asked Question
How Long Do the Results Last?
The results of contouring and highlighting will last all day, but if you want to make them last even longer, set with a translucent powder.
When Will I See Results?
Your skin will look brighter and more sculpted. In addition, your features should appear much more defined, and angles should be sharper with contouring and highlighting, making your face appear thinner overall!
Where Can I Buy These Products?
These products are easily found at your local drugstore or makeup store.
You Can check it Out to Shorten a Long Face
Conclusion
If you have a round or full face, contouring is the key to creating definition and angles. You can slim your face and create a more angular appearance with the right products and techniques. Follow our tips for contouring a fat face, and see how dramatically different you look in just minutes! Have you tried contouring before? What are your favorite tips? Thanks for reading our post about how to contour a fat face.