
Are you looking for ways to contour your double chin? You’ve come to the right place! In this guide, we will provide you with tips and tricks on how to contour double chin.

Contouring is a popular makeup technique used to define and enhance facial features, and it can be particularly effective in minimizing the appearance of a double chin. With the right tools and techniques, you can create the illusion of a more sculpted and defined jawline. Whether you’re a beginner or experienced with makeup, learning how to contour a double chin can help boost your confidence and sharpen your overall look.
This guide on how to get rid of double chin will walk you through the steps to achieve a seamless and natural contour, tailored specifically to address a double chin.
What Are the Benefits of Contouring a Double Chin?
Contouring has become a popular makeup technique, and for good reason. It allows you to highlight your best features and minimize areas that you may not be as confident about. When it comes to contouring a double chin, the benefits are clear:
- Creates the illusion of a slimmer and more defined jawline
- It can help define and sculpt the face
- Enhances facial symmetry
- Boosts confidence and self-esteem
With these benefits in mind, learning how to contour a double chin is worth adding to your makeup routine.
What Will You Need?
Before getting started, make sure you have the following items on hand:
- Contour powder or cream (2 shades darker than your skin tone)
- Highlighter (1 shade lighter than your skin tone)
- Blending brush
- Angled contour brush
Once you have these items, you can begin the process of contouring your double chin.
10 Easy Steps on How to Contour Double Chin
Step 1. Prep Your Skin

Start by cleansing your face to ensure a smooth and clean canvas for makeup application. Follow this with a lightweight moisturizer to hydrate your skin and prevent any dryness throughout the day. Allow the moisturizer to fully absorb, then apply a primer to even out your skin texture and help your makeup stay in place longer. A well-prepped base is essential for achieving a flawless contour that appears natural and lasts all day.
Step 2. Apply Foundation
Choose a foundation that matches your skin tone and offers the desired level of coverage. Apply small amounts of foundation to your face using a makeup sponge, brush, or your fingertips, starting at the center and blending outward. Focus on creating an even layer, ensuring that there are no harsh lines or streaks. Pay special attention to blending around the edges of your face, such as the jawline and hairline, for a seamless transition. This step sets the stage for a polished and natural look before moving on to contouring.
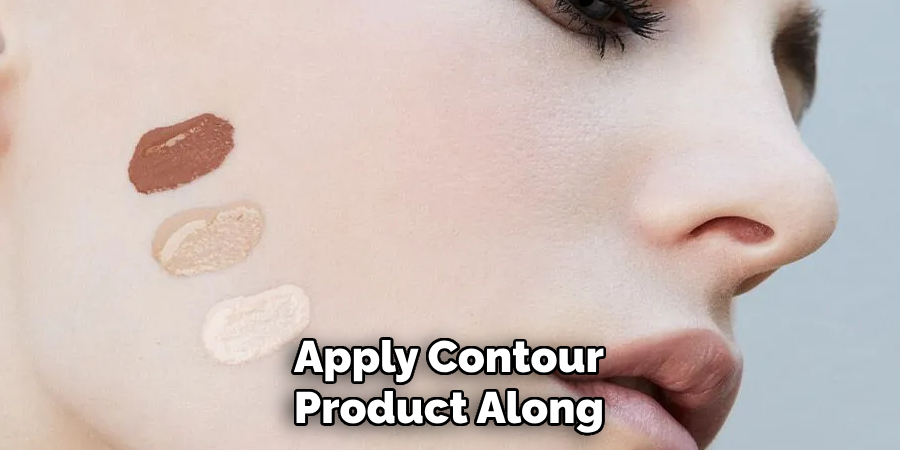
Step 3. Mark the Contour Zone
To mark the contour zone, identify the areas of your face you want to define and add dimension to. Generally, this includes the hollows of your cheeks, the sides of your nose, along your jawline, and the perimeter of your forehead. Using a contour product, such as a cream or powder, gently trace lines in these areas. For the cheeks, start from the top of your ear and angle the line toward the corner of your mouth, stopping midway. Be sure to adjust the placement of the contours to suit your face shape, as this will enhance your natural features more effectively.
Step 4. Blend Downward
Using a blending brush, sponge, or your fingers, begin to blend the contour lines downward in soft, circular motions. The goal is to diffuse any harsh lines while maintaining the shadows that define your features. Be patient during this step to ensure a seamless and natural finish. If needed, use a clean brush or sponge to further soften the edges. Remember, the key is to blend until the contour appears as a natural shadow rather than a distinct line.
Step 5. Focus on the Sides of Your Jawline
Using a smaller, angled brush or the edge of your sponge, apply contour product along the sides of your jawline, starting just below the ears and extending towards your chin. This technique helps create a sculpted and defined jawline. Be sure to blend the contour into your neck to avoid any noticeable lines or harsh edges, achieving a natural transition between your jaw and neckline. Take your time blending, as this step ensures a polished and cohesive look.
Step 6. Highlight the Chin and Jawline
Using a small, precise brush or your fingertips, apply a highlighting product to the center of your chin and along the middle of your jawline. This step enhances the natural structure of your face by drawing light to these areas. Choose a highlighter that complements your skin tone, ensuring a subtle glow rather than an overly shiny finish. Blend the product gently to avoid any stark lines, creating a seamless and radiant look. Proper highlighting will give your chin and jawline a lifted, luminous appearance, completing the sculpted effect.
Step 7. Blend the Highlighter
Blending the highlighter is a crucial step in achieving a natural and flawless finish. Use a damp makeup sponge or a soft blending brush to gently diffuse the product into your skin. Work in small, tapping motions to seamlessly merge the highlighter with the rest of your makeup. Focus on softening any harsh edges and ensuring an even application. The goal is to enhance your features without any visible streaks or buildup. Take your time with this step to create a cohesive and radiant look that appears effortless.
Step 8. Set Your Makeup
To ensure your makeup lasts all day, it’s essential to set it properly. Begin by using a lightweight setting powder to lock your foundation in place, focusing on areas prone to oiliness like the T-zone. Use a fluffy brush to lightly dust the powder over your face, avoiding any heavy application to maintain a natural finish. Follow up with a setting spray to add a touch of hydration and ensure everything stays in place. Hold the bottle 8-10 inches away from your face and mist evenly, allowing it to dry naturally. This final step helps to blend all layers of makeup together, giving you a polished and long-lasting look.

Step 9. Check Lighting
Before stepping out or capturing photos, ensure you check your makeup in good lighting. Natural daylight is ideal, as it reveals the true tones and blends of your makeup. Position yourself by a window or use a bright, daylight-simulating light to examine your look from different angles. This step helps to identify and correct any uneven blending, harsh lines, or mismatched tones that may be less visible under artificial lighting. Taking time to check your makeup under proper lighting ensures your look appears flawless in any setting.
Step 10. Finish the Look
To complete your makeup look, apply a setting spray or translucent powder to lock everything in place. This final step not only helps to keep your makeup intact throughout the day but also gives your skin a polished and finished appearance. Add a touch of highlighter to the high points of your face, such as the cheekbones, bridge of the nose, and cupid’s bow, for a radiant glow. Finally, double-check your look in natural lighting to ensure everything is seamless, and you’re ready to confidently step out and shine!
By following these steps and experimenting with different techniques and products, you can create a flawless makeup look that enhances your natural beauty.
5 Things You Should Avoid
1. Using the Wrong Shade of Contour
Choosing a contour color that is too dark or too light can create an unnatural look. Opt for a shade that is one to two tones darker than your natural skin tone to ensure it blends seamlessly and mimics a natural shadow.
2. Over-Applying Product
Applying too much contour can emphasize the area instead of slimming it down. Start with a small amount of product and build it up gradually to avoid a heavy, cakey appearance.
3. Neglecting to Blend Properly

Harsh lines and unblended edges can draw attention to your double chin rather than disguising it. Use a makeup sponge or a soft brush to carefully blend the contour for a smooth, natural finish.
4. Skipping Highlight and Balance
Ignoring highlight or not balancing your contour with other parts of your face can lead to an unpolished look. Adding light to areas like the chin and jawline can create contrast and enhance the overall effect.
5. Applying Contour in the Wrong Places
Placing the contour directly on the chin instead of along the jawline and under it can make the area look heavier. Focus the product beneath the jawline to define the chin and create a slimming illusion.
Conclusion
Mastering the art of contouring a double chin can significantly enhance your makeup routine, helping you achieve a more defined and sculpted appearance.
By using the right products, techniques, and shades, you can create the illusion of a well-defined jawline effortlessly. Remember to blend thoroughly, apply contour in the correct areas, and balance the look with complementary highlights. With practice and attention to detail, contouring can become a powerful tool to enhance your natural beauty confidently.
Hopefully, the article on how to contour double chin has provided helpful insights and tips for achieving a more sculpted and defined jawline.
About the Author
Jane Hubbard is a passionate beauty expert with a wealth of experience in makeup, hair, and overall beauty techniques. After years of working as a hairdresser specialist, she followed her entrepreneurial spirit and started her own consultancy business.
Jane has always been driven by her desire to help others feel confident in their own skin, and she does this by sharing her knowledge, experiences, and practical beauty tips. Through her consultancy, she empowers individuals to embrace their unique beauty, offering tailored guidance that boosts both self-esteem and personal style.
Professional Focus
Specializes in makeup, hairstyling, and beauty consulting.
Provides personalized beauty advice, tips, and techniques to help individuals feel confident in their appearance.
Dedicated to staying up-to-date with the latest industry trends and developments.
Passionate about creating a comfortable and empowering experience for every client.
Education History
University of Craft and Design – Bachelor of Fine Arts (BFA) in Woodworking and Furniture Design
Woodworking Apprenticeships – Extensive hands-on training with skilled craftsmen to refine carpentry and furniture making techniques
Online Courses & Masterclasses – Continued education in advanced woodworking techniques, design principles, and specialized tools
Expertise:
Makeup artistry, hairstyling, and beauty consulting.
Personalized beauty techniques to enhance confidence and self-expression.
Educating clients on how to maintain their beauty routines at home.