
Are you a monolid makeup wearer looking for tips on how to apply eyeliner? Whether you prefer liquid, gel, or pencil liners, having monolids can make it more challenging to create the perfect look. But fear not! With these expert tips and tricks, prepare to take your eyeliner game up.
If you have ever tried to do a cat eye or winged eyeliner on monolids, you know it can be tricky. Monolid eyes are unique and require some extra attention when applying makeup, particularly when putting on eyeliner. But don’t worry—with the right technique and practice, anyone can master the art of doing eyeliner for monolids! In this blog post, we will discuss how to do eyeliner for monolids in an easy step-by-step guide.
So if you’re looking to spruce up your look without having to struggle with complex techniques, read on!
Does Eyeliner Look Good on Monolids?
Absolutely! Eyeliner is a great way to accentuate and enhance the beauty of monolids. It can help create definition around your eyes and make them look bigger and brighter. As long as you follow the tips outlined above, you’ll be able to find the perfect eyeliner look for your eyes.
Have fun experimenting with different colors, textures, and shapes to create something unique that reflects your style!
What Will You Need?
Before you get started, there are a few things you’ll need to have on hand. Make sure that you have the following tools on-hand:
- An eye pencil, liquid or gel eyeliner
- A thin eyeliner brush
- Q-tips for cleaning up mistakes
- Eyeshadow primer (optional)
- Mascara (optional)
Once you have all of your supplies, you’re ready to get started.
10 Easy Steps on How to Do Eyeliner for Monolids
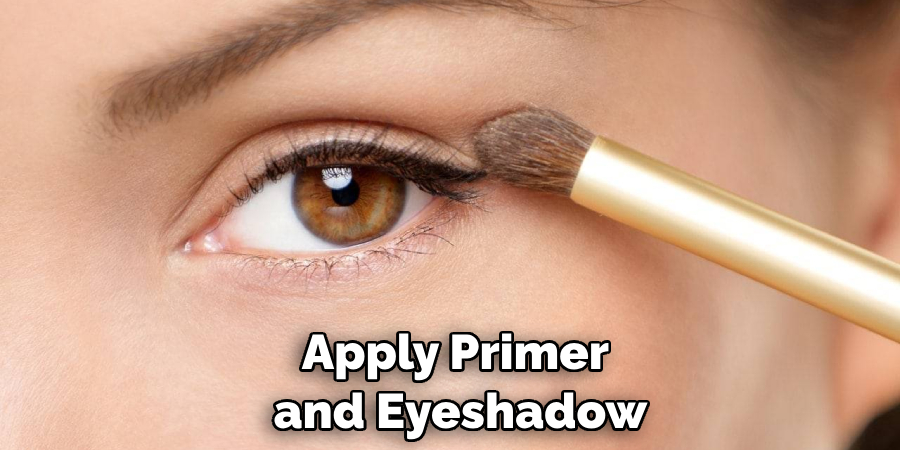
Step 1: Start with Primer and Eyeshadow
The first step in doing eyeliner for monolids is to apply primer and eyeshadow. This will provide a nice base on which you can easily apply the liner, helping it stay in place all day long. Make sure to use an eyeshadow that is the same shade as your eyeliner.
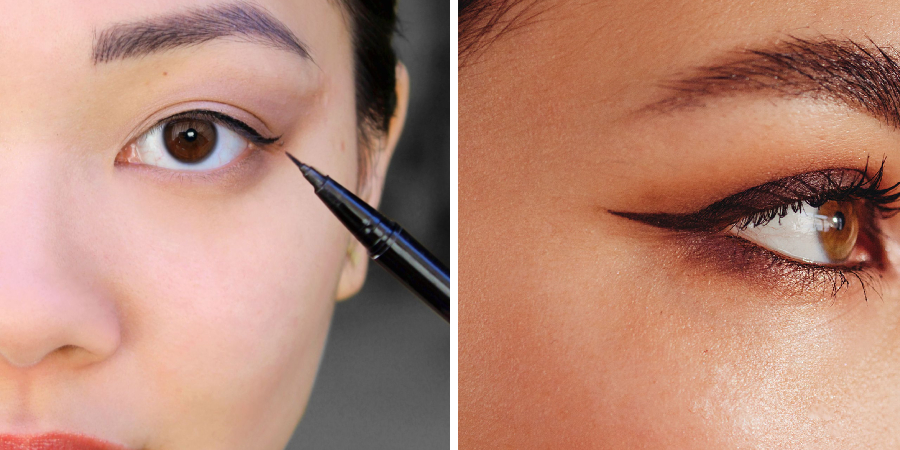
Step 2: Slowly Line Along Your Lash Line
Once you have your base ready, it’s time to start lining up! Start from the outer corner of your eye and slowly line along your lash line towards the inner corner of your eye. Use a light hand and take care not to overdo it.
Step 3: Extend Outwards Towards The End Of Your Eye
Using the same liner, extend outwards towards the end of your eye. You can make this line as thick or thin as you like, depending on how dramatic you want your look to be. Make sure that both lines meet in the middle, creating the perfect winged look.
Step 4: Create a V-Shape at The Outer Corner of Your Eye
Once you have finished lining along your lash line, create a V-shape at the outer corner of your eye. This will give your eyes a lifted and more open look. Be careful not to overdo this step; the goal is to create a subtle V-shape, not an overly dramatic one.
Step 5: Fill in Gaps With An Eyeliner Pencil
If there are any gaps or uneven lines, you can use an eyeliner pencil to fill them in. It is important to ensure that all of your lines are even and smooth so that the overall effect looks natural. Additionally, the pencil can be used to darken any areas that need more depth.
Step 6: Go Over Lines With A Liquid or Gel Liner
Once you have filled in any gaps, you can go over the lines with a liquid or gel liner. This will help to create a more precise and even look. Moreover, it will help to make sure that your lines stay in place all day.
Step 7: Apply Mascara On The Upper Lash Line
Once you have finished lining your eyes, it’s time to apply mascara on the upper lash line. This will add further definition and make your eyes stand out. Don’t forget to curl your lashes beforehand!
Step 8: Add Definition To The Lower Lash Line
If you want an even more dramatic look, you can add some definition to the lower lash line using a thin eyeliner brush. Start from the outer corner and move inwards towards the inner corner of your eye. Add additional coats of mascara for extra volume and thickness.
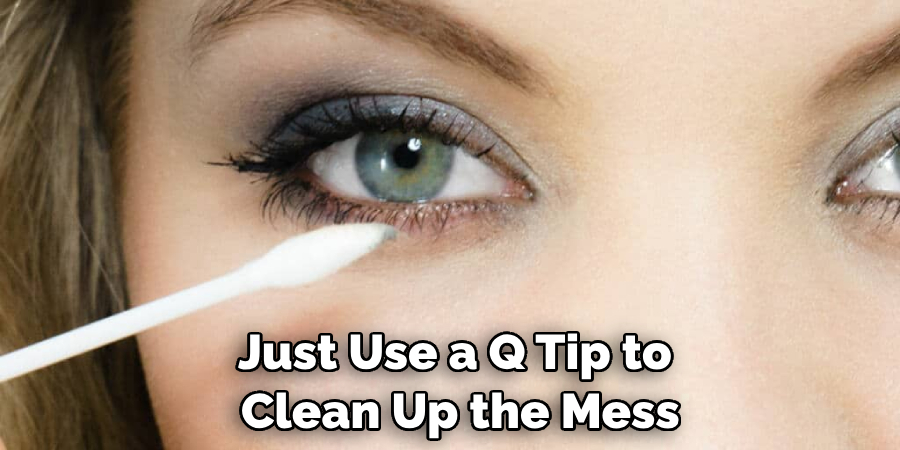
Step 9: Clean Up Mistakes
If you make any mistakes while applying your eyeliner, don’t worry! Just use a Q-tip to clean up the mess and start again. Keep in mind that practice makes perfect, and with time you’ll get better at it.
Step 10: Seal It With Setting Spray
Once you have finished applying your eyeliner for monolids, seal it with setting spray. This will help ensure that the makeup lasts all day long and won’t smudge or fade. Remember to always start with a small amount and then add more if needed.
And there you have it—10 easy steps on how to do eyeliner for monolids! With practice and patience, soon enough, you’ll be able to perfect this look in no time.
5 Additional Tips and Tricks
1. Apply your eyeliner in short strokes to avoid a single thick line that can look too harsh.
2. Use an angled brush and gel liner to create more precise lines and better control of the angle and shape of the wings.
3. If you want a softer, smokier look, use eye shadow instead of a liquid liner for a less defined line.
4. Make sure to begin from the inner corner of your eye when starting to apply the eyeliner, as this will help keep everything symmetrical.
5. When applying eyeliner on your lower lash line, start near the outer corners of your eyes and draw inward at a slight diagonal angle rather than applying it straight across – this will give it a more natural effect and make your eyes look bigger.
With these tips, you can create an eye-catching look with ease!
6 Things You Should Avoid
- Avoid using darker colors near the inner corners of your eyes, as this can make them appear smaller.
- Don’t draw one continuous line from the inner corner to the outer corner – this won’t help you achieve that winged look.
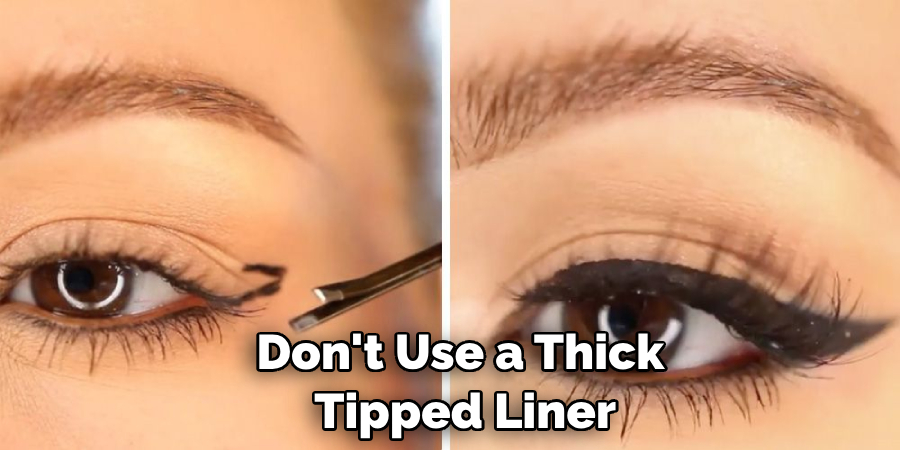
- Don’t use a thick-tipped liner, as it will be difficult to control on monolids.
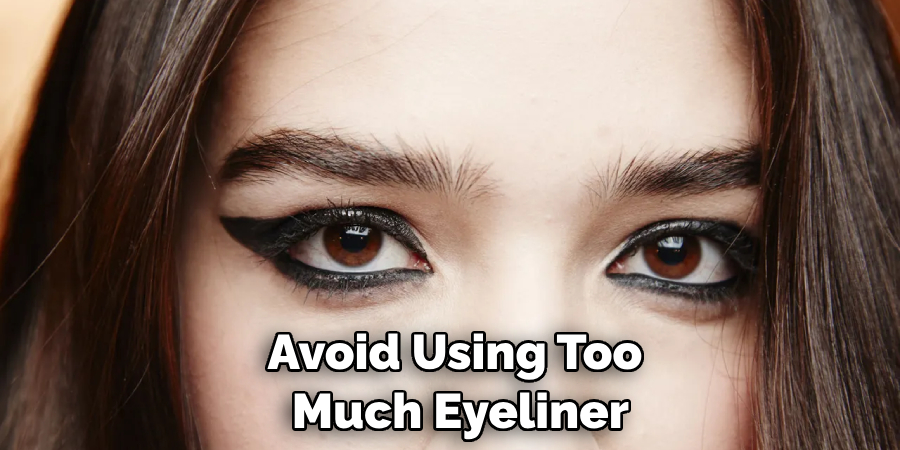
- Don’t apply too much eyeliner along your lower lashline – it should still be subtle and blend into your skin for a natural effect.
- Avoid smudging out the eyeliner after application – this can cause it to run and create a mess.
- Don’t forget to clean up any mistakes with a Q-tip!
Following these guidelines, you can create beautiful eyeliner looks with ease! With a little practice, you can master the art of applying eyeliner on monolids in no time.
What is the Best Eyeliner Shape for Monolid Eyes?
When it comes to creating the perfect eyeliner shape for monolid eyes, there is no one-size-fits-all solution. Depending on the size and shape of your eyes, you may need to adjust the wing length or angle to make it look flattering. Generally speaking, a slightly elongated and curved line works best for monolid eyes – this will help draw attention to your eye shape and add definition without looking too harsh. You can also try experimenting with different liner styles, such as cat-eye or half-moon shapes, as these can give you more room for creativity and highlight your unique eye shape!
Another tip is to avoid using too much eyeliner along the lower lash line – this can make your eyes look smaller. Instead, opt for a softer and more natural-looking line. Lastly, be sure to use waterproof eyeliner so that it lasts through any tears or sweat throughout the day!
No matter what style of eyeliner you decide to go with, remember that practice makes perfect! With some trial and error, you can find the perfect eyeliner shape for monolid eyes that will bring out your natural beauty.
Conclusion
How to do eyeliner for monolids doesn’t have to be a daunting task. With the skills and techniques explored in this post, creating an eye-catching piece of art that won’t smudge or disturb your appearance is just a few easy steps away.
There are so many ways to create a unique look by experimenting with different products and techniques until you find one perfectly tailored to your eyes and style. If you’re new to applying eyeliner to monolids, it’s important to start slow by practicing first on your hand before applying directly onto your lid; this will help build up your confidence and steadiness while you get used to the process. Don’t be afraid to take risks – after all, makeup is meant to be fun!
Remember, practice makes perfect, so give yourself plenty of time and patience as you craft an eye-catching masterpiece you’ll love wearing every day. Why not try creating something with an item from our collection today?
About the Author
Jane Hubbard is a passionate beauty expert with a wealth of experience in makeup, hair, and overall beauty techniques. After years of working as a hairdresser specialist, she followed her entrepreneurial spirit and started her own consultancy business.
Jane has always been driven by her desire to help others feel confident in their own skin, and she does this by sharing her knowledge, experiences, and practical beauty tips. Through her consultancy, she empowers individuals to embrace their unique beauty, offering tailored guidance that boosts both self-esteem and personal style.
Professional Focus
Specializes in makeup, hairstyling, and beauty consulting.
Provides personalized beauty advice, tips, and techniques to help individuals feel confident in their appearance.
Dedicated to staying up-to-date with the latest industry trends and developments.
Passionate about creating a comfortable and empowering experience for every client.
Education History
University of Craft and Design – Bachelor of Fine Arts (BFA) in Woodworking and Furniture Design
Woodworking Apprenticeships – Extensive hands-on training with skilled craftsmen to refine carpentry and furniture making techniques
Online Courses & Masterclasses – Continued education in advanced woodworking techniques, design principles, and specialized tools
Expertise:
Makeup artistry, hairstyling, and beauty consulting.
Personalized beauty techniques to enhance confidence and self-expression.
Educating clients on how to maintain their beauty routines at home.