
Are you ready to uplevel your eyeliner game? Spider web eyeliner is a fun and daring look that will really make you stand out wherever you go! Adding an extra oomph to your eyeshadow look is easy with spider web eyeliner. Not only will this fun and daring technique create a statement eye, but it will also give you the opportunity to express your creative side. Whether you’re a complete beginner when it comes to applying makeup or an experienced artist, this post is here to guide you in recreating this unique and eye-catching style.
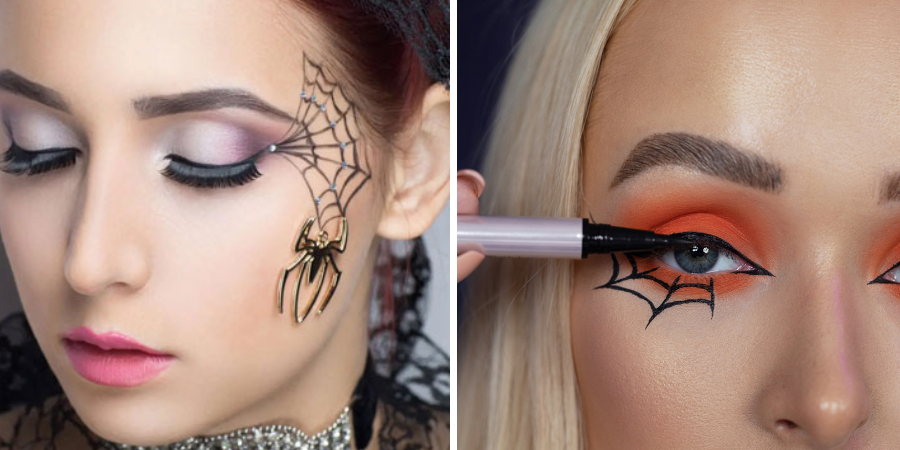
It’s time to get out of that beauty rut and put on something special! Whether you’re looking for inspiration while getting ready for a night out or just want to add flare while crafting your everyday makeup style, spider web eyeliner can provide the perfect touch. Let us show you how this unique trend can bring freshness and excitement back into your look! With easy-to-follow steps on how to do spider web eyeliner illustrated with instructional pictures as well as tips on how to use spider web eyeliner covers or decorate other items like sculptures or fabrics, by the time you are finished reading, your confidence for creating beautiful looks of your own will soar.
What is Spider Web Eyeliner?
Spider web eyeliner is a makeup look that incorporates the intricate shapes and lines of spider webs into your everyday makeup style. This trend takes regular eyeliner looks to a whole new level as it requires precision, skill, and patience. The idea behind this daring look is to create a unique pattern with an array of lines, curves, dots, circles, and other shapes with eyeliner to bring an attention-grabbing style.
Required Items
Before beginning to recreate your spider web eyeliner look, make sure you have all the necessary items. Here are a few must-haves for recreating this unique style:
- Eyeliner (choose a liquid or cream-based formula with an angled brush)
- Concealer and/or eyeshadow primer
- Eyeshadow (optional but can be used to create a base)
- A makeup brush (a thin liner brush would work best for intricate designs)
- A pencil or Q-tip for smudging/blending the eyeliner
10 Instructions on How to Do Spider Web Eyeliner
1. Clean Up
Start by cleaning the area around your eyes and apply a concealer or primer to create an even base. Dirt and oils on the skin can interfere with the application of your eyeliner. Cleaning the area after the primer also ensures that you have a clean and even working surface.

2. Start With the Basics
Begin your look by creating a simple line or shape first, something like a curved line or circle. This will help create the framework for your design as it serves as the foundation of your spider web eyeliner look. Starting with the basics will help you get comfortable with the technique before getting to those more intricate designs.
3. Outline and Define
Once you have your basic shape, start outlining and defining it by adding thicker lines or sections around it. This step is crucial as it gives your design structure and brings everything together. Also, feel free to make mistakes! If you need to erase or start over, use a makeup wipe to clean up the area and start fresh.
4. Fill It In
Once you have your basic shape outlined, it’s time to fill in the gaps with smaller lines and shapes. Use your thin liner brush and work around the shape you’ve created to bring your look together.
5. Add Details
Continue adding details like dots, lines, and swirls until you have achieved the desired effect. Feel free to experiment with different shapes and designs, but make sure that everything is in balance so that it doesn’t look too busy or overwhelming.
6. Smudge and Blend
For those areas that need to be blended, use a pencil or Q-tip to smudge the eyeliner until it looks even. This step will also help give your look a more polished finish. Smudging and blending your eyeliner can also help to soften the edges of your design.
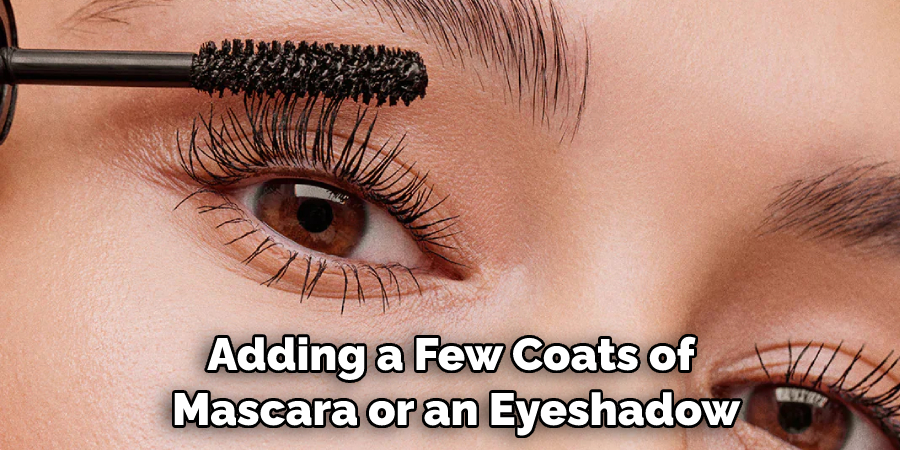
7. Finish Up
Once you are satisfied with the look, finish up by adding a few coats of mascara or an eyeshadow color that compliments your design. This will help enhance and define your look even more. Finishing with a few coats of mascara or eyeshadow will also help to make your design last longer.
8. Clean Up
Finally, clean up any areas around your eyes that may have been affected by the eyeliner application. You can use makeup remover wipes or a Q-tip dipped in micellar water to remove any excess product around your eyes.
And that’s it! You have successfully created a beautiful spider web eyeliner look. With some practice and patience, you can master this daring style and even use it to create more unique looks.
8 Common Mistakes to Avoid
When it comes to mastering the art of spider web eyeliner, there are a few common mistakes that beginners often make. Here are eight of the most common mistakes to steer clear of:
1. Not Using Enough Product
One of the most common mistakes is not applying enough product; you want to be sure your eyeliner is bold and dramatic enough to look like a spider web. Also, be sure to use quality eyeliner that won’t smudge or wear off easily.
2. Not Stretching the Skin
When you go to apply your eyeliner, it’s important to stretch the skin at the corners of your eye to ensure smooth and even application. Otherwise, you risk making mistakes and not being able to get the spider web look you’re going for.
3. Not Drawing Thin Lines
It’s important to draw thin lines when applying your eyeliner if you want to achieve the spider web effect. You don’t want your lines too thick; they need to be delicate and precise in order to have the desired look.
4. Starting From the Wrong Point
When you start applying your eyeliner, be sure to start at the inner corner of your eye and work outward. Otherwise, you won’t have enough room to draw out the full web effect. Starting from the wrong point can also make it difficult to achieve a symmetrical look.
5. Not Taking Breaks Between Layers
It’s important to take breaks between layers of eyeliner when you’re creating your spider web look. This allows each layer of liner enough time to dry before you start on the next layer. Otherwise, you can end up with smudges and uneven lines that ruin the effect.
6. Using Too Many Lines
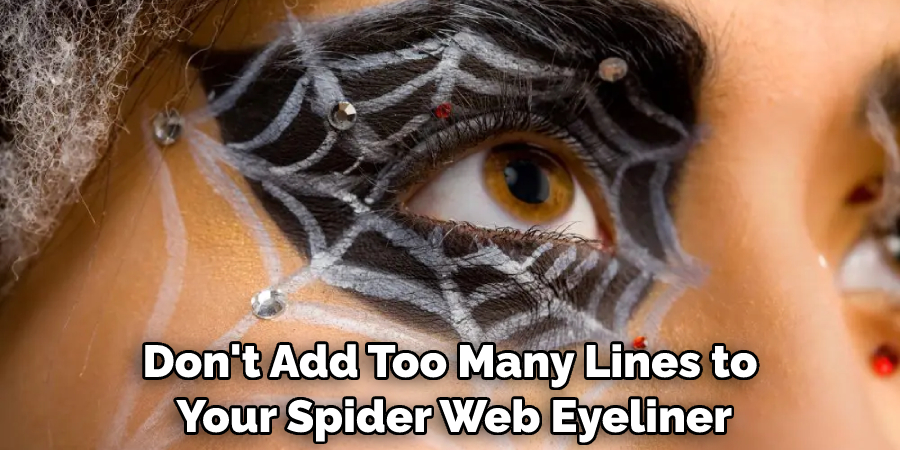
Adding too many lines to your spider web eyeliner look can make it appear messy and overdone. You want your design to have an airy, delicate appearance; adding too many lines will take away from this.
7. Not Blending the Lines
Blending your lines can help to soften any harsh edges and create a more even look overall. This is especially important when it comes to spider web eyeliner; you want it to have a continuous, seamless flow.
8. Not Setting Your Liner
Once you’ve finished your spider web eyeliner, it’s important that you set it with a setting powder or spray. This will help to keep your design in place all day and prevent any smudging or fading. Liner-setting sprays are great for this!
By avoiding these eight common mistakes, you can ensure that your spider web eyeliner looks its best. With a little practice and patience, you’ll be turning heads with your masterpiece in no time!
Frequently Asked Question
Are There Any Special Tools to Keep the Liner Straight?
Yes, you can use a straightedge like a ruler or an eyeliner stencil to help keep your lines straight. Make sure that when using a stencil, the guide holes are aligned with the natural curves of your eyes. Also, use gentle pressure and stop applying liner if it begins to drag across the skin.
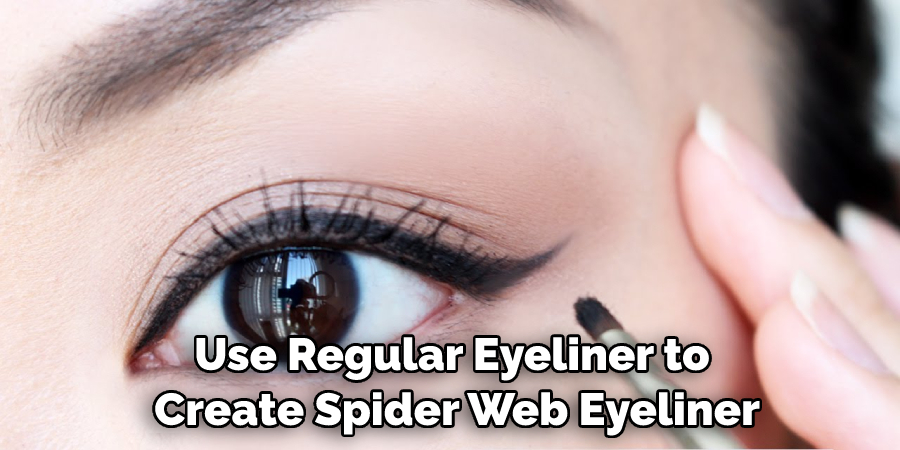
Can I Use Regular Eyeliner to Create Spider Web Eyeliner?
Yes, you can use regular eyeliner to create spider web eyeliner. However, liquid liners tend to be more effective and easier to work with as they provide a smoother and more precise application. If you are using a pencil liner, make sure it is sharpened so that the lines are clean and accurate.
Conclusion
Creating spider web eyeliner may seem like an intimidating task at first, but with enough practice, you’ll be a master in no time. After reading this guide on how to do spider web eyeliner, we hope you have encountered the confidence and knowledge needed to make it happen. If not, practice makes perfect! With more tutorials and experimentation, you’re sure to find the eyeliner look that fits you best.
Start off by trying something easy to get a foundation for success. Whether you want to stand out or remain subtle – spider web eyeliner is one way of doing it. Get creative with different makeup products and colors and find what expresses your individual style. So grab your supplies, take out time set aside for yourself, and see just how easy creating spider web eyeliner can be – all while having fun while making a stunning craft item!
About the Author
Jane Hubbard is a passionate beauty expert with a wealth of experience in makeup, hair, and overall beauty techniques. After years of working as a hairdresser specialist, she followed her entrepreneurial spirit and started her own consultancy business.
Jane has always been driven by her desire to help others feel confident in their own skin, and she does this by sharing her knowledge, experiences, and practical beauty tips. Through her consultancy, she empowers individuals to embrace their unique beauty, offering tailored guidance that boosts both self-esteem and personal style.
Professional Focus
Specializes in makeup, hairstyling, and beauty consulting.
Provides personalized beauty advice, tips, and techniques to help individuals feel confident in their appearance.
Dedicated to staying up-to-date with the latest industry trends and developments.
Passionate about creating a comfortable and empowering experience for every client.
Education History
University of Craft and Design – Bachelor of Fine Arts (BFA) in Woodworking and Furniture Design
Woodworking Apprenticeships – Extensive hands-on training with skilled craftsmen to refine carpentry and furniture making techniques
Online Courses & Masterclasses – Continued education in advanced woodworking techniques, design principles, and specialized tools
Expertise:
Makeup artistry, hairstyling, and beauty consulting.
Personalized beauty techniques to enhance confidence and self-expression.
Educating clients on how to maintain their beauty routines at home.