
Are you tired of having your hair sticking out from under your wig? Pinning your hair can be a great solution to keep it neat and secure. Here’s how to pin hair under a wig in a few easy steps.
Wearing a wig can be a fantastic way to change your look, whether for everyday wear, a special occasion, or a theatrical performance. However, ensuring that your natural hair is securely pinned down is crucial for achieving a smooth and natural-looking finish. Properly pinning your hair under a wig enhances the wig’s fit and comfort and prevents any unwanted lumps or movement.

In this guide, we will walk you through the step-by-step process to effectively pin down your hair, making your wig-wearing experience both seamless and stress-free.
What Will You Need?
Before getting started, make sure you have the following items ready:
- Hairpins or bobby pins
- Hair ties or elastic bands
- A wig cap (optional)
Once you have all the necessary materials, you’re ready to begin.
10 Easy Steps on How to Pin Hair Under a Wig
Step 1: Prepare Your Hair
Start by brushing your hair thoroughly to remove any tangles and knots. If you have longer hair, consider creating a low ponytail at the nape of your neck using a hair tie or elastic band. This will help keep your hair in place and prevent it from falling out while pinning it under the wig.
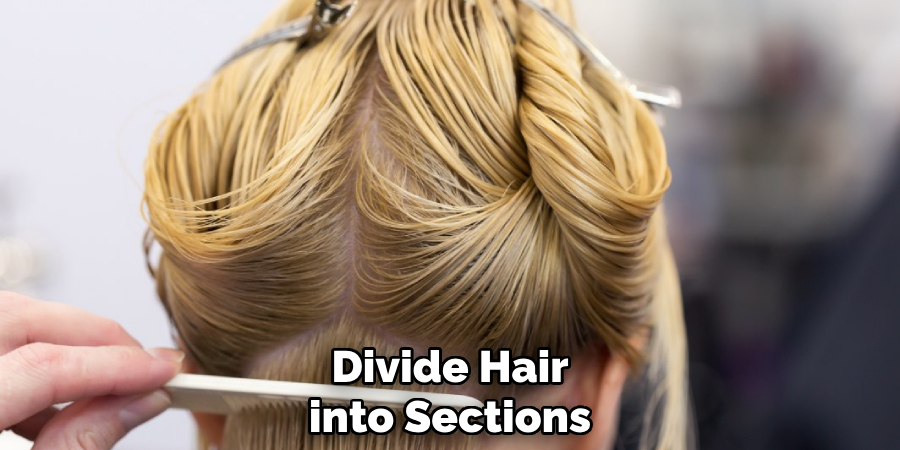
Step 2: Divide Your Hair into Sections
To begin, evenly divide your hair into manageable sections. Creating smaller sections for those with long or thick hair will make the pinning process easier. You can part your hair down the middle and then create additional sections by parting horizontally from ear to ear. Use small hair ties or clips to keep these sections separate. This method not only helps to distribute your hair under the wig evenly but also enhances the smoothness and flatness of the finish.
Step 3: Pin Each Section
Take one section of hair at a time and start pinning it flat against your scalp. Begin by twisting the section of hair and then carefully tucking it under itself. Use hairpins or bobby pins to secure the twisted section against your scalp. The key is to pin in a criss-cross pattern, ensuring each pin is tightly securing both the wig and your natural hair.
Step 4: Repeat with the Remaining Sections
Continue the process of twisting and pinning with each remaining section of hair. Work methodically to ensure that each segment is securely pinned against your scalp. For those with longer hair, you may need to fold and pin each section multiple times to achieve a compact arrangement. Remember, the more evenly distributed and flat your hair lies, the better your wig will sit on your head. This can prevent any awkward bulges and ensure a more natural appearance.
Step 5: Cross-check security and Smoothness
Once all the sections have been pinned, gently run your fingers over your scalp to check for any areas needing additional pins or adjustments. Make sure there are no loose ends or bumps. If you feel any sections that seem less secure, add more pins to reinforce them. The goal is to create a smooth and stable base for your wig to rest comfortably.
Step 6: Apply the Wig Cap(Optional)
If you choose to use a wig cap, it is time to put it on. Wig caps are handy for adding an extra layer of security and keeping all pinned sections in place. Carefully stretch the wig cap over your pinned hair, ensuring that it covers your entire scalp and all pinned sections. Adjust the cap until it feels snug but comfortable, then tuck in any stray hairs along the edges.

Step 7: Position the Wig
Take your wig and hold it by the inner lining or the lace front, depending on the type of wig you are using. Lean forward slightly and position the front of the wig at your forehead hairline. Slowly pull the wig over your head, adjusting it so that it sits evenly and securely on your scalp. Make sure the wig’s hairline aligns with your natural hairline for the most realistic look.
Step 8: Secure the Wig
Once your wig is positioned correctly on your head, you must ensure it is securely fastened to avoid shifting or slipping throughout the day. Most wigs come with built-in adjustment straps, combs, or clips that can be used to secure the wig in place. Start by adjusting the straps at the nape of the neck to fit snugly but comfortably. Next, use the combs or clips at the wig’s front, sides, and back to anchor it to your pinned hair or wig cap. If your wig does not have these features, you can use additional bobby pins to secure the edges of the wig, carefully hiding the pins within the wig hair for a natural look.
Step 9: Style the Wig
Now that your wig is secure, it’s time to style it to your liking. Gently brush or comb the wig to remove tangles and smooth the hair. Depending on your wig type, you can also use heat styling tools such as curling irons or straighteners to achieve your desired look. However, be sure to check that your wig is made of heat-resistant fibers before using any heated tools. If your wig allows, you can also trim or layer the hair to flatter your face shape. Use styling products like hairspray or mousse sparingly to help maintain the style throughout the day.
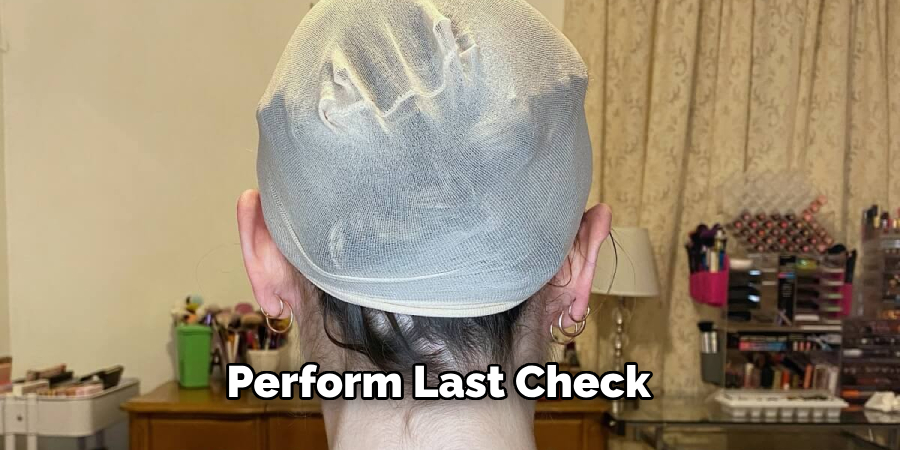
Step 10: Final Touches and Maintenance
Finally, perform a last check to ensure everything looks perfect. This includes inspecting the hairline, ensuring the wig sits correctly, and checking for any visible pins or edges. Lightly spray some wig-safe hairspray to hold your style in place. You may need minor touch-ups throughout the day to keep your wig looking fresh. Proper maintenance is key to prolonging the life and appearance of your wig. Regularly wash and condition your wig to keep it clean and free of product buildup, and store it on a wig stand to maintain its shape when not in use.
By following these steps and maintaining your wig properly, you can enjoy a secure, comfortable, and natural-looking hairstyle anytime you wear one.
5 Additional Tips and Tricks
- Section Your Hair: Divide your hair into multiple small sections before pinning it. This helps to distribute the hair evenly under the wig and prevents bulky areas that can ruin the wig’s natural look.
- Use Bobby Pins Strategically: Choose bobby pins that match your hair color and place them strategically to hold your hair sections securely. Ensure the pins lay flat against the scalp to avoid lumps and bumps.
- Try Braiding: Braiding can be an excellent way to keep hair contained and flat for longer. Create small, tight braids, and pin them around your head in a pattern evenly distributing the bulk of your hair.
- Employ a Wig Cap: After pinning your hair, use a wig cap to smoothen further and secure your hair. A wig cap can also prevent your natural hair from poking through the wig, maintaining a seamless look.
- Use Hairspray: Lightly spray your pinned hair with hairspray before putting on the wig cap. This can help keep those tiny, stubborn flyaways in place, ensuring a neater appearance.
Once you have your wig in place, remember to style it with a gentle hand and avoid using heat styling tools if possible.
5 Things You Should Avoid
- Skipping the Wig Cap: Neglecting to use a wig cap can result in your natural hair poking through the wig, creating an uneven and messy look. The wig cap helps to smooth and secure your hair, so always include this essential step.
- Using Too Many Bobby Pins: Overloading your hair with bobby pins can make the wig lumpy and uncomfortable to wear. Instead, use just enough pins to secure the sections of your hair without creating excessive bulk.
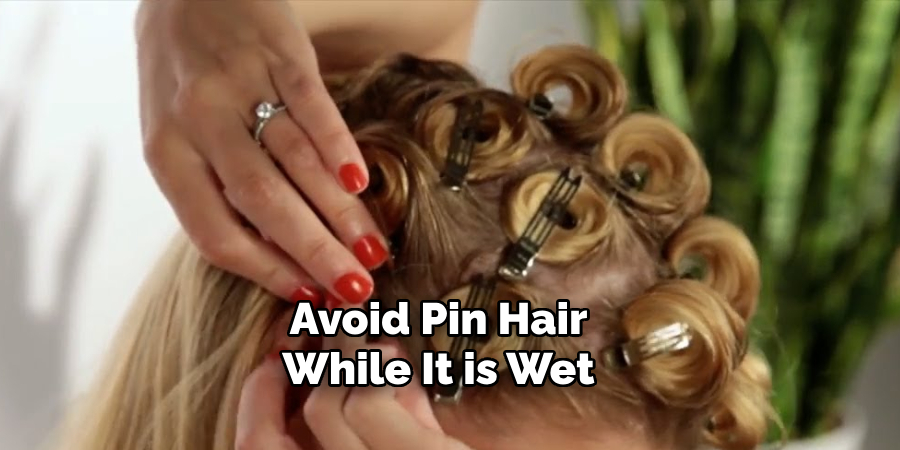
- Pinning Wet Hair: Avoid pinning your hair while it is still wet. Wet hair is more prone to slipping, creating an uncomfortable and damp environment under the wig, potentially leading to scalp irritation.
- Ignoring Your Natural Hairline: Be cautious not to pin your hair too far back from your natural hairline. This can cause an unnatural look and make the wig appear as though it is not properly fitted. Always align the wig with your natural hairline for a seamless transition.
- Using Heavy Products: Avoid using heavy gels, creams, or oils before pinning your hair. These products can make your hair greasy and weighed down, affecting how the wig fits and looks. Opt for lightweight styling products if necessary.
By avoiding these common mistakes and incorporating these additional tips, you can confidently wear your wig with a natural look and feel comfortable throughout the day.
Conclusion
Achieving a secure and natural look when wearing a wig starts with properly pinning your hair underneath.
By following these tips and avoiding common pitfalls, you can ensure your hair stays flat and evenly distributed, resulting in a smoother appearance. Sectioning your hair, using bobby pins strategically, employing braids for longer hair, and utilizing a wig cap are crucial steps in this process. Applying a light layer of hairspray can also help manage flyaways, contributing to a neater look. On the other hand, remember to avoid practices such as skipping the wig cap, using too many bobby pins, pinning wet hair, ignoring your natural hairline, and applying heavy styling products.
By adhering to these guidelines on how to pin hair under a wig, you’ll enhance the comfort and aesthetic of your wig, allowing you to wear it confidently throughout the day.
About the Author
Jane Hubbard is a passionate beauty expert with a wealth of experience in makeup, hair, and overall beauty techniques. After years of working as a hairdresser specialist, she followed her entrepreneurial spirit and started her own consultancy business.
Jane has always been driven by her desire to help others feel confident in their own skin, and she does this by sharing her knowledge, experiences, and practical beauty tips. Through her consultancy, she empowers individuals to embrace their unique beauty, offering tailored guidance that boosts both self-esteem and personal style.
Professional Focus
Specializes in makeup, hairstyling, and beauty consulting.
Provides personalized beauty advice, tips, and techniques to help individuals feel confident in their appearance.
Dedicated to staying up-to-date with the latest industry trends and developments.
Passionate about creating a comfortable and empowering experience for every client.
Education History
University of Craft and Design – Bachelor of Fine Arts (BFA) in Woodworking and Furniture Design
Woodworking Apprenticeships – Extensive hands-on training with skilled craftsmen to refine carpentry and furniture making techniques
Online Courses & Masterclasses – Continued education in advanced woodworking techniques, design principles, and specialized tools
Expertise:
Makeup artistry, hairstyling, and beauty consulting.
Personalized beauty techniques to enhance confidence and self-expression.
Educating clients on how to maintain their beauty routines at home.