
Are you tired of struggling to remove your eye makeup without damaging your precious lash extensions? Look no further! Here are some useful tips and tricks on properly removing eye makeup without jeopardizing your beautiful lashes.
We all know how difficult it can be to remove stubborn eye makeup when you have eyelash extensions, especially if they refuse to budge! But don’t worry – we’re here to help make the process much easier and quicker.
In this blog post, we will be discussing some tried-and-tested techniques on how to remove eye makeup with lash extensions. We promise that following these tips and tricks will give you clean eyes with long-lasting lashes for days! So put down the cotton pad and get ready as we dive deeper into learning more about removing eye makeup properly with lash extensions.
What Will You Need?
Before we begin, let’s ensure you have the tools to properly remove your eye makeup with lash extensions. You will need:
- A gentle oil-based makeup remover
- Cotton pads
- A clean mascara wand or spoolie brush
- Q-tips (optional)
Investing in a good quality oil-based makeup remover when you have lash extensions is crucial, as it will be gentle on your lashes and won’t cause any damage. Additionally, make sure you have cotton pads that are soft and lint-free to avoid them getting stuck in your lashes.
10 Easy Steps on How to Remove Eye Makeup With Lash Extensions
Step 1. Wet the Cotton Pad:
Start by wetting a cotton pad with your oil-based makeup remover. Gently press the cotton pad against your closed eyelid. Hold it there for a few seconds to allow the remover to dissolve the makeup.
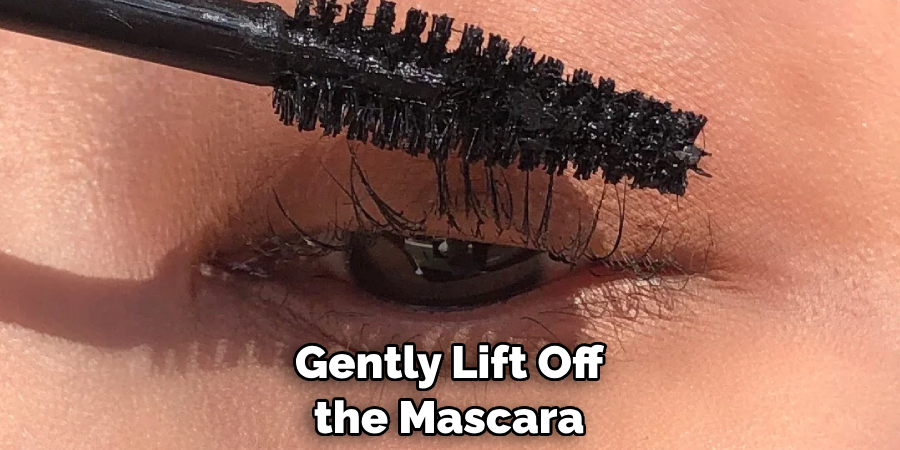
Step 2. Gently Wipe:
Once the makeup has dissolved, gently wipe the cotton pad across your eyelid downward. Be careful not to rub or pull, as this can damage your lash extensions. The goal is to gently lift off the mascara, eyeliner, or eyeshadow, not to scrub it off. Repeat this step until the majority of the makeup has been removed.
Step 3. Use Q-tip for Details:
For any remaining eye makeup, especially near the lash line or in the corners of your eyes where a cotton pad might be too bulky, use a Q-tip. Dip the Q-tip in the oil-based remover and gently swipe it along your lash line or corners. This will also help to clean up any leftover makeup without tugging on your lashes. Be careful to avoid direct contact with your actual lash extensions. Repeat this process until all of your eye makeup has been successfully removed.
Step 4. Brush Your Lashes:
Once you are confident that all your eye makeup has been properly removed, grab your clean mascara wand or spoolie brush. Gently brush through your lash extensions to remove any potential remnants of makeup or remover. This process also helps to untangle your lashes and maintain their nice, fluffy look. Again, be careful to brush gently to avoid causing any damage to your lash extensions.
Step 5. Rinse Your Eyes:
After ensuring that all makeup has been removed and your lashes have been combed through, it’s time to rinse your eyes. Use warm (not hot) water to rinse your eyelids and lashes gently. This step helps to remove any residual makeup remover and ensures your lashes are clean. Be careful not to rub your eyes during this process, as it could damage your lash extensions. Pat your face dry with a clean, soft towel, making sure not to tug at your lashes. Remember, the key is to be as gentle as possible to maintain the health and longevity of your lash extensions.
Step 6. Dry Your Lashes:
Once your face is dry, it’s time to take care of your lashes. Air-drying is the best option for lash extensions, but if you’re in a hurry, gently dry your lashes using a hairdryer on the ‘cool’ setting. Hold the hairdryer at a safe distance to avoid heat damage, and let the cool air gently dry your lashes. Use your mascara wand or spoolie to brush your lashes during this process, ensuring they dry straight and stay in their proper place.
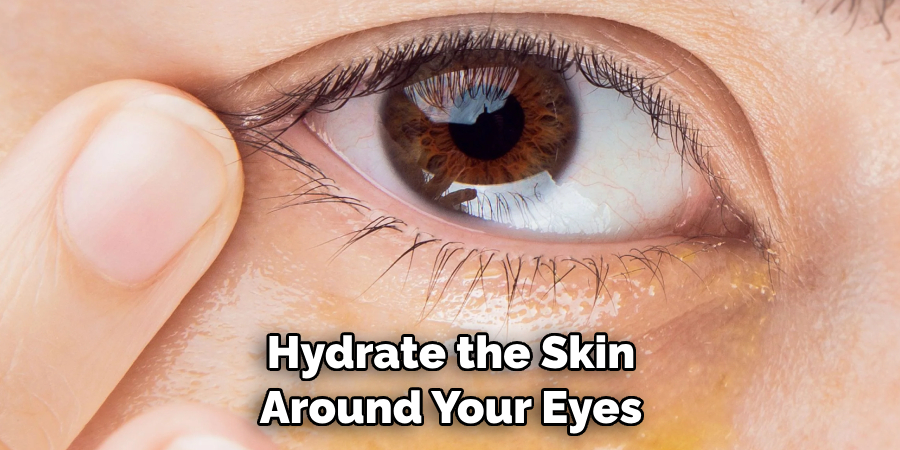
Step 7. Moisturize Your Eye Area:
After your lashes are dry, it’s important to hydrate the skin around your eyes. Apply a gentle, oil-free moisturizer to your eyes, being careful not to get any on your lash extensions. The moisturizer will help replenish any moisture lost during the makeup removal process and keep your skin looking fresh and healthy. It’s important to use an oil-free product as oils can cause the glue of lash extensions to loosen, reducing lifespan.
Step 8. Avoid Touching Your Lashes:
Once you’ve completed your post-cleanup skincare routine, avoid touching your lashes. Even though they may feel slightly different after makeup removal, resist the urge to tamper with them. Fidgeting with the lashes can lead to premature fallout or misalignment. Let them settle, and remember that they are more fragile when wet.
Step 9. Regular Maintenance:
Maintaining a regular and careful cleaning routine is vital for the longevity of your lash extensions. Always clean them thoroughly but gently every day, especially if you wear makeup regularly. This will keep your lashes healthy and your eyes free from potential irritants.
Step 10. Professional Check-ups:
It’s recommended to visit your lash technician for regular check-ups and infills. Even with careful cleaning and maintenance, your extensions will still naturally shed with your natural lash cycle. Regular professional upkeep ensures your lash extensions always look their best and last as long as possible.
By following these simple but effective steps, you can enjoy wearing makeup and having beautiful lash extensions that last!
5 Additional Tips and Tricks
Tip 1. Choose the Right Makeup:
While lash extensions allow you to reduce the amount of makeup you use, if you do choose to wear eye makeup, be sure to use products that are safe for lash extensions. Avoid any oil-based or waterproof makeup, as they can weaken the bond of your lash extensions and cause them to fall out faster.
Tip 2. Be Gentle:
We can’t stress this point enough – always be gentle when removing makeup from your eyes with lash extensions. Avoid rubbing or pulling at your lashes, as this can cause damage and even lead to premature fallout. Take your time and be patient.
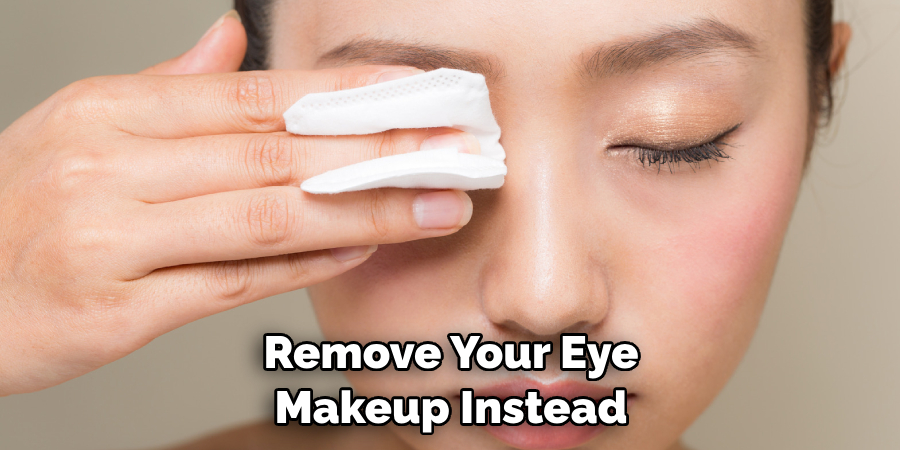
Tip 3. Use a Lint-Free Cloth:
If you’re not a fan of cotton pads, consider using a soft, lint-free cloth to remove your eye makeup instead. The smoother texture will be less abrasive on your lashes and still effectively remove any stubborn makeup.
Tip 4. Try Micellar Water:
Micellar water is a popular makeup remover that is gentler on the skin and lashes than traditional oil-based removers. It’s also effective in removing eye makeup without rubbing or pulling, making it a great option for lash extensions.
Tip 5. Keep an Extra Spoolie on Hand:
Accidents happen, and if you accidentally damage your lash extensions while removing makeup, having an extra spoolie on hand can be a lifesaver. Use it to gently comb through damaged lashes and reshape them back into place. It’s always better to be prepared!
By incorporating these tips and tricks into your lash extension makeup removal routine, you can keep your lashes looking beautiful and healthy for as long as possible.
5 Things You Should Avoid
1. Avoid Oil-Based Products: Oil-based products can weaken the bonding glue used for lash extensions, leading to premature fallouts. This includes not just makeup and removers but also moisturizers and cleansers.
2. Avoid Excessive Heat: Avoid direct heat on your lashes, such as from ovens, hairdryers on hot settings, or sunbathing. Excessive heat can warp the synthetic material of the lash extensions.
3. Avoid Pulling and Tugging: Never pull or tug at your lash extensions. Doing so can damage your natural lashes and lead to gaps in your extensions.
4. Avoid Waterproof Mascara: Waterproof mascara is a no-go for lash extensions. It’s easier to remove with an oil-based cleanser, which, as we know, can damage lash extensions.
5. Avoid Sleeping on Your Face: Avoid sleeping on your face as the pressure can misshape your lash extensions, causing them to fall out prematurely or become twisted and tangled. Opt for sleeping on your back instead.
By avoiding these common pitfalls, you can help ensure that your lash extensions stay looking their best for as long as possible.

Conclusion
Taking care of your eye makeup with lash extensions is doable. By following these tips, you can ensure that your lashes stay clean and look beautiful for weeks to come. And once you’ve mastered the technique, upkeep will be a breeze.
Hopefully, the article on how to remove eye makeup with lash extensions has helped you understand the importance of proper makeup removal and how to do it effectively.
Just remember to stay gentle, use oil-free products, and let everything soak in so you can rock your beautiful, long lashes without any worries! So go ahead and throw out those old cleansing methods and show off those natural, fluttery lashes – you deserve it!
About the Author
Jane Hubbard is a passionate beauty expert with a wealth of experience in makeup, hair, and overall beauty techniques. After years of working as a hairdresser specialist, she followed her entrepreneurial spirit and started her own consultancy business.
Jane has always been driven by her desire to help others feel confident in their own skin, and she does this by sharing her knowledge, experiences, and practical beauty tips. Through her consultancy, she empowers individuals to embrace their unique beauty, offering tailored guidance that boosts both self-esteem and personal style.
Professional Focus
Specializes in makeup, hairstyling, and beauty consulting.
Provides personalized beauty advice, tips, and techniques to help individuals feel confident in their appearance.
Dedicated to staying up-to-date with the latest industry trends and developments.
Passionate about creating a comfortable and empowering experience for every client.
Education History
University of Craft and Design – Bachelor of Fine Arts (BFA) in Woodworking and Furniture Design
Woodworking Apprenticeships – Extensive hands-on training with skilled craftsmen to refine carpentry and furniture making techniques
Online Courses & Masterclasses – Continued education in advanced woodworking techniques, design principles, and specialized tools
Expertise:
Makeup artistry, hairstyling, and beauty consulting.
Personalized beauty techniques to enhance confidence and self-expression.
Educating clients on how to maintain their beauty routines at home.