
Are you tired of your weft extensions and ready for a change? Removing them can be simple if done correctly. However, if not done properly, it can damage your natural hair and cause pain.
Removing weft extensions can be a delicate process that requires patience and proper technique to avoid damaging your natural hair. Whether you’re transitioning to a new hairstyle or simply giving your hair a break, handling the removal process with care is essential.
In this guide, we’ll walk you through the step-by-step process of safely removing weft extensions, ensuring that you maintain the health and integrity of your natural hair. Let’s dive in and discover how to remove weft extensions effectively while preserving the beauty of your locks.
What are the Benefits of Removing Weft Extensions?
There are several reasons why you may decide to remove your weft extensions. Some of the benefits include:
- Allowing your natural hair to breathe and recover from constant styling
- Giving your scalp a break from added weight and tension
- Preventing damage or tangling of your natural hair due to improper maintenance of the extensions
By removing weft extensions, you can also assess the health of your natural hair and address any potential issues before they worsen.
What Will You Need?
Before you begin the removal process, gathering all the necessary tools and supplies is essential. Here’s a list of items you’ll need:
- A wide-tooth comb or detangling brush
- Hair clips or pins to section your hair
- Cutting shears (optional)
- Coconut oil or other hair-friendly oil for added slip and moisture
Once you have all the necessary items, you can start removing your weft extensions.

10 Easy Steps on How to Remove Weft Extensions:
Step 1: Prepare Your Work Station
Ensure your work area is clean, organized, and well-lit. A comfortable seat and a mirror in front of you will make the process much easier. Gather all the above tools and supplies and set them within easy reach. Preparing your workspace ahead of time will help the removal process go smoothly and efficiently without unnecessary interruptions. Enlist the help of a friend or family member to assist you.
Step 2: Divide Your Hair into Sections
Use hair clips or pins to divide your hair into manageable sections. Start by parting your hair down the middle and then divide each side into smaller sections. Securing your hair in sections will allow you to focus on one area at a time, making the removal process more manageable and reducing the risk of tangling or pulling on your natural hair. Be sure to clip the sections out of the way to keep them tidy as you work.
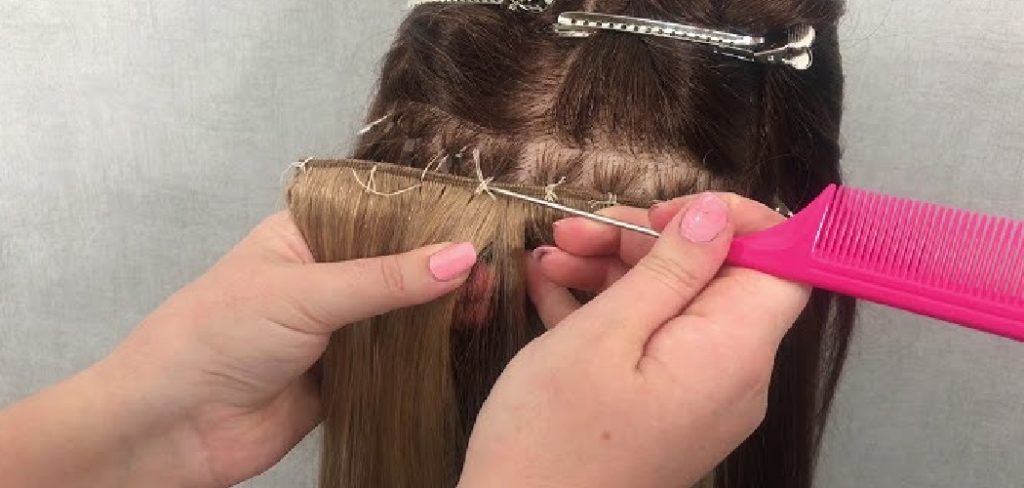
Step 3: Locate the Weft Extension Bonds
Carefully run your fingers along the track of the weft extensions to locate the bonds or threads holding them in place. If your extensions are sewn in, you will feel the stitches connecting the wefts to your natural hair or braid. Take your time during this step to ensure you know exactly where the bonds are. Rushing can lead to accidentally cutting or damaging your natural hair.
Step 4: Apply Oil for Slip
Using coconut oil or another hair-friendly oil, gently apply it to the bonded area, focusing on the threads or adhesive holding the wefts in place. The oil helps to loosen the bonds, making the removal process smoother and less likely to cause breakage or pain. Be generous but careful with the application to ensure you coat the necessary areas without oversaturating your hair. Allow the oil to sit for a few minutes to work its way into the bonds.
Step 5: Gently Loosen the Bonds
Once the oil has had time to set, gently use your fingers or a wide-tooth comb to loosen the bonds or threads. If the weft is sewn in, carefully work along the stitch to find an end that you can begin unraveling. Take your time to avoid pulling or snagging your natural hair. If the extensions are glued in, the oil should help weaken the adhesive, making separating the weft from your hair more manageable. Be patient and work in small sections to ensure minimal damage.

Step 6: Cut the Thread (If Necessary)
You may need cutting shears to trim the thread that holds the wefts in place for sewn-in weft extensions. Be highly cautious during this step to avoid cutting your natural hair. Start by identifying the thread and gently snipping it with your shears. It may be helpful to have a friend assist you to ensure precision. If you need more clarification, take small snips one at a time and check your progress frequently. Additionally, avoid cutting all the threads simultaneously to prevent potential tangling or damage.
Step 7: Remove Each Weft Slowly
Slowly and carefully remove each weft once the bonds or threads have been loosened or cut. Hold your natural hair securely at the root as you slide the weft out to avoid pulling. Take your time and continue working in sections until all extensions are removed. If you encounter resistance, apply more oil and allow it to sit for a few moments before trying again. Don’t force or tug on the wefts to prevent damaging your natural hair.
Step 8: Detangle Your Hair
After removing all the extensions, detangle your natural hair with a wide-tooth comb or detangling brush. Start at the ends and work up to the roots to minimize breakage. Removing tangles at this stage helps ensure your hair stays manageable and prepares it for cleansing and conditioning.
Step 9: Wash and Condition Your Hair
Using a gentle shampoo, thoroughly cleanse your hair and scalp to remove any residue left behind from the extensions or oil. Follow with a deep conditioner to restore moisture and nourish your hair. Try to avoid pulling or tugging on your hair while washing and conditioning to prevent further damage.
Step 10: Give Your Hair a Break
Once your hair is clean and conditioned, consider giving it a break from extensions or heavy styling. Focus on maintaining its health through regular treatments, trimming split ends, and avoiding excessive heat. This recovery period will promote stronger, healthier hair, allowing you to enjoy your natural beauty even more. Remember to consult a professional stylist for further tips on caring for your natural hair.
Following these ten steps, you can safely and effectively remove your weft extensions without damaging your natural hair.
5 Things You Should Avoid
When it comes to removing weft extensions, certain practices should be avoided to ensure the process is safe and effective. Here are five things to steer clear of when removing weft extensions:
- Using Excessive Force: Avoid pulling or tugging on the weft extensions forcefully, as this can cause damage to your natural hair and scalp.
- Cutting the Wefts: It may be tempting to cut the weft extensions and remove them, but this can lead to uneven cuts and make it challenging to reuse the extensions in the future.
- Skipping Proper Detangling: Failing to detangle your hair and the weft extensions beforehand can result in unnecessary pulling and breakage. Take the time to gently remove any knots or tangles before attempting to remove the extensions.
- Neglecting Proper Product Removal: If you use adhesive or tape to secure the weft extensions, it’s crucial to dissolve or remove the product properly using a suitable solvent or adhesive remover. Avoid forcefully pulling the wefts without first properly loosening the adhesive.
- Removing Wefts Without Professional Assistance: If you need help removing weft extensions safely, it’s best to seek professional assistance. Professional stylists have the expertise to remove extensions without causing damage and can provide guidance on the proper techniques and products to use.
By avoiding these common pitfalls, you can ensure a smooth and damage-free process when removing your weft extensions, allowing you to maintain the health and integrity of your natural hair.
Why is My Hair So Thin After Weft Extensions?
There are several reasons why your hair may appear thinner after removing weft extensions:
- Natural Shedding: On average, individuals lose around 50-100 strands of hair daily due to natural shedding. However, when wearing weft extensions, these shed hairs get trapped in the extension tracks and cannot fall out as usual.
- Traction Alopecia: Traction alopecia is hair loss caused by excessive tension or pulling on the hair. If your weft extensions were installed too tightly or worn for an extended period, this can damage your hair follicles and lead to thinning hair.
- Improper Care: Failing to care for your natural hair and the weft extensions properly can also contribute to thinning hair. This includes not detangling correctly, using harsh products, and neglecting regular maintenance appointments with a professional stylist.
If you experience thinning hair after removing your weft extensions, it is essential to take good care of your natural hair and give it time to recover.

Conclusion
In conclusion, how to remove weft extensions is crucial to maintaining the health and integrity of your natural hair.
You can ensure a safe and effective removal process by avoiding excessive force, cutting the wefts, skipping detangling, neglecting product removal, and seeking professional assistance when needed. It’s also essential to carefully follow any instructions your stylist or the extension manufacturer provides to ensure the best results.
Remember to always prioritize the well-being of your natural hair and scalp when removing extensions. So, next time you consider getting weft extensions or taking them out on your own, keep these.
About the Author
Jane Hubbard is a passionate beauty expert with a wealth of experience in makeup, hair, and overall beauty techniques. After years of working as a hairdresser specialist, she followed her entrepreneurial spirit and started her own consultancy business.
Jane has always been driven by her desire to help others feel confident in their own skin, and she does this by sharing her knowledge, experiences, and practical beauty tips. Through her consultancy, she empowers individuals to embrace their unique beauty, offering tailored guidance that boosts both self-esteem and personal style.
Professional Focus
Specializes in makeup, hairstyling, and beauty consulting.
Provides personalized beauty advice, tips, and techniques to help individuals feel confident in their appearance.
Dedicated to staying up-to-date with the latest industry trends and developments.
Passionate about creating a comfortable and empowering experience for every client.
Education History
University of Craft and Design – Bachelor of Fine Arts (BFA) in Woodworking and Furniture Design
Woodworking Apprenticeships – Extensive hands-on training with skilled craftsmen to refine carpentry and furniture making techniques
Online Courses & Masterclasses – Continued education in advanced woodworking techniques, design principles, and specialized tools
Expertise:
Makeup artistry, hairstyling, and beauty consulting.
Personalized beauty techniques to enhance confidence and self-expression.
Educating clients on how to maintain their beauty routines at home.