
Achieving an even tan under your arms can be a tricky task, but it’s not impossible. This guide on how to tan under arms will walk you through practical steps and considerations to help you get a balanced and consistent tan in this often overlooked area.
Whether you’re preparing for a special occasion or simply want to enhance your overall appearance, knowing how to properly tan under your arms can make a significant difference.
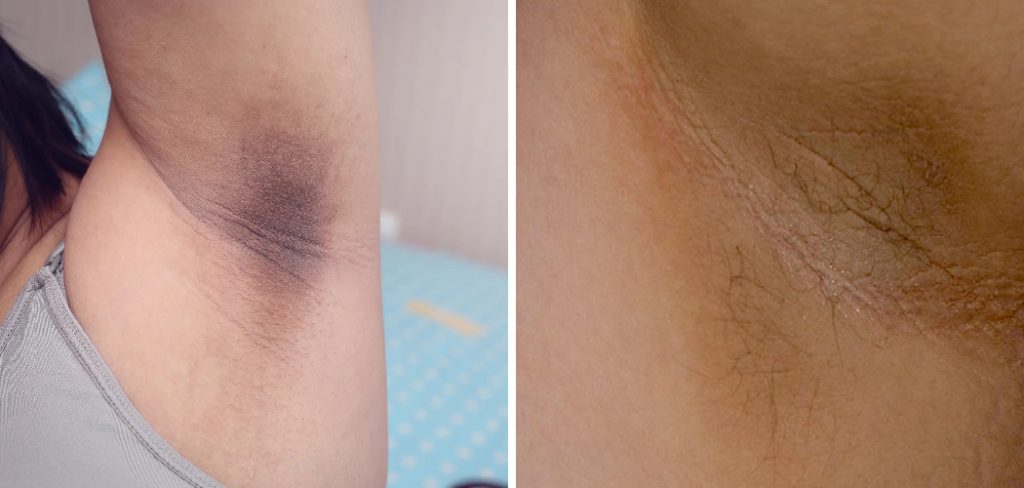
Why is Tan Under Your Arms Important?
When considering how to tan under your arms, many people may overlook this area as they focus on getting a perfect tan on their face, legs, and other visible body parts. However, tanning under your arms is just as important for achieving an overall evenly bronzed look.
One of the main reasons why it’s important to tan under your arms is because it helps blend in any natural color differences between different areas of your body. For example, if you have naturally darker skin on your face and lighter skin on your arms, tanning under your arms can help create a more seamless and natural-looking tan.
Additionally, the underarm area is often neglected when it comes to sun exposure, leading to a noticeable contrast between the rest of your body and your armpits. Tanning under your arms can help even out this contrast and create a more balanced appearance.
Needed Materials
Before we dive into the steps on how to tan under your arms, let’s first go through the materials you’ll need:
Tanning Lotion or Oil:
To achieve an even and natural-looking tan, it’s essential to use a tanning lotion or oil specifically designed for this purpose. These products often contain ingredients that can help deepen and prolong your tan while also moisturizing the skin.
Exfoliating Scrub:
Exfoliating before tanning is crucial as it helps remove dead skin cells and create a smooth surface for the tanner to be applied. Make sure to choose a gentle scrub suitable for your skin type.
Applicator Mitt:
Using an applicator mitt can help ensure that the tanning product is evenly distributed on your underarms and prevents any streaks or uneven spots.
7 Step-by-step Guidelines on How to Tan Under Arms:
Step 1: Prepare Your Underarm Area
Before applying any tanning product, it’s essential to prepare your underarm area to ensure the best results. Begin by thoroughly cleansing your underarms to remove any deodorant, sweat, or impurities that could interfere with the tanning process. Use a gentle body wash and warm water to cleanse the area, then pat it dry with a clean towel.
Next, exfoliate the underarm skin using a gentle exfoliating scrub. Focus on removing dead skin cells and any build-up that might create uneven patches of tan. Be sure to choose a scrub that is suitable for sensitive skin to avoid irritation. After exfoliation, rinse off the scrub and again pat the area dry. This step ensures your skin is smooth and ready for an even application of the tanning product.
Step 2: Apply a Barrier to Sensitive Areas
To protect sensitive areas from absorbing too much tanning product, it’s important to apply a barrier. Areas such as the folds of your skin and any places where you shave regularly might react differently to the tanning lotion or oil. Take a small amount of barrier cream or a light moisturizer and apply it thinly to these spots.
Focus on the creases of your underarms and any sensitive skin that may be more prone to irritation. This barrier will help prevent the tanning product from causing an uneven tan and reduce the risk of skin irritation. Once the barrier has been applied, allow it to dry for a few minutes before moving on to the next step in the tanning process.
Step 3: Apply the Tanning Product
Now that your underarms are prepared, it’s time to apply the tanning product. Start by putting on the applicator mitt to prevent any stains on your hands. Squeeze a small amount of tanning lotion or oil onto the mitt and begin applying it in circular motions, working from the outside towards the center of your underarms. Be sure to cover all areas evenly, including any creases or folds.
Avoid using too much product at once as this can lead to an uneven tan. Instead, start with a small amount and build up gradually if needed. Be sure to blend the product well and avoid any harsh lines or streaks.
Step 4: Blend with a Mirror
After applying the tanning product to your underarms, it is crucial to check for any areas that may need further blending to avoid streaks or uneven patches. Use a handheld or wall-mounted mirror to carefully inspect your underarms from different angles. The mirror will help you see any spots that you might have missed and ensure that the tanning product has been applied uniformly.
If you notice any areas that need more blending, use the applicator mitt and gently blend in circular motions until the tan appears even. Pay particular attention to the folds and creases of your skin, as these areas can often be tricky. Take your time with this step to ensure a seamless and even tan. Once you are satisfied with the blending, allow the tanning product to dry completely before moving to the next step or getting dressed.
Step 5: Wash Your Hands
Once you have ensured that your underarms have an even application of the tanning product, it’s important to wash your hands thoroughly. This step is crucial because any remaining tanning product on your hands can lead to unintended staining and an uneven tan on your palms and fingers.
Remove the applicator mitt and use gentle soap and warm water to scrub your hands, paying particular attention to the areas between your fingers and your nail beds. Make sure to wash off all traces of the tanning product.
If needed, use a gentle exfoliating scrub on your hands to ensure no residue is left behind. Once your hands are clean, dry them thoroughly with a towel and you will be ready to proceed. Ensuring that your hands are free from any tanning product will help maintain a natural and professional appearance.
Step 6: Wait for the Tan to Develop
Now that your underarms are evenly and thoroughly covered, it’s time to wait for the tan to develop. Depending on the type of tanning product you have used, this process can take anywhere from a few hours to overnight. Follow the instructions provided by the manufacturer carefully to achieve the desired depth of color.
During this waiting period, avoid any activities that could cause excessive sweating or rubbing against your underarm area. This includes exercise, wearing tight clothing, or using harsh soaps or exfoliants. These actions can interfere with the development of your tan and cause it to appear uneven or fade prematurely.
Step 7: Moisturize and Maintain
Once your tan has fully developed, it’s crucial to keep your underarm area moisturized to maintain the color and prevent any patchiness. Use a light, fragrance-free lotion or oil daily to keep your skin hydrated and prolong the life of your tan. Avoid using products with harsh chemicals or exfoliants on your underarms as they can strip away the tanning product and cause an uneven fade.
Additionally, be mindful of shaving in this area as it can also shorten the lifespan of your tan. If you must shave, do so gently and use a moisturizing shaving cream to minimize any potential damage to your tan. With proper maintenance and care, your underarm tan can last for several days before needing to be reapplied.
Following these steps on how to tan under arms will help you achieve a flawless and natural-looking tan on your underarms. Be sure to research and choose a high-quality tanning product that is suitable for sensitive areas, and always patch test before applying it to larger areas of your body.
Frequently Asked Questions
Q: Can I Use the Same Tanning Product on My Underarms as I Do on the Rest of My Body?
A: It is recommended to use a tanning product specifically designed for sensitive areas on your underarms. Regular tanning products may contain harsh chemicals that can irritate this delicate area. Be sure to read the labels carefully and choose a product that is suitable for use on underarms.
Q: How Often Should I Reapply Tanning Product on My Underarms?
A: This ultimately depends on the type of tanning product used and how well you maintain it. On average, it is recommended to reapply every 3-4 days to maintain an even and consistent tan.
Q: Can I Go Swimming or Sweat After Applying Tanning Product to My Underarms?
A: It is best to avoid any activities that may cause excessive sweating or rubbing against your underarm area for at least 8 hours after applying the tanning product. This will give the product enough time to fully develop and reduce the risk of an uneven tan.
Conclusion
Achieving a flawless and natural-looking tan on your underarms requires attention to detail and the right products. By following the step-by-step guide on how to tan under arms outlined above, you can ensure that your underarms have an even, streak-free glow.
Remember to use a tanning product suitable for sensitive areas, accurately blend for a uniform appearance, and maintain the tan by moisturizing and minimizing activities that can lead to fading.
With proper care and maintenance, your underarm tan can enhance your overall look, providing you with a boost of confidence and a sun-kissed appearance without the harmful effects of sun exposure. Always prioritize skin health and choose gentle products to keep your skin radiant and healthy.
About the Author
Jane Hubbard is a passionate beauty expert with a wealth of experience in makeup, hair, and overall beauty techniques. After years of working as a hairdresser specialist, she followed her entrepreneurial spirit and started her own consultancy business.
Jane has always been driven by her desire to help others feel confident in their own skin, and she does this by sharing her knowledge, experiences, and practical beauty tips. Through her consultancy, she empowers individuals to embrace their unique beauty, offering tailored guidance that boosts both self-esteem and personal style.
Professional Focus
Specializes in makeup, hairstyling, and beauty consulting.
Provides personalized beauty advice, tips, and techniques to help individuals feel confident in their appearance.
Dedicated to staying up-to-date with the latest industry trends and developments.
Passionate about creating a comfortable and empowering experience for every client.
Education History
University of Craft and Design – Bachelor of Fine Arts (BFA) in Woodworking and Furniture Design
Woodworking Apprenticeships – Extensive hands-on training with skilled craftsmen to refine carpentry and furniture making techniques
Online Courses & Masterclasses – Continued education in advanced woodworking techniques, design principles, and specialized tools
Expertise:
Makeup artistry, hairstyling, and beauty consulting.
Personalized beauty techniques to enhance confidence and self-expression.
Educating clients on how to maintain their beauty routines at home.