
Are you looking for a way to add shine and dimension to your hair? Glaze hair might be the perfect solution! Glaze is a semi-permanent hair color that adds shimmer, depth, and richness to your locks without damaging them.
Glazing hair is a popular technique for enhancing shine and improving the overall appearance of locks without causing damage. This process involves applying a semi-permanent hair treatment that coats the hair’s surface, providing a glossy finish. Whether aiming to boost your natural hue or add a temporary tint, using a hair glaze can breathe new life into your hairstyle.
In the following guide, we’ll explore how to use glaze hair at home, ensuring salon-quality results with minimal effort.
What Will You Need?
Before you begin, ensure you have all the necessary tools and products. Here’s a list of items you’ll need to achieve beautiful glazed hair:
- Semi-permanent hair glaze (choose your desired shade)
- Shampoo and conditioner
- Towel
- Hair clips
- Gloves
- Wide-tooth comb or brush
Once you have all your supplies ready, it’s time to start glazing!
10 Easy Steps on How to Use Glaze Hair
Step 1: Prepare Your Hair
Start by washing your hair with a gentle shampoo to remove any dirt, oil, or styling products that could interfere with the glaze application. Avoid using conditioner at this stage, as it might create a barrier that prevents the glaze from adhering correctly to your hair.
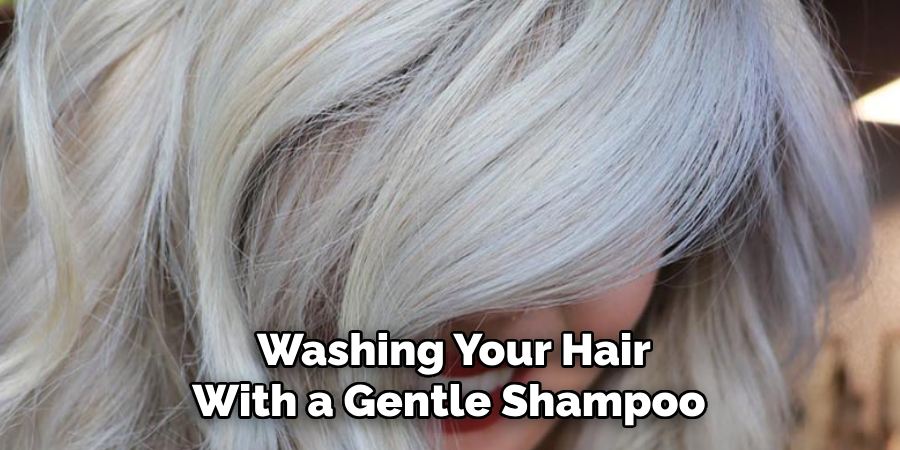
Once thoroughly shampooed, gently towel dry your hair until it’s damp but not dripping. Damp hair ensures that the glaze is absorbed evenly, providing consistent color and shine. Use a wide-tooth comb or brush to detangle your hair, ensuring it’s smooth and knot-free.
Section your hair into manageable parts using hair clips, making the application process more straightforward and ensuring every strand receives an even coat of glaze. Now, you’re ready to advance to the next step in the glazing process.
Step 2: Protect Your Skin and Clothing
Before applying the glaze, protect your skin and clothing from any potential staining. Wear an old T-shirt or drape a towel around your shoulders. Do your gloves to keep the glaze from coloring your hands. Consider applying a thin layer of petroleum jelly along your hairline, ears, and neck.
This barrier will make it easier to wipe away any glaze that gets onto your skin, ensuring a clean and mistake-free process. With these precautions, you can move on to the next step.
Step 3: Mix the Glaze
Once you have prepared your hair and have taken the necessary precautions to protect your skin and clothing, it’s time to mix the glaze. If your glaze product comes with a mixing solution, carefully follow the manufacturer’s instructions for combining the components.
This step is crucial, as the correct ratio will ensure that the color and gloss are applied evenly and effectively. Pour the glaze into a mixing bowl and use a brush or comb to blend thoroughly until you achieve a uniform consistency. This will help distribute the product evenly throughout your hair.
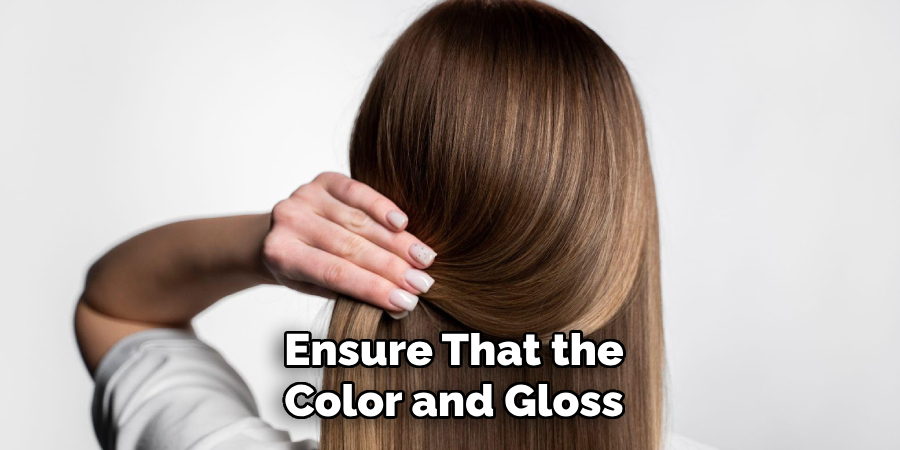
Spend a few extra moments to ensure no lumps or unmixed areas, as these could result in inconsistent application and uneven shine. Once mixed, you can start applying the glaze to your hair.
Step 4: Apply the Glaze
You can begin applying the product with your hair sectioned and the glaze thoroughly mixed. Starting from the roots, use a brush or gloved fingers to work the glaze evenly through each section of hair. Ensure that every strand is coated for consistent shine and color.
Work in small portions to maintain control and precision, focusing on evenly distributing the glaze. Consider using a wide-tooth comb to help detangle and spread the glaze more effectively across your hair. Make sure to cover all areas, paying particular attention to the ends, which might need extra gloss and care.
Once the glaze is applied, gently massage your scalp to encourage even coverage and help the product penetrate better. Now, you are ready to let the glaze work its magic.
Step 5: Let the Glaze Set
After thoroughly applying the glaze to your hair, the next step is to allow the treatment time to set. Check the glaze product’s instructions for the recommended waiting period, typically about 20 to 30 minutes. During this time, avoiding any activity that might disturb the glaze is essential, such as moving around excessively or letting your hair touch surfaces that could disrupt the even coat.
Use this time to relax and catch up on a book or listen to music. Allowing the glaze to set fully will ensure that the color and shine are adequately absorbed, resulting in a vibrant and glossy finish. Be mindful of the timing and set a timer to help you achieve optimal results without over-processing the hair.
Step 6: Rinse and Condition
Once the glaze has set for the recommended time, it’s time to rinse it out thoroughly with lukewarm water. Be gentle while rinsing to ensure the glaze is thoroughly washed out without disturbing the shine it has imparted to your strands.

Avoid hot water, which can strip away moisture and reduce the glaze’s effectiveness. After rinsing, apply a nourishing conditioner to restore lost moisture and help seal in the glaze. Allow the conditioner to sit for a few minutes before rinsing it out thoroughly.
This step will help smooth and soften your hair, enhancing the glaze’s effects for a smooth, vibrant look. Pat your hair dry with a towel, avoiding vigorous rubbing that might cause frizz, and prepare to style your beautifully glazed, glossy locks as desired.
Step 7: Style as Desired
Now that your hair is glazed and conditioned, it’s time to style it as you wish. Whether you prefer to air dry your hair for a natural look or use a blow dryer for some volume, the choice is yours. To enhance the shine, consider using a heat styling tool with a low to medium setting and a brush with natural bristles for a smoother finish.
Apply a lightweight serum or leave-in conditioner to add extra gloss and protection. Remember to handle your hair gently to preserve the glaze and maintain its radiant finish. Enjoy your freshly glazed hair, which now boasts added shine, vibrancy, and a polished appearance.
Step 8: Maintain Your Glazed Hair
To extend the longevity of your glossy finish, it’s crucial to follow specific maintenance tips. First, use sulfate-free shampoos and conditioners to preserve the glaze and prevent premature fading. Limit washing your hair to 2-3 times weekly to maintain its vibrancy.
Incorporate a weekly deep conditioning treatment or hair mask to keep your hair hydrated and healthy. Additionally, protect your hair from heat damage by using a heat protectant spray before styling with hot tools. Finally, consider wearing a hat or using a UV-protectant spray when exposed to the sun, as UV rays can dull your glaze over time.
Step 9: Troubleshooting Common Issues
Sometimes, despite best efforts, you may encounter specific issues with your hair glaze. If you notice uneven color or shine, consider using a clarifying shampoo to gently remove the glaze and then reapplying with a focus on even distribution across all hair sections. In case of persistent dryness or frizz following the glazing process, indulge in a deep conditioning treatment to replenish moisture.
If your hair appears too dark or intense, lack of proper rinsing might be the cause, so ensure thorough rinsing and opt for a milder glaze next time. Always follow the glaze product’s specific instructions and adjust your routine as needed for the best results. Consistent maintenance and care will help you achieve and sustain that perfect glossy finish with minimal fuss.
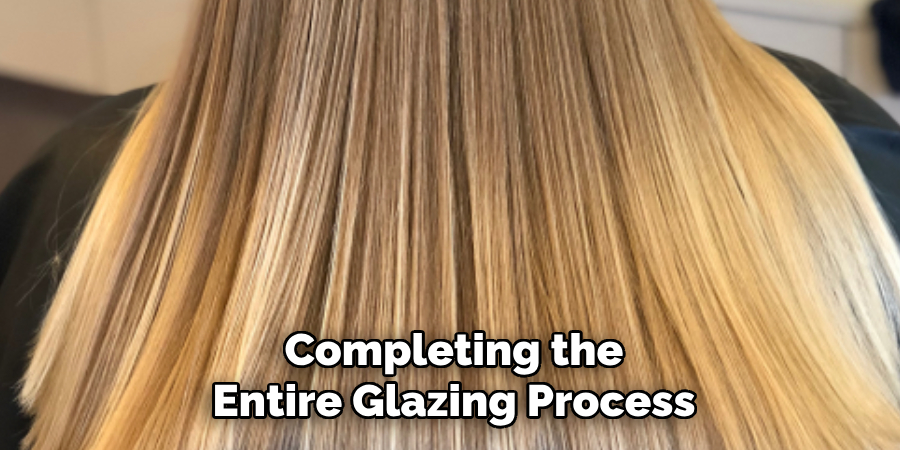
Step 10: Evaluate Your Results
After completing the entire glazing process and styling your hair, take a moment to evaluate the results. Examine your hair’s shine, color, and overall health. Ideally, the glaze should have enhanced the glossiness and richness of your natural or colored hair, providing a sleek and polished finish. If you are satisfied with the outcome, note the products and techniques used so you can replicate the process in the future.
However, consider adjusting your application or product choices next time if areas need improvement. It’s helpful to journal your glazing attempts, noting what works best for your hair type and desired look. Embracing feedback from each experience will help you refine your skills and achieve salon-quality results at home.
With the help of a hair glaze, you can easily achieve radiant, glossy hair by following these steps and tips.
Conclusion
How to use glaze hair is a transformative yet straightforward process that enhances the shine and vibrancy of your hair without drastic changes.
You can achieve a salon-quality finish at home by following a sequence of steps—preparation, application, setting, rinsing, conditioning, and styling.
Consistent maintenance, using the right products, and employing protective measures can prolong the results, keeping your hair glossy and healthy. Troubleshooting common issues offers a chance to refine your technique, ensuring the best possible outcome with each application.
Reflecting on each experience allows you to tailor your approach to meet your unique hair needs, making hair glazing a reliable addition to your beauty routine.
About the Author
Jane Hubbard is a passionate beauty expert with a wealth of experience in makeup, hair, and overall beauty techniques. After years of working as a hairdresser specialist, she followed her entrepreneurial spirit and started her own consultancy business.
Jane has always been driven by her desire to help others feel confident in their own skin, and she does this by sharing her knowledge, experiences, and practical beauty tips. Through her consultancy, she empowers individuals to embrace their unique beauty, offering tailored guidance that boosts both self-esteem and personal style.
Professional Focus
- Specializes in makeup, hairstyling, and beauty consulting.
- Provides personalized beauty advice, tips, and techniques to help individuals feel confident in their appearance.
- Dedicated to staying up-to-date with the latest industry trends and developments.
- Passionate about creating a comfortable and empowering experience for every client.
Education History
- University of Craft and Design – Bachelor of Fine Arts (BFA) in Woodworking and Furniture Design
- Woodworking Apprenticeships – Extensive hands-on training with skilled craftsmen to refine carpentry and furniture making techniques
- Online Courses & Masterclasses – Continued education in advanced woodworking techniques, design principles, and specialized tools
Expertise:
- Makeup artistry, hairstyling, and beauty consulting.
- Personalized beauty techniques to enhance confidence and self-expression.
- Educating clients on how to maintain their beauty routines at home.