
Are you tired of dry, damaged, and brittle hair? Olaplex 2 may be the solution for you! This revolutionary product is designed to restore and repair your hair from within, leaving you with healthy, shiny, and strong locks. In this guide, we will walk you through how to use Olaplex 2 to achieve optimal results.
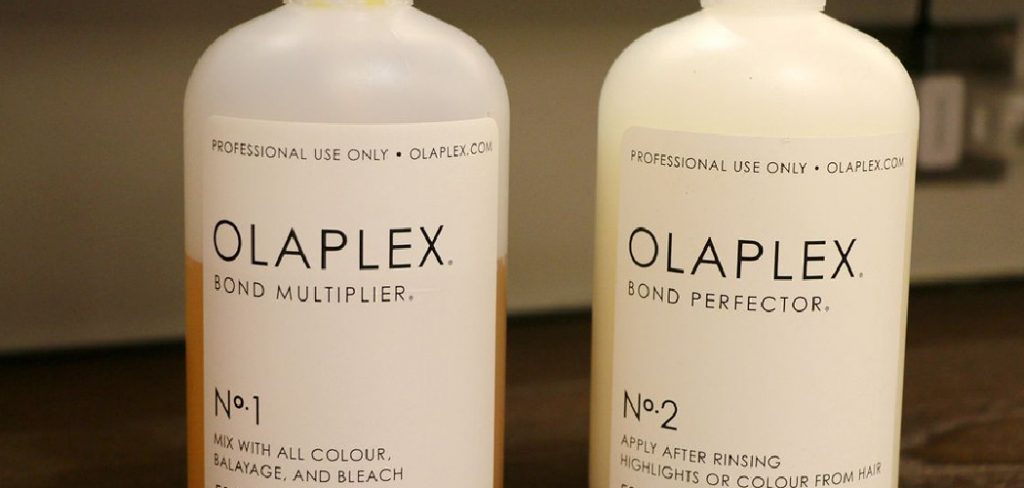
Olaplex 2, also known as Olaplex Bond Perfector, is a crucial step in the Olaplex hair treatment system, designed to further repair and strengthen hair following chemical services. Whether you’re a professional stylist or an at-home enthusiast, using Olaplex 2 correctly can make a significant difference in maintaining the integrity of your hair.
This guide will walk you through the process, ensuring you get the best possible results from your Olaplex treatment.
What Will You Need?
Before diving into the steps, let’s ensure you have all the necessary tools and products for a successful Olaplex 2 treatment. Here’s what you’ll need:
- Olaplex 2 Bond Perfector
- Plastic processing cap or foil
- Hair clips
- Comb
- Shampoo and conditioner (preferably Olaplex No.4 and No.5)
Now that you have everything ready let’s get started!
10 Easy Steps on How to Use Olaplex 2
Step 1: Preparing Your Hair
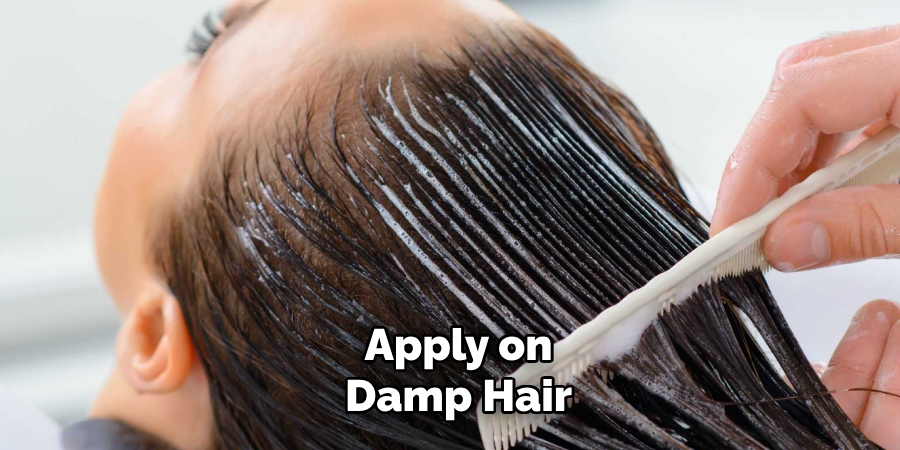
To begin, ensure your hair is damp, as Olaplex 2 works best on wet hair. Dampen your hair with a spray bottle or quickly run it under water. Make sure your hair is not soaking wet but sufficiently moist. This ensures that the product is evenly distributed and absorbed efficiently. Use a wide-tooth comb to detangle your hair gently, starting from the ends and working your way up to the roots. Detangling will help the product penetrate all sections of your hair more effectively. After this initial preparation, section your hair into manageable parts using the hair clips. Typically, dividing your hair into four sections works well, but adjust according to your hair’s thickness and length.

Step 2: Applying Olaplex 2
Once your hair is sectioned and prepared, it’s time to apply Olaplex 2. Squeeze a generous amount of the Bond Perfector into your hands and apply it to the first section of your hair. Start at the roots and work your way down to the ends, ensuring every strand is coated evenly. Massage the product into your hair gently but thoroughly. Repeat this process for each section until your entire head is covered with Olaplex 2. For best results, make sure to apply the product evenly and focus on areas that might be more damaged, such as the ends or chemically treated sections.
Step 3: Processing Time
After applying Olaplex 2, cover your hair with a plastic processing cap or foil. This helps to retain heat and improve the product’s efficiency. Leave Olaplex 2 on your hair for at least 10-20 minutes. For hair that is extremely damaged or if you feel your hair needs extra attention, you can leave it on longer. During the processing time, you can use the opportunity to relax, read a book, or take care of other beauty treatments. Just ensure you give the product enough time to work its magic.
Step 4: Rinsing
Once the waiting period is over, remove the processing cap or foil and rinse your hair thoroughly with warm water. Make sure to rinse out all the product from your hair. Follow up with a shampoo — preferably Olaplex No.4 Bond Maintenance Shampoo — to cleanse your hair. Rinse again and then apply Olaplex No.5 Bond Maintenance Conditioner to nourish and hydrate your hair. Rinse well to ensure no residue is left behind.
Step 5: Post-Treatment Care
After rinsing out the conditioner, gently towel-dry your hair by blotting, not rubbing, to prevent unnecessary breakage and damage. Comb through your hair to remove any remaining tangles. At this point, you can proceed with your regular hair routine, whether it be air-drying, blow-drying, or styling. To maintain the health of your hair, consider incorporating Olaplex treatments into your regimen regularly and follow up with Olaplex No.3 Hair Perfector once a week as part of your ongoing hair care routine.

Step 6: Monthly Maintenance
Incorporating Olaplex 2 into your monthly routine can help maintain your hair’s strength and elasticity. Schedule a monthly treatment to keep your hair in optimal condition, especially if it undergoes frequent chemical treatments. Consistency is key, as regular use can help prevent further damage and promote healthier hair over time.
Step 7: Using Olaplex No.3
To enhance the benefits of Olaplex 2, include Olaplex No.3 as part of your weekly hair care regimen. Apply it on damp hair and leave it on for at least 10 minutes before rinsing, shampooing, and conditioning. This weekly treatment will help maintain the strength and integrity of your hair between Olaplex 2 treatments.
Step 8: Daily Hair Care
Follow a good daily hair care routine to maintain the results of your Olaplex treatment. Use a gentle, sulfate-free shampoo and conditioner, such as Olaplex No.4 and No.5, to keep your hair healthy and hydrated. Avoid excessive heat styling and use a heat protectant when using blow dryers, curling irons, or straighteners.
Step 9: Protecting Your Hair
Protect your hair from environmental factors that can cause damage. Wear a hat or use a UV protectant spray when exposed to the sun. Avoid swimming in chlorinated pools without protecting your hair, and rinse thoroughly with clean water after a swim. These steps will help preserve your hair’s health and color.
Step 10: Regular Trims
Regular trims are essential for maintaining healthy hair, especially if you’re working to repair damage. Schedule a trim every 6-8 weeks to remove split ends and promote healthier hair growth. This will help keep your hair looking fresh and reduce the risk of further breakage.
By following these 10 easy steps, you can effectively use Olaplex 2 to restore strength and vitality to your damaged hair. Remember, consistency is key, so make sure to incorporate Olaplex treatments into your regular hair care routine for long-lasting results.
5 Additional Tips and Tricks
- Apply on Damp Hair: For best results, apply Olaplex 2 to damp, towel-dried hair. This ensures better product absorption into the hair shaft.
- Comb Through for Even Distribution: Use a wide-tooth comb to evenly distribute Olaplex 2 throughout your hair, ensuring that every strand gets covered.
- Leave-In Time: While the recommended leave-in time is at least 10 minutes, for deeper conditioning and repair, you can leave it in for up to 30 minutes.
- Pair with Heat: For an enhanced effect, use a shower cap or a hot towel around your head to create a warm environment while the product is working. This helps the Olaplex 2 penetrate more effectively.
- Check for Results: After using Olaplex 2, you can check the results by running your hands through your hair. You will notice that it feels much softer, smoother, and stronger than before.
With these additional tips and tricks, you can maximize the benefits of Olaplex 2 and achieve healthier, more manageable hair. Remember to always follow the instructions carefully and consult with a professional if you have any concerns or questions.
5 Things You Should Avoid
- Skipping a Patch Test: Always perform a patch test before using Olaplex No. 2 to avoid potential allergic reactions or sensitivities.
- Using it on Unwashed Hair: Ensure your hair is clean before applying Olaplex No. 2 for optimal absorption and effectiveness.
- Leaving it On for Too Long: Follow the recommended time on the packaging. Leaving it on for extended periods won’t necessarily enhance results and might cause build-up.
- Applying it Incorrectly: Apply Olaplex No. 2 evenly from the roots to the ends of your hair for consistent and thorough treatment.
- Skipping Conditioner: Don’t skip conditioner after rinsing out Olaplex No. 2. Conditioning helps to lock in moisture and maintain hair health.
By avoiding these common mistakes, you can ensure that your Olaplex No. 2 treatment is effective and safe for your hair. Remember to always read and follow the instructions carefully for best results.
Does Olaplex 2 Go on Before or After Toner?
The answer to this question depends on your specific hair needs and the type of toner you are using. In general, applying Olaplex No. 2 treatment is recommended after toning your hair. This allows the toner to fully process and for Olaplex to work its magic in repairing any damage caused by the color or bleach.
However, if you are using a toner that requires a developer, such as one used for subtle highlights or lowlights, it is best to apply Olaplex No. 2 before toning. This will minimize any potential damage from the developer while still allowing the toner to process effectively.
It is always important to consult with your stylist for personalized advice on when to use Olaplex No. 2 in relation to your specific hair coloring process. They can also provide guidance on how often you should use Olaplex No. 2 based on your hair’s condition and needs.
In general, using Olaplex No. 2 after toning will help maintain the health and integrity of your hair while still achieving beautiful color results. Just remember to follow the instructions carefully and avoid any of the mistakes mentioned above for optimal results.

Conclusion
In conclusion, Olaplex No. 2 can be a game-changer in your hair care routine when used correctly. Start by avoiding common mistakes such as skipping patch tests, applying on unwashed hair, or leaving it on for too long.
Always follow the recommended guidelines for the best results. When it comes to incorporating Olaplex No. 2 into your toning process, consider your specific hair needs and consult with your stylist for personalized advice. By adhering to these practices, you’ll be able to enjoy healthier, stronger hair and maintain the vibrant color you desire.
Hopefully, the article on how to use olaplex 2 has provided you with useful information and tips. Remember to always prioritize the health of your hair and be mindful of how you treat it. Happy coloring!
About the Author
Jane Hubbard is a passionate beauty expert with a wealth of experience in makeup, hair, and overall beauty techniques. After years of working as a hairdresser specialist, she followed her entrepreneurial spirit and started her own consultancy business.
Jane has always been driven by her desire to help others feel confident in their own skin, and she does this by sharing her knowledge, experiences, and practical beauty tips. Through her consultancy, she empowers individuals to embrace their unique beauty, offering tailored guidance that boosts both self-esteem and personal style.
Professional Focus
Specializes in makeup, hairstyling, and beauty consulting.
Provides personalized beauty advice, tips, and techniques to help individuals feel confident in their appearance.
Dedicated to staying up-to-date with the latest industry trends and developments.
Passionate about creating a comfortable and empowering experience for every client.
Education History
University of Craft and Design – Bachelor of Fine Arts (BFA) in Woodworking and Furniture Design
Woodworking Apprenticeships – Extensive hands-on training with skilled craftsmen to refine carpentry and furniture making techniques
Online Courses & Masterclasses – Continued education in advanced woodworking techniques, design principles, and specialized tools
Expertise:
Makeup artistry, hairstyling, and beauty consulting.
Personalized beauty techniques to enhance confidence and self-expression.
Educating clients on how to maintain their beauty routines at home.