
Have you ever noticed those perfectly smooth and silky arms of your favorite celebrities? It’s not just their good skin genetics that is responsible for it; they also make sure to take proper care of their skin – one way being waxing. Waxing is a great option if you’re looking for an easy but efficient way to remove unwanted hair from the arms.
Not only does it keep the arms visibly cleaner and smoother compared to other hair removal methods, such as razors or epilators, but it also helps delay regrowth, leaving your arms soft and free from any stubble or bumps after each wax session. In this blog post, we’ll be discussing how to wax arms in detail: from what kind of product works best for this area, how long will the results typically last, safety precautions, and more! Read on if you’re ready to turn your rough-feeling arm hairs into silky smoothness.
Things to Do Before Waxing Arms
- Choose the right type of wax: If you’re waxing your arms, it’s important to select the right type of wax. Opt for a gentle cream or oil-based wax that is non-irritating and suitable for sensitive skin.
- Cleanse your skin: Make sure to start with clean skin before waxing. Gently exfoliate the area to remove any dirt, oil, and dead skin cells that may have been on your arms.
- Apply a pre-waxing oil: Applying a pre-waxing oil is important for two reasons — it creates an additional layer of protection against the hot wax and helps reduce pain.
Needed Items
- Wax
- Wax heater/warmer
- Spatula
- Pre and Post waxing oils
10 Steps on How to Wax Arms
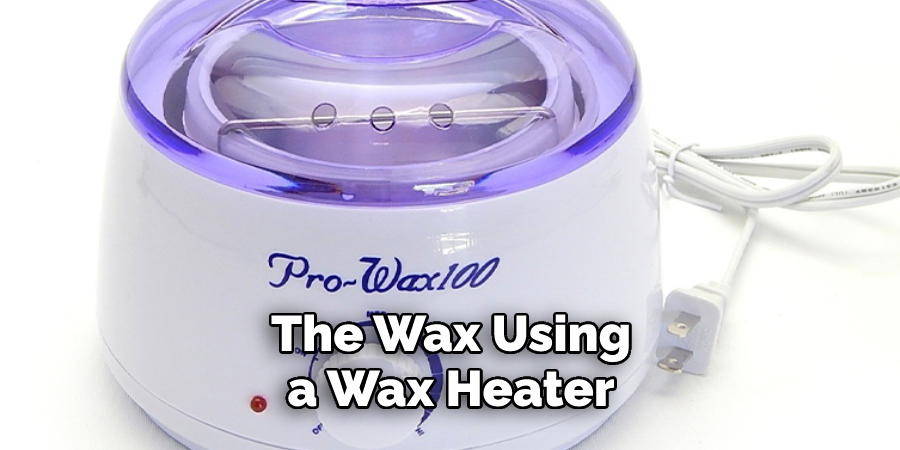
Step 1: Heat the Wax
Start by heating the wax using a wax heater/warmer. Check the temperature of the wax before applying it to your skin. Make sure it isn’t too hot, as this could cause burns. You have to be extra careful when it comes to waxing sensitive areas like around the elbows.
Step 2: Apply Wax
Once you’re sure that the wax is at a suitable temperature, use a spatula to apply the wax in thin layers on your arms. Make sure not to overload it with too much wax, as this will make it difficult to remove.
Step 3: Wait for the Wax to Dry
Allow the wax to dry before you begin removing it. This will help ensure that all the hairs have been effectively coated with wax and make it easier to remove in one go. Otherwise, you’ll end up having to go over the same area multiple times.
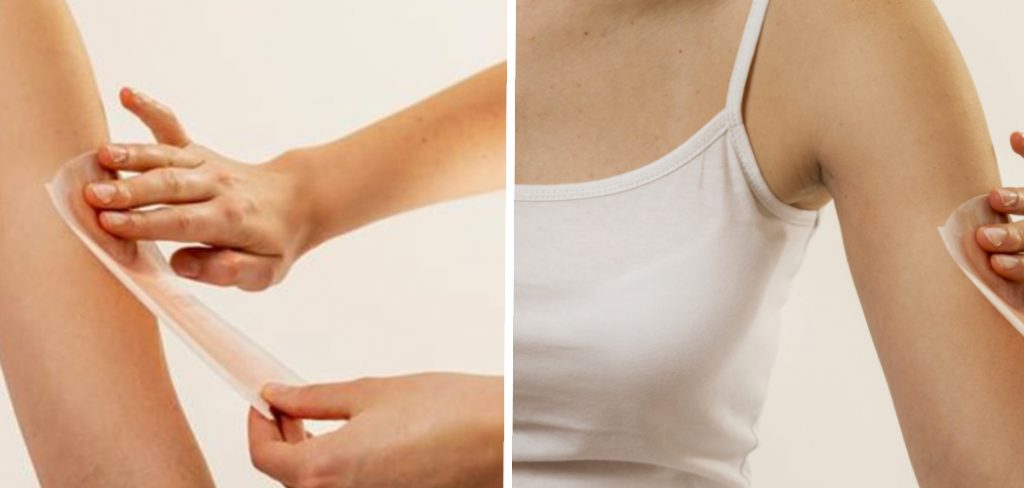
Step 4: Pull Off Wax
When it’s time to start removing the wax, do so in quick but gentle motions. Be sure to pull the wax off in the opposite direction of your hair growth for the best results. Pull it off as swiftly as possible to avoid any pain.
Step 5: Clean and Moisturize the Area
Once you’ve removed all the wax, it’s time to clean and moisturize the area. Use a mild cleanser and some cold water to rinse off any remaining wax residue. Follow up with a soothing moisturizer to hydrate your skin and reduce any redness.
Step 6: Apply Pre and Post Waxing Oils
Applying pre and post-waxing oils is also essential for hydrating, soothing, and protecting the skin after waxing. Use a gentle oil that won’t irritate the area or clog pores. Clogging will also prolong the time it takes for the wax to set and increase discomfort.
Step 7: Re-apply Wax if Necessary
If there are any patches of hair that have been missed, simply re-apply wax on those areas and repeat the process. Re-applying is also recommended if you notice any dark spots on the skin that could be caused by leaving excess wax.
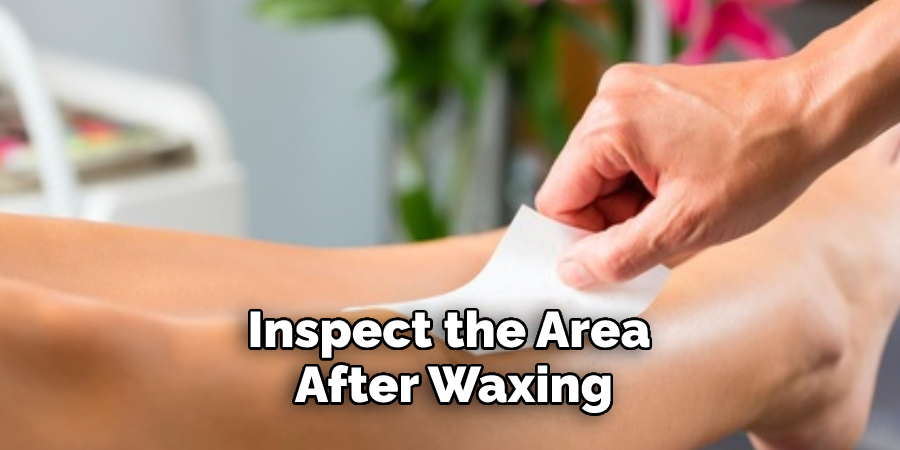
Step 8: Inspect for Ingrown Hairs
Be sure to inspect the area after waxing for any ingrown hairs. If you find any, use a warm compress to reduce inflammation and apply an ingrown hair treatment cream or lotion for the best results.
Step 9: Gently Exfoliate
It’s essential to exfoliate the area after waxing. This will help remove any dead skin cells and promote cell renewal. Use a gentle scrub or body wash that is specifically made for exfoliating sensitive areas.
Step 10: Wait 24 Hours Before Shaving
It’s important to wait at least 24 hours before shaving the area again. Hair removal wax has been known to irritate freshly-shaved skin, so it’s best to wait until any redness or irritation has subsided and then proceed with exfoliation and shaving if necessary.
8 Afterward Take Care Tips
1. Avoid tight clothing. After waxing your arms, you should avoid wearing tight clothing for at least 24 hours. Tight clothing can cause inflammation and skin irritation due to friction against the newly sensitive skin.
2. Apply antiseptic cream. Apply a topical antiseptic cream to the area where you waxed. This will help protect your skin from any bacterial infections. Antiseptic cream also acts as a moisturizer, providing your skin with an extra dose of hydration.
3. Use mild soap and water. When washing your arms after waxing, use mild soaps to avoid irritating the newly sensitive skin. Do not scrub the area vigorously; instead, use light circular motions to prevent further irritation.
4. Moisturize daily. After waxing, you should moisturize your arms daily to replenish lost hydration and protect the skin from dryness. A good moisturizer will also help soothe any redness or tenderness that may have resulted from waxing.
5. Wear sunscreen. Sun exposure can be especially harmful on freshly waxed skin, as the waxing process strips away a layer of protection. To avoid sunburns or long-term damage to the skin, make sure to wear sunscreen with SPF 30 or higher when going out in the sun.
6. Avoid hot water and saunas. Hot water can cause further irritation and inflammation to your freshly waxed skin, so it’s best to avoid hot showers and saunas. If you must take a bath, opt for lukewarm water instead.
7. Refrain from picking or scratching. Picking or scratching at the area can cause infection and scarring, both of which are undesirable results of waxing your arms.
8. Re-wax regularly. Waxing your arms regularly will help keep the hair away for longer and make it easier to maintain a smoother, softer look. How often you wax will depend on your individual preferences, but in general it is best to re-wax every 4-6 weeks. Remember that the more frequently you wax, the less painful it will be as the hair grows back finer and thinner.
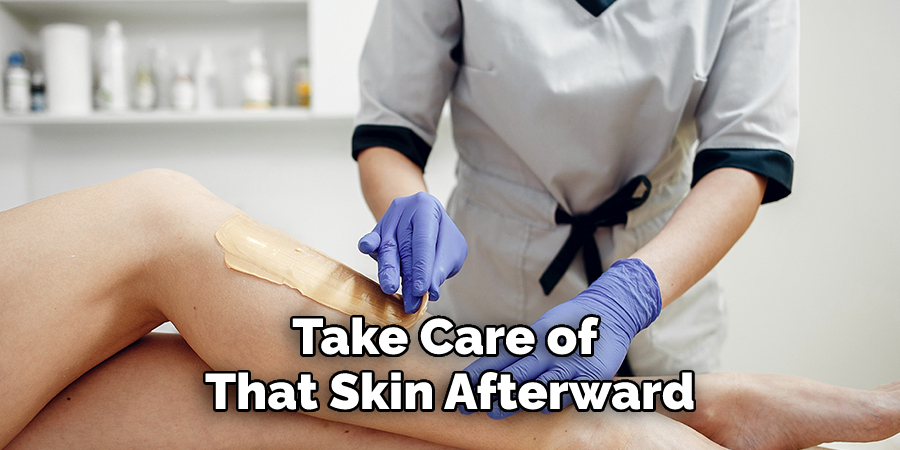
By following these tips, you can make sure that your newly waxed skin stays healthy and radiant. Waxing your arms can be a great way to get smooth, soft skin with minimal effort – just remember to take care of that skin afterward!
Frequently-asked Questions
How Frequent Should You Wax Your Arms?
It is best to re-wax your arms every 4-6 weeks in order to maintain a smooth, soft look. The more frequently you wax, the less painful it will be as the hair grows back finer and thinner. The time between waxes will also depend on your individual preferences.
How Do You Avoid Irritating Your Skin After Waxing?
To avoid irritating the skin after waxing, you should avoid tight clothing for at least 24 hours and use lukewarm water to wash your arms with mild soaps. Additionally, apply a topical antiseptic cream to the area and moisturize daily to replenish lost hydration. Be sure to wear sunscreen when going out in the sun, as newly waxed skin is more likely to be burned or damaged by UV rays. Refrain from picking or scratching at the area, and re-wax regularly for best results.
What Is the Best Way to Keep Your Skin Smooth After Waxing?
The best way to keep your skin smooth after waxing is to moisturize daily, wear sunscreen when going out in the sun, and re-wax regularly. Moisturizing will help soothe any redness or tenderness that may have resulted from waxing, while sunscreen will protect the skin from UV damage. Re-waxing regularly will help keep the hair away for longer and make it easier to maintain a smoother, softer look. With these tips, you can make sure that your newly waxed arms stay healthy and radiant!

Conclusion
If you follow these steps on how to wax arms, you should have successfully waxed your arms. Be sure to exfoliate prior to waxing and moisturize afterward for the best experience. If this is your first time waxing, it may be beneficial to visit a professional esthetician.
Estheticians are trained in hair removal and will ensure that you have a comfortable experience. It will also help to avoid any skin irritation and keep your arms looking smooth and healthy. Waxing your arms can be a great way to get smooth, soft skin with minimal effort – just remember to take care of that skin afterward! With these tips, you can make sure that your newly waxed arms stay healthy and radiant. Happy waxing!
About the Author
Jane Hubbard is a passionate beauty expert with a wealth of experience in makeup, hair, and overall beauty techniques. After years of working as a hairdresser specialist, she followed her entrepreneurial spirit and started her own consultancy business.
Jane has always been driven by her desire to help others feel confident in their own skin, and she does this by sharing her knowledge, experiences, and practical beauty tips. Through her consultancy, she empowers individuals to embrace their unique beauty, offering tailored guidance that boosts both self-esteem and personal style.
Professional Focus
Specializes in makeup, hairstyling, and beauty consulting.
Provides personalized beauty advice, tips, and techniques to help individuals feel confident in their appearance.
Dedicated to staying up-to-date with the latest industry trends and developments.
Passionate about creating a comfortable and empowering experience for every client.
Education History
University of Craft and Design – Bachelor of Fine Arts (BFA) in Woodworking and Furniture Design
Woodworking Apprenticeships – Extensive hands-on training with skilled craftsmen to refine carpentry and furniture making techniques
Online Courses & Masterclasses – Continued education in advanced woodworking techniques, design principles, and specialized tools
Expertise:
Makeup artistry, hairstyling, and beauty consulting.
Personalized beauty techniques to enhance confidence and self-expression.
Educating clients on how to maintain their beauty routines at home.