
Are you unsure of how to contour your uniquely shaped face? Are you struggling with contouring your face perfectly, especially if you have an upside down triangle-shaped face? If so, you’re not alone. Don’t worry—we’re here to help! Contouring is a great way to bring balance and structure back into your features, making them look sharper than ever. To make it easier for those of us blessed with the unique shape of an upside-down triangle, we’ve put together this guide on contouring like a pro in just a few steps—read on for our top tips that will leave you looking flawless.
Contouring can be tedious, even for the most experienced makeup connoisseurs. For those with an upside down triangle-shaped face, however, it can seem downright daunting! Take a deep breath and relax because we’ve got all the tips and tricks on how to contour upside down triangle face you need to master contouring with an upside down triangle-shaped face like a pro. With our easy steps and advice, you can quickly rock that gorgeous sculptured look!
Necessary Items for Contouring
Before we dive into the steps, let’s gather all the necessary items to contour your upside down triangle face.
- Contour powder or cream: This is the most crucial item, as this will be used to create shadows and define your features. Choose a shade that is slightly darker than your natural skin tone.
- Highlighter: This will bring light and brightness to certain areas of your face for a more defined and sculpted look.
- Blush: To add color and warmth to your cheeks, choose a blush that complements your skin tone.
- Angled contour brush: This brush is best for contouring as it helps with precise application.
- Beauty sponge or blending brush: This will blend out any harsh lines and create a seamless finish.
- Setting powder: To set your contour in place, use a translucent setting powder.
Now that you have all the necessary items, let’s move on to contouring your upside down triangle face.
10 Steps on How to Contour Upside Down Triangle Face
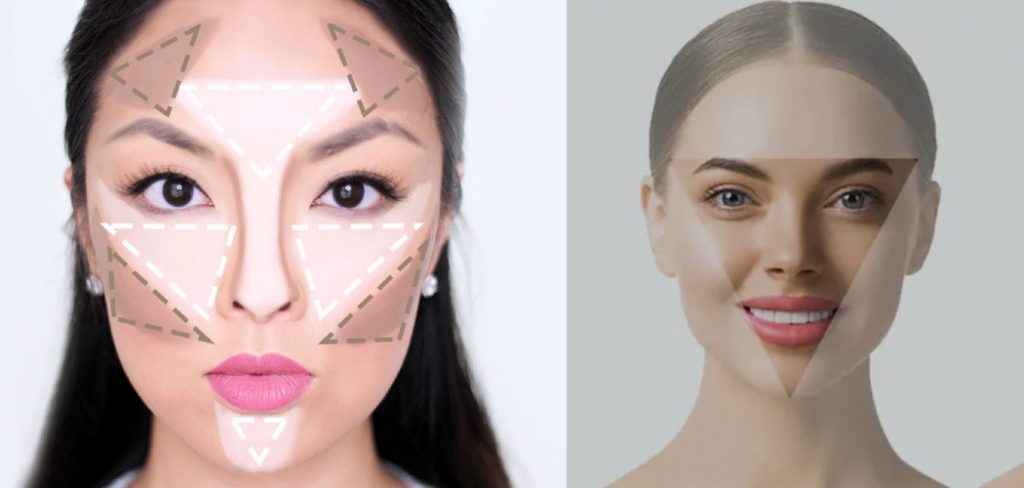
Step 1: Identify Your Face Shape
Before you can start contouring, knowing your face shape is important. As we will focus on the upside-down triangle-shaped face, here are some characteristics you should look out for:
- Broad forehead
- Narrow and sharp chin
- Prominent cheekbones
Once you’ve identified your face shape, you can move on to the next step.
Step 2: Contour Your Forehead
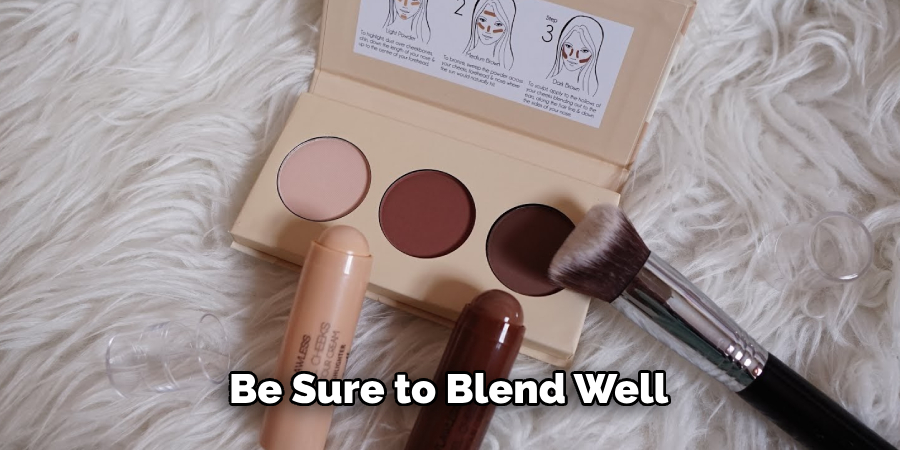
To soften the appearance of your forehead and create more balance, contour along the hairline. Apply a contour powder or cream to your temples, and blend it towards your hairline. Be sure to blend well for a natural look.
Step 3: Add Definition to Your Cheekbones
Next, we want to define those cheekbones using contour powder or cream. Start by placing the product at the top of your cheekbone and blending it in a diagonal line towards your ear.
Step 4: Contour Your Jawline
To add more definition to your jawline, apply contour powder or cream along your jawline and blend well. This will help to balance out the sharpness of your chin.
Step 5: Highlight Your Cheekbones
Highlight the top of your cheekbones to bring more light and dimension to your face. Use a highlighter with a slightly shimmery finish and apply it just above where you contoured your cheeks.
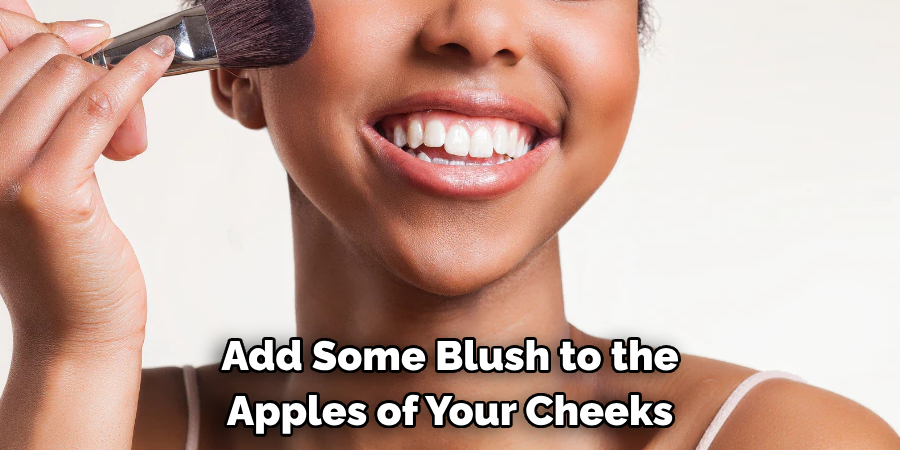
Step 6: Add Blush
For a pop of color and warmth, add some blush to the apples of your cheeks. Make sure to blend it out well for a natural look.
Step 7: Contour Your Nose
To create the illusion of a slimmer nose, apply your contour powder or cream along the sides of your nose, blending well as you go.
Step 8: Set Your Contour
Use a translucent setting powder to set your contour to ensure that your hard work stays in place all day.
Step 9: Blend Well
Using a beauty sponge or blending brush, blend out any harsh lines and make sure everything is well blended for a seamless finish.
Step 10: Practice Makes Perfect
Contouring takes practice, so don’t be discouraged if it doesn’t look perfect on your first try. Keep practicing and experimenting with different techniques until you find what works best for you.
Contouring may seem tricky, especially when dealing with an upside down triangle-shaped face, but with these ten tips, you can contour like a pro in no time. Remember to start light and build up gradually, as adding more product is easier than removing it. With practice and patience, you’ll soon be rocking that perfectly sculpted look daily! Don’t be afraid to use different products and techniques to find what works best for your unique face shape.
8 Additional Tips for Contouring
1. Choosing Products for Your Skin Type
If you have oily skin, opt for powder products, as they will help to absorb excess oil and stay in place longer. For dry skin, cream products are better as they provide extra moisture.
2. Start Light and Build Up
Adding more product than taking it away is always easier, so start with a small amount and gradually build up to achieve your desired look.
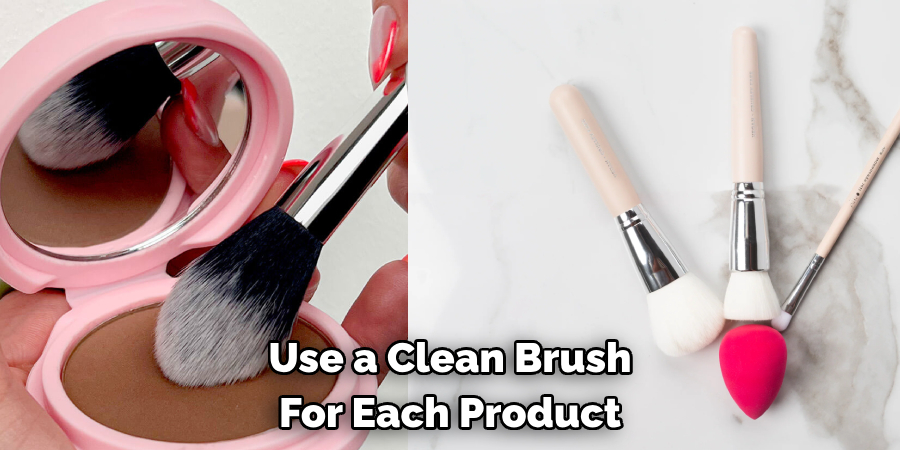
3. Use a Clean Brush for Each Product
Use a clean brush for each product to avoid muddying your contour and highlight shades. This will also help to create a more precise and defined look.
4. Don’t Forget to Blend Your Neck
To avoid any harsh lines or a “floating head” effect, blend your contour and highlight shades down onto your neck for a seamless finish.
5. Blend Outward
When blending, always start in the center of your forehead and blend outwards towards your hairline for a natural finish.
6. Use a Damp Makeup Sponge
Use a damp makeup sponge to blend out any harsh lines for a more natural and seamless blend. The dampness will help to blend the products without removing too much pigment.
7. Experiment with Different Techniques
Everyone’s face shape is different, so don’t be afraid to experiment and find the best contouring technique that works for you. It may not be the same as someone else’s, and that’s okay.
8. Practice, Practice, Practice
As with any makeup technique, practice makes perfect. Don’t be discouraged if it doesn’t look perfect on your first try. Keep practicing, and you’ll soon become a contouring pro!
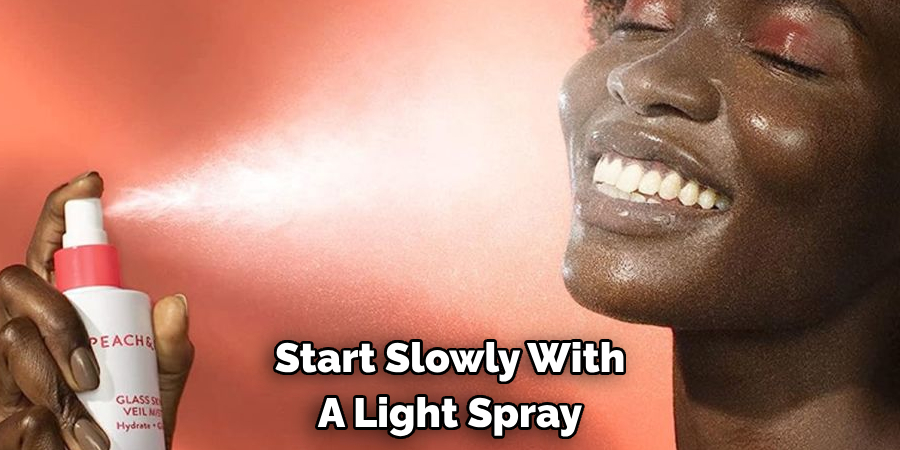
Taking the time to contour your unique face can seem daunting, but with the right tools and techniques, you can go from an upside down triangle face to a balanced and defined look with ease. Depending on the level of contouring you’d like to do, certain products better suit your needs. Start slowly with a light spray or powder foundation first, then build up your application using two shades of a cream-based formula.
Frequently Asked Questions
Can I Use Cream Products for Contouring?
Yes, you can use either powder or cream products for contouring. It depends on your skin type and preference. As mentioned earlier, powder products work better for oily skin, while cream products are suitable for dry skin.
Can I Contour Every Day?
Yes, you can contour every day if you wish. Just remember to keep it subtle and natural for daytime looks and amp it up for more dramatic looks at night.
Do I Need to Use All the Products Mentioned?
You don’t have to use all the products mentioned in this guide. You can choose the best ones for your skin type and personal preference. Just remember always to start light and build up gradually for a natural finish.
Is Contouring Necessary?
Contouring is not necessary; it’s an optional step in makeup application. It’s a useful technique for creating dimension and enhancing your natural features, but it’s completely up to personal preference. Remember, makeup is about self-expression and having fun!
So do what makes you feel confident and beautiful. If that includes contouring, go for it! If not, no worries – plenty of other ways to enhance your beauty. Ultimately, it’s up to you. But if you want to try contouring, hopefully, these tips will help guide you along the way.
Conclusion
Contouring can seem intimidating, but with the right products and techniques on how to contour upside down triangle face, anyone can achieve a perfectly sculpted look. To summarize, contouring can be a beneficial tool to accentuate the features of your upside down triangle face shape. From getting familiar with the three core elements of highlighting, contouring, and blending and learning where to apply best and blend each step of the contour process, you can now accessorize your face in previously unavailable ways!
You can take your look from barely-there to red carpet-ready with just a few simple techniques. Contour and highlight your way to success and unlock doors for endless looks and shapes beyond traditional limits. So, what are you waiting for? Get creative, mix it up, and make that gorgeous upside down triangle face pop! Remember to take your time and practice until you find what works best for you. Feel free to play around and experiment with different products and methods. And most importantly, have fun! Makeup is all about self-expression and feeling confident in your skin.
About the Author
Jane Hubbard is a passionate beauty expert with a wealth of experience in makeup, hair, and overall beauty techniques. After years of working as a hairdresser specialist, she followed her entrepreneurial spirit and started her own consultancy business.
Jane has always been driven by her desire to help others feel confident in their own skin, and she does this by sharing her knowledge, experiences, and practical beauty tips. Through her consultancy, she empowers individuals to embrace their unique beauty, offering tailored guidance that boosts both self-esteem and personal style.
Professional Focus
Specializes in makeup, hairstyling, and beauty consulting.
Provides personalized beauty advice, tips, and techniques to help individuals feel confident in their appearance.
Dedicated to staying up-to-date with the latest industry trends and developments.
Passionate about creating a comfortable and empowering experience for every client.
Education History
University of Craft and Design – Bachelor of Fine Arts (BFA) in Woodworking and Furniture Design
Woodworking Apprenticeships – Extensive hands-on training with skilled craftsmen to refine carpentry and furniture making techniques
Online Courses & Masterclasses – Continued education in advanced woodworking techniques, design principles, and specialized tools
Expertise:
Makeup artistry, hairstyling, and beauty consulting.
Personalized beauty techniques to enhance confidence and self-expression.
Educating clients on how to maintain their beauty routines at home.