

There is a small pause that happens before you reach for a skirt or shorts. You catch sight of those bluish, twisting lines along your legs, and suddenly the decision feels heavier than it should. Learning how to cover varicose veins with makeup hands that decision back to you, letting you choose when those veins fade quietly into the background.
So take a breath. This is more doable than it looks.
Smooth, even-looking skin is genuinely within reach, and the method is simpler than most people assume. We will walk through why veins show through in the first place, the products that actually deliver, a full step-by-step routine, and the small habits that keep everything looking flawless all day. Grab your makeup bag and let’s get into it.
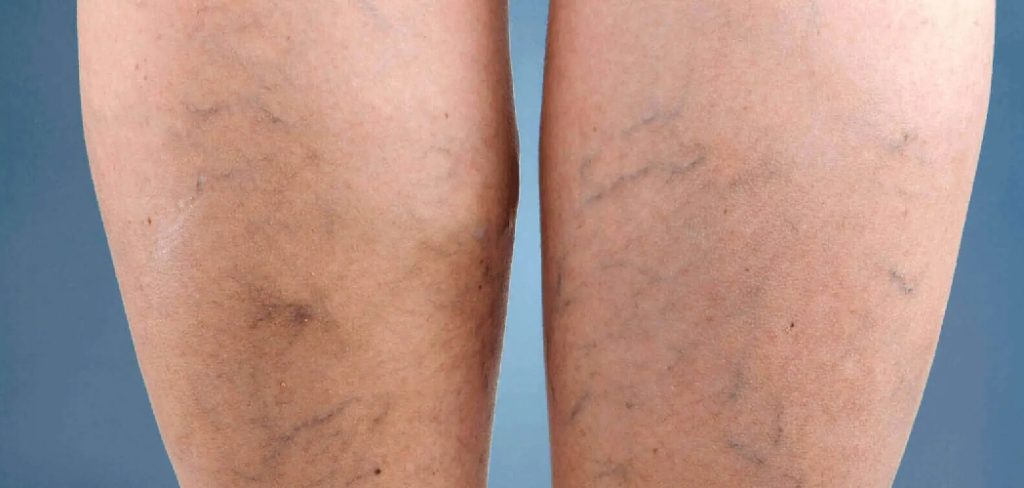
Understanding Varicose Veins Before You Cover Them
Before you start covering, it helps to know what you are working with. A little understanding here turns the whole process from guesswork into something that makes sense.
What Causes Veins to Show Through Skin
Varicose veins tend to form when the tiny valves inside them weaken and blood pools, pushing the vein closer to the surface. That is the short version, anyway.
Once they sit near the surface, they read as blue, purple, or sometimes green through the skin. This is incredibly common and nothing to feel self-conscious about.
Knowing the color matters more than you might think. It points you toward the right corrective shades later, which is really the secret to coverage that looks natural rather than caked on.
Why Standard Foundation Often Isn’t Enough
Here is where a lot of people give up too soon. A single swipe of regular foundation rarely hides a raised or darkly pigmented vein, and the bluish tone tends to peek right through.
Texture plays a part, too. Foundation alone can sit unevenly over a vein, drawing attention rather than hiding it.
The real answer comes down to color correction and full-coverage formulas working together. It sounds like more effort, and it is, a little. But that small extra step changes everything.
Gathering the Right Makeup Products
A few key items do most of the work here. You do not need a sprawling collection, just the right pieces.
Color Correctors That Neutralize Blue Tones
Color correctors are the quiet heroes of this whole routine. Peach and orange shades cancel out blue and purple veins, while yellow softens any green undertones.
It comes down to basic color theory, the idea that opposite tones neutralize each other. A peach corrector sitting over a blue vein essentially erases the coolness before any foundation goes on.
A little goes a long way. Finding the correct shade that suits both your skin tone and your vein color is, honestly, the single biggest game-changer in the entire process.

Full-Coverage Foundation and Body Makeup
Every day foundation and dedicated body makeup are not quite the same thing. Body and leg formulas are built for higher coverage and far better transfer resistance.
That matters on legs, which move, rub against clothing, and sweat through the day. A thicker, buildable formula simply holds up better under all that activity.
Match the product carefully to your skin tone and blend it into the surrounding area. The right base creates a seamless canvas, disguising the veins without ever looking heavy or obviously made up.
Prepping Your Skin for Flawless Coverage
Good coverage starts before any color touches your legs. Prep is the part people skip, and then wonder why their makeup slides off by lunchtime.
Cleansing and Exfoliating the Area
Clean, gently exfoliated skin gives makeup a smooth surface to grip. Wash the area, then lightly buff away any dry patches so the product glides on evenly.
This small step quietly prevents flaking and uneven texture down the line. Your skin does not need to be flawless here, just clean and prepped.
A few minutes of this is the difference between coverage that lasts and coverage that slides. It is worth the small effort.
Moisturizing and Priming for Longevity
Follow up with a light, fast-absorbing moisturizer, then a primer made for legs or body. The primer helps everything cling and resist transfer through the day.
Skip the heavy, greasy lotions. They can break down coverage before you have even left the house.
That smooth, ready feeling tells you the skin is prepped. Let each layer dry fully before moving on to color correction, since rushing this part tends to undo the good work.
How to Cover Varicose Veins With Makeup: Step-by-Step Guide
Here is the heart of it. Knowing how to cover varicose veins with makeup really comes down to a clear sequence, moving from visible veins to smooth, even skin without rushing. Take each step in order, and let the products do their job.
Step 1: Assess the Vein Color and Choose Your Corrector
Start by looking closely at your veins in good lighting. Are they reading blue, purple, or green?
That quick read points you to the right corrector. Peach or orange for blue and purple tones, yellow for anything green.
Trust the color theory here. Taking a moment to match correctly upfront saves time later and gives you far more believable coverage in the end.

Step 2: Apply Color Corrector Directly to the Veins
Dab a small amount of corrector right onto the visible veins, using a fingertip or a small brush. Focus only on the discolored areas, not the whole leg.
Gentle patting works better than rubbing, which tends to wipe the product straight back off. Watch the vein color begin to neutralize as you go.
A thin, targeted layer beats a heavy one nearly every time. Build it up gradually, and the result stays seamless rather than thick.
Step 3: Blend the Edges Carefully
Now soften only the outer edges of the corrector so it melts into the surrounding skin. The trick is to blend the edges without lifting the product off the veins themselves.
A damp sponge or a light fingertip does this well. The goal is to avoid harsh lines and patchy spots around the treated area.
Patience matters here. This careful blending is what separates obvious makeup from skin that simply looks naturally even.
Step 4: Layer Full-Coverage Foundation Over the Area
Apply your full-coverage foundation or body makeup over the corrected area, extending just slightly beyond it for a smooth transition. Build it in thin layers, letting each one set before adding more.
Match the foundation to the surrounding skin so the leg looks uniform. Tap rather than drag, which protects the corrector working underneath.
This is the moment the veins truly disappear. And again, thin and patient wins over one thick coat for a finish that looks natural and actually lasts.
Step 5: Set Everything With Powder
Lock in your work with a light dusting of translucent setting powder. Press it gently into the skin rather than sweeping it across, which can disturb the layers below.
Powder keeps the coverage from transferring onto clothing and helps it survive movement and warmth. A soft brush or puff does the job evenly.
That slightly matters; set feeling is your signal. The makeup is ready to last through a long day or a long evening.
Step 6: Add a Final Setting Spray and Check in Daylight
Mist a transfer-resistant setting spray to seal everything, then step into natural light for a final look. Daylight has a way of revealing any spots that need a touch more product or blending.
Make small corrections rather than starting over. A little dab here, a bit of blending there.
Then take it in. Smooth, even skin from every angle is a quietly satisfying thing, and that quick daylight review gives you the confidence to head out without second-guessing.

Choosing the Best Products for Different Skin Tones
Coverage behaves a little differently across skin tones. A few tailored notes can save you some trial and error.
Fair to Light Skin Tones
Lighter skin tends to show blue and purple veins clearly, which makes peach correctors and light-to-medium foundations the natural match. A slightly warm shade helps counter the coolness in the skin.
Keep the building subtle and sheer. That approach keeps the look natural and avoids an ashy or overly pale finish on delicate, fair complexions.
Medium to Olive Skin Tones
Orange-toned correctors work well here, standing up to deeper vein discoloration without leaving a gray cast behind. Match your foundation to the golden or olive undertone for seamless blending.
These warmer correctors are essential rather than optional. The right depth of correction keeps the coverage looking like real skin, not a noticeable patch.
Deep Skin Tones
Rich orange and red-toned correctors neutralize veins on deeper skin most effectively. Pair them with full-coverage foundations in warm, true-to-tone shades to avoid any dullness.
Finding correctly pigmented products may take a bit of searching. The payoff, though, is flawless coverage that honors the depth and warmth of your complexion rather than flattening it.
Common Mistakes That Make Coverage Look Obvious
Sometimes the coverage gives itself away, and usually it traces back to one of a few small habits. The fixes are easy once you spot them.
Skipping Color Correction
Jumping straight to foundation lets that bluish tone peek through, which then tempts you to pile on more product. That is how coverage starts looking heavy.
Add the corrector step instead. It feels unnecessary right up until you try it, after which you may never want to go without it again.
Applying Too Much Product at Once
Thick layers crack, transfer, and look cakey. It is the most common trap, and an understandable one when you are eager to hide the vein.
Go thin and buildable, with a little drying time between coats. Less product applied patiently outperforms a heavy hand, leaving skin that looks smooth and believable.
Forgetting to Set the Makeup
Unset coverage rubs onto clothing and fades within a few hours. All that careful work, gone by midafternoon.
Powder and setting spray are non-negotiable final steps. They are what turn a short-lived cover-up into coverage that survives sitting, walking, and warm weather.

Keeping Coverage Flawless All Day
Once you have nailed the application, a couple of simple habits protect the result. Neither takes much effort.
Touch-Up Tips for Long Days
Carry a small amount of corrector or a travel setting spray for quick midday refreshes. If a spot fades, gently pat product onto it without disturbing the surrounding makeup.
A thirty-second touch-up keeps everything looking fresh from morning into evening. These small fixes are completely normal, so there is no need to worry about coverage thinning at an awkward moment.
Removing Makeup Gently at Night
At the end of the day, dissolve heavier coverage with a cleansing oil or balm before you wash. This saves you from scrubbing skin that is already a little tired.
Gentle removal protects the skin over the veins and keeps it healthy for tomorrow. Follow with a soothing moisturizer.
Think of it as a small, restorative ritual. Treating the area kindly each evening tends to make the next day’s coverage apply even more smoothly.
Conclusion
Knowing how to cover varicose veins with makeup turns a moment of hesitation into a simple, quietly empowering routine. What once felt like a reason to cover up is really just a stain of color waiting for the right approach.
You now hold the full picture. Why veins show through, which correctors to choose, the step-by-step routine, and the habits that keep coverage flawless all day.
So gather your products and give the method a try today. Confidence grows with every smooth, even result, and you deserve to wear whatever makes you happy.

About the Author
Jane Hubbard is a passionate beauty expert with a wealth of experience in makeup, hair, and overall beauty techniques. After years of working as a hairdresser specialist, she followed her entrepreneurial spirit and started her own consultancy business.
Jane has always been driven by her desire to help others feel confident in their own skin, and she does this by sharing her knowledge, experiences, and practical beauty tips. Through her consultancy, she empowers individuals to embrace their unique beauty, offering tailored guidance that boosts both self-esteem and personal style.
Professional Focus
Specializes in makeup, hairstyling, and beauty consulting.
Provides personalized beauty advice, tips, and techniques to help individuals feel confident in their appearance.
Dedicated to staying up-to-date with the latest industry trends and developments.
Passionate about creating a comfortable and empowering experience for every client.
Education History
University of Craft and Design – Bachelor of Fine Arts (BFA) in Woodworking and Furniture Design
Woodworking Apprenticeships – Extensive hands-on training with skilled craftsmen to refine carpentry and furniture making techniques
Online Courses & Masterclasses – Continued education in advanced woodworking techniques, design principles, and specialized tools
Expertise:
Makeup artistry, hairstyling, and beauty consulting.
Personalized beauty techniques to enhance confidence and self-expression.
Educating clients on how to maintain their beauty routines at home.