
Are you tired of your forward helix piercing? Would you like to change it up with a different piece of jewelry?
Removing a forward helix piercing is a delicate process that requires patience, precision, and an understanding of the proper technique to ensure safety and minimize discomfort.
This small, cartilaginous area at the upper front of the ear can be particularly sensitive, making removing jewelry from this piercing slightly more challenging than others.
Whether you’re opting to change your jewelry, giving your piercing time to heal, or simply taking a break from your forward helix piercing, it’s essential to approach the removal process carefully.
In this guide, we’ll walk you through the step-by-step process of how to remove a forward helix piercing, highlighting the tools you’ll need and offering tips to maintain the health of your piercing site.
What are the Significance and Benefits of Forward Helix Piercing?
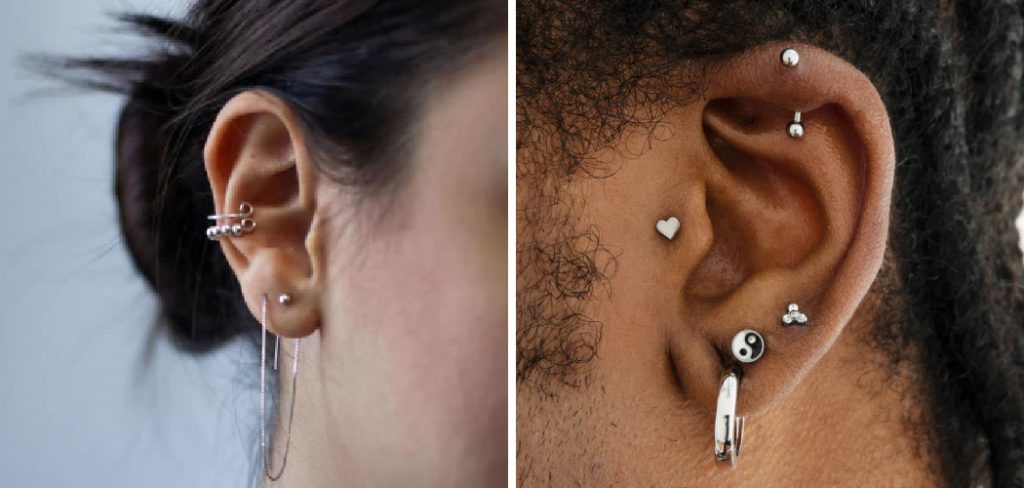
Before we dive into the removal process, it’s essential to understand the significance and benefits of a forward helix piercing. This popular ear piercing is done through the small cartilage fold at the front of your ear, just above the tragus. It can be adorned with various types of jewelry, such as studs or hoops, adding an edgy or elegant touch to your overall look.
However, aside from its aesthetic appeal, a forward helix piercing also has several potential benefits. Some people believe this type of piercing can help alleviate migraines and headaches, as it is said to stimulate specific pressure points in the ear.
Additionally, some individuals have reported improved hearing after getting a forward helix piercing, although more research is needed to confirm this claim.
Necessary Supplies for Removing a Forward Helix Piercing
Before beginning the removal process, gathering all the necessary supplies is important. These include:

- Clean Hands: Ensure your hands are thoroughly washed with soap and water before touching your piercing. This will help prevent any bacteria or germs from entering the piercing site.
- Sterile Gloves: Wearing sterile gloves will provide extra protection against infection.
- Cotton Swabs or Balls: You will use these to clean the area around your piercing before and after removal.
- Piercing-specific Pliers or Forceps: These tools are designed to safely remove jewelry without damaging the piercing or surrounding skin.
- Clean Towel: To dry the area after cleaning and removal.
- Sterile Saline Solution: This will be used to clean the piercing site and jewelry before and after removal.
Once you have all the necessary supplies, it’s time to begin the removal process.
10 Easy Steps on How to Remove a Forward Helix Piercing
Step 1: Prepare for the Removal Process
Before touching your piercing, wash your hands thoroughly with antibacterial soap. This will help minimize the risk of transferring bacteria to your piercing site. If you have long hair, tie it back or use a hair tie to keep it out of the way.
Step 2: Put on Sterile Gloves
Before proceeding, it is essential to wear a pair of sterile gloves. The gloves protect the piercing area from bacteria and germs on your hands and offer a better grip on the jewelry, especially if it is small or slippery. Ensure the gloves fit snugly on your hands to maintain precise control during removal.
Step 3: Clean the Area Around the Piercing
Before attempting to remove the jewelry from your forward helix piercing, it’s critical to cleanse the area. Gently wipe around the piercing site with a cotton ball or gauze pad soaked in piercing aftercare solution. This step helps remove any accumulated debris and reduces the risk of infection post-removal. Allow the area to air-dry for a few minutes or carefully dab it dry with a clean piece of gauze.
Step 4: Identify the Type of Jewelry Closure
The next crucial step is to carefully examine the type of closure your forward helix jewelry has. The most common types include screw-on balls, captive bead rings, and clicker rings. Knowing the closure type is fundamental because the technique for removal will vary accordingly.
For screw-on balls, you’ll need to twist the ball counter-clockwise. Captive bead rings require a gentle but firm pressure to pop the bead out. Meanwhile, clicker rings come with a hinge mechanism that you simply need to click open. Identifying the type accurately ensures you approach the removal process with the correct method, preventing any unnecessary tugging or damage to the piercing site.
Step 5: Gently Loosen the Closure
With a clear understanding of the type of jewelry closure you are dealing with, the next step is to carefully begin loosening it. If you are working with a screw-on ball, hold the post firmly with one hand while you twist the ball counter-clockwise with the other.
For captive bead rings, use your thumb and forefinger to gently apply pressure on either side of the bead until it pops out. In the case of clicker rings, locate the hinge and gently press or pull on the ring until it clicks open. Take your time with this step to avoid sudden movements that could harm your piercing.
Step 6: Remove the Jewelry Carefully
Once you have successfully loosened the closure, carefully remove the jewelry from your forward helix piercing.
If resistance is felt, do not force it. Instead, take a moment to readjust your grip and try again gently. The key is to pull the jewelry out smoothly to avoid causing any damage or pain to your piercing site. Remember, patience and a steady hand are crucial during this step to ensure a safe removal.
Step 7: Clean the Piercing Site Post-Removal
After the jewelry has been successfully removed, it is essential to clean the piercing site once again. Use a cotton ball or gauze pad soaked in a piercing aftercare solution to gently cleanse the area.
This step is crucial to prevent infection and to facilitate healing, especially if you plan to leave the piercing out for an extended period. Allow the area to air-dry or lightly dab it with a clean, dry piece of gauze.
Step 8: Store the Jewelry Properly
Once the jewelry is removed and the area is clean, ensure that the jewelry is also cleaned with the piercing aftercare solution. Dry it thoroughly and store it in a clean, dry place. This prevents the build-up of bacteria on the jewelry and ensures it is safe for use next time. Storing the jewelry properly also prevents it from getting lost or damaged.
Step 9: Monitor the Piercing Site for Any Signs of Infection
After removing your forward helix piercing and completing the cleaning process, it’s important to monitor the site for any signs of infection. Look out for symptoms such as redness, swelling, warmth, pain, or unusual discharge.
If any of these signs are present, it is advisable to seek medical attention promptly to prevent complications. Regular monitoring not only ensures the health of your piercing site but also enables timely intervention if needed.
Step 10: Consider Re-Piercing or Jewelry Reinsertion Carefully
If you plan to reinsert jewelry into your forward helix piercing after a break, or if you’re contemplating getting re-pierced in the same area, it’s crucial to ensure that the site is fully healed and free from any irritation or infection.
Consult with a professional piercer for advice and assistance with reinsertion or re-piercing to ensure it’s done safely and hygienically. Remember, the health and safety of your piercing site should always take precedence.
By following these ten easy steps, you can safely and effectively remove your forward helix piercing without causing any harm or irritation to the area.
5 Additional Tips and Tricks
- Apply a Warm Compress: Before attempting to remove your forward helix piercing, applying a warm compress can help. The warmth not only soothes the area but also promotes blood flow, potentially loosening the piercing slightly and making removal smoother.
- Use Clean Hands and Tools: Always wash your hands thoroughly before touching your piercing. If you’re using tools, such as tweezers or pliers, ensure they are sterilized to prevent any risk of infection.
- Twist Gently: If the jewelry has a screw-on ball, gently twist it counterclockwise while holding the post steady. Apply steady, gentle pressure to avoid any sudden movements that might cause injury.
- Lubrication Helps: Applying a small amount of lubricant (such as petroleum jelly or a specific product designed for piercings) can make the process smoother. This is particularly useful if the skin around the piercing feels tight or dry.
- Consider Professional Help: If you’re finding it difficult to remove the piercing or if you experience significant discomfort, it might be best to seek assistance from a professional piercer. They have the right tools and expertise to remove the jewelry safely and can provide advice on aftercare to avoid complications.
With these additional tips and tricks, removing a forward helix piercing should be a smoother and less daunting process. Remember to always prioritize the health and safety of your piercing and seek professional help if needed.
5 Things You Should Avoid
- Avoid Using Force: Do not attempt to forcibly remove the jewelry if it feels stuck. Using too much force can cause injury to the ear or damage the piercing site. Instead, revisit the lubrication step or consider seeking professional help.
- Don’t Use Unsanitary Tools: Never use tools that haven’t been adequately sterilized or your hands if they are not clean. Introducing bacteria to the site can lead to infections and prolonged healing times.
- Steer Clear of Harsh Chemicals: Avoid using products or chemicals that are not specifically designed for use with piercings, such as alcohol or hydrogen peroxide. These can irritate the skin and may hinder the healing process.
- Do Not Rush the Process: Taking your time to remove the piercing carefully is crucial. Rushing through the removal process can lead to mistakes, unnecessary pain, and potential injury.
- Ignore the Importance of Aftercare: Once the piercing is removed, the care for the site shouldn’t stop. Skipping aftercare can lead to complications such as infections or delayed healing. Continue to clean the area as recommended until it has fully healed.
Adhering to these precautions will help ensure the removal of your forward helix piercing is safe and complication-free.
How to Unscrew a Helix Piercing Ball?
To unscrew a helix piercing ball, follow these steps:

- Prepare the Area: Before attempting to remove the ball, make sure your hands are clean and the piercing site is gently cleaned with warm water and mild soap.
- Use a Mirror: It can be helpful to use a mirror to see the jewelry and its placement before trying to remove it.
- Hold the Post Steady: Use your non-dominant hand to hold the post of the piercing steady.
- Twist Gently: With your dominant hand, gently twist the ball counterclockwise while holding the post steady. Apply slight pressure and avoid any sudden movements.
- Use Lubrication (Optional): If you encounter resistance, try adding a small amount of lubricant to the area to make the process smoother.
- Remove the Ball: Once the ball is unscrewed, gently pull it away from the post and set it aside.
- Cleanse the Area: After removing the jewelry, clean around the piercing with warm water and mild soap to prevent any buildup or infection.
If you encounter difficulty in unscrewing the ball, consider seeking professional help to avoid any injury or damage to the piercing. Remember to always prioritize safety and cleanliness when handling piercings.
How to Take Out Helix Piercing With Flat Back?
To take out a helix piercing with a flat back, follow these steps:
- Prepare the Area: Before attempting to remove the jewelry, make sure your hands are clean and the piercing site is gently cleaned with warm water and mild soap.
- Use a Mirror: It can be helpful to use a mirror to see the jewelry and its placement before trying to remove it.
- Hold the Post Steady: Use your non-dominant hand to hold the post of the piercing steady.
- Remove the Back Plate: With your dominant hand, gently pull the jewelry back plate away from the post. Some flat-back jewelry may also have a screw-on back that can be unscrewed instead.
- Gently Remove the Post: Once the back plate is removed, gently pull on the post to remove it from your ear.
- Cleanse the Area: After removing the jewelry, clean around the piercing with warm water and mild soap to prevent any buildup or infection.
If you encounter difficulty in removing a helix piercing with a flat back, consider seeking professional help to avoid any injury or damage to the piercing. Remember always to prioritize safety and cleanliness when handling piercings.
Overall, removing a helix piercing with a flat back is similar to unscrewing a ball closure but may require some additional steps depending on the type of jewelry you have.
Again, if you encounter difficulty or discomfort during the process, seek professional assistance. Now that you know how to safely remove a forward helix piercing and some helpful tips and tricks, you can confidently handle any jewelry changes or removals with ease.
How Do You Hide a Forward Helix Piercing?
There are a few ways to hide a forward helix piercing, depending on the placement and type of jewelry you have. Here are some tips:

- Wear a More Oversized Earring: If your forward helix piercing is visible, try wearing a more oversized earring, such as a hoop or dangle earring, that can cover it up.
- Use Flesh-colored Jewelry: There are also flesh-colored options for jewelry, such as clear or nude-tone retainers, that can blend in with your skin and make the piercing less noticeable.
- Cover It With Hair: If possible, you can try styling your hair to cover up the piercing or wear a headband or hat to conceal it.
- Apply Makeup: You can also use makeup to cover up the piercing, such as using foundation or concealer on the area.
Keep in mind that these methods may not completely hide your piercing and it’s important to still properly care for it while it is healing. If you are unable to conceal your forward helix piercing due to work or other reasons, consider opting for a different placement or waiting until the piercing is fully healed before showing it in public.
Conclusion
How to remove a forward helix piercing safely is a meticulous process that demands attention to detail and a commitment to proper aftercare.
By following the steps outlined above, such as preparing the area, using the right techniques for unscrewing or removing the backing, and maintaining cleanliness throughout the process, you can minimize the risk of complications.
Importantly, patience and gentle handling are key to preventing damage to the skin or the piercing site. If at any point you feel unsure or encounter issues, seeking professional assistance is advisable to ensure the health and safety of your piercing.
Ultimately, by adhering to these guidelines, you can successfully manage the removal of your forward helix piercing, preserving the integrity of your skin and allowing for future jewelry changes or removals with confidence.
About the Author
Jane Hubbard is a passionate beauty expert with a wealth of experience in makeup, hair, and overall beauty techniques. After years of working as a hairdresser specialist, she followed her entrepreneurial spirit and started her own consultancy business.
Jane has always been driven by her desire to help others feel confident in their own skin, and she does this by sharing her knowledge, experiences, and practical beauty tips. Through her consultancy, she empowers individuals to embrace their unique beauty, offering tailored guidance that boosts both self-esteem and personal style.
Professional Focus
Specializes in makeup, hairstyling, and beauty consulting.
Provides personalized beauty advice, tips, and techniques to help individuals feel confident in their appearance.
Dedicated to staying up-to-date with the latest industry trends and developments.
Passionate about creating a comfortable and empowering experience for every client.
Education History
University of Craft and Design – Bachelor of Fine Arts (BFA) in Woodworking and Furniture Design
Woodworking Apprenticeships – Extensive hands-on training with skilled craftsmen to refine carpentry and furniture making techniques
Online Courses & Masterclasses – Continued education in advanced woodworking techniques, design principles, and specialized tools
Expertise:
Makeup artistry, hairstyling, and beauty consulting.
Personalized beauty techniques to enhance confidence and self-expression.
Educating clients on how to maintain their beauty routines at home.