
Achieving a sun-kissed glow without exposing your skin to harmful UV rays is easier than ever with the convenience of at-home spray tanning. Whether you’re preparing for a special event or just want to maintain a bronzed look year-round, learning how to spray tan yourself can save you time and money.
This guide will walk you through the steps necessary to achieve an even, streak-free tan from the comfort of your own home.
What is Spray Tanning?
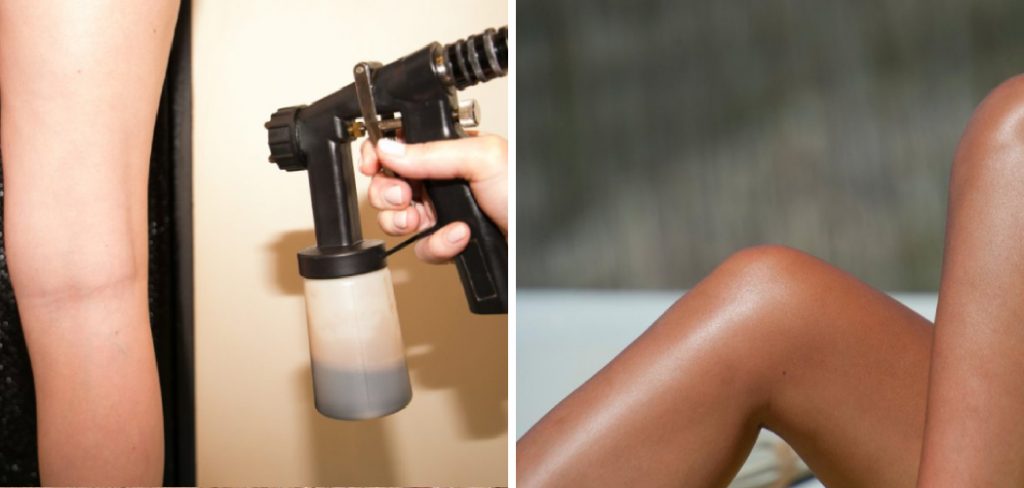
Spray tanning is a method of applying a fine mist of tanning solution to the skin to achieve a bronzed appearance. The active ingredient in most tanning solutions is dihydroxyacetone (DHA), a colorless chemical that interacts with the amino acids in the dead cells on the skin’s surface layer to produce a brown color.
Unlike sunbathing or using tanning beds, spray tanning does not involve harmful UV radiation, making it a safer alternative for achieving a tanned appearance. The results can last anywhere from a few days to a week, depending on skin type and how well the tan is maintained.
Why Spray Tan at Home?
While many people choose to visit a professional salon for spray tanning, there are several benefits to doing it yourself at home. For one, it is much more cost-effective in the long run. A single session at a salon can range from $30 to $50, with additional costs for touch-ups and maintenance. By purchasing your own equipment and supplies, you can save money and have the convenience of being able to tan whenever you want.
Another benefit is the privacy and comfort of being in your own home. Many people feel self-conscious when getting undressed in front of strangers at a salon or dealing with a technician who may not understand their desired level of tan. By doing it yourself at home, you have complete control over the process and can achieve your desired results without feeling self-conscious.
What You Will Need
To get started with at-home spray tanning, you will need a few key items:
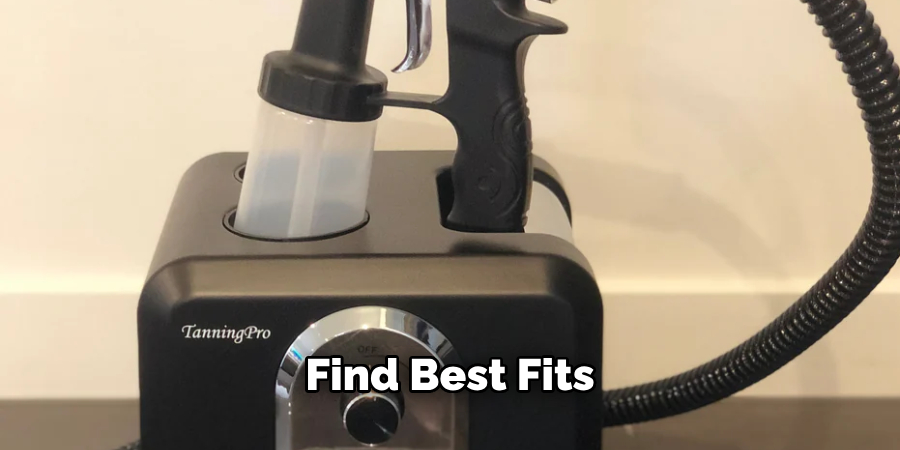
A Quality Spray Tan Machine:
There are many options available on the market, so do some research and read reviews to find one that best fits your needs and budget. Look for a machine that sprays evenly and has adjustable settings for different areas of the body.
Tanning Solution:
Choose a solution with natural ingredients and a shade suitable for your skin tone. You can find solutions in various shades, from light to dark, to achieve your desired level of tan.
Exfoliating Mitt or Scrub:
Proper exfoliation is key to achieving an even tan. Use an exfoliating mitt or scrub before tanning to remove dead skin cells and create a smooth surface to which the tanning solution can adhere.
Applicator Mitt:
This will help you evenly distribute the tanning solution and prevent staining on your palms.
Moisturizer:
Moisturize dry areas, such as elbows and knees, before tanning to prevent the solution from clinging to those areas and creating dark patches.
7 Step-by-step Guidelines on How to Spray Tan Yourself
Step 1: Prep Your Skin
The foundation of a flawless spray tan starts with properly prepped skin. Begin by exfoliating your entire body at least 24 hours before your tanning session. This step is crucial as it removes dead skin cells, ensuring a smooth surface to which the tanning solution can adhere. Use an exfoliating mitt or a body scrub with gentle circular motions, paying extra attention to rough areas like elbows, knees, and ankles.
Shave or wax any areas of unwanted hair after exfoliating, but make sure to do this at least 24 hours before tanning to allow your skin time to recover and to prevent the tanning solution from settling into any open pores. Finally, moisturize thoroughly after exfoliation, but avoid applying lotion, deodorant, or any oily products on the day of your tanning session, as they can create a barrier and hinder the tanning solution’s effectiveness. Proper skin prep is key to achieving an even, long-lasting tan.
Step 2: Set Up Your Tanning Area
Creating the right environment for your spray tanning session is essential to avoid mess and achieve the best results. Choose a well-ventilated area, such as a bathroom with an exhaust fan or a room with open windows, to ensure proper air circulation. Lay down old towels or a disposable tarp on the floor and over any surfaces that might get sprayed, as the tanning solution can stain. If possible, set up your tanning area in a shower or bathtub to contain any overspray and make cleanup easier.

Make sure you have good lighting to see what you’re doing and to avoid missing any spots. Having a full-length mirror can also be very helpful for checking your coverage as you go. Gather all your supplies within arm’s reach—you’ll need your spray tanning machine, tanning solution, applicator mitt, moisturizer, and some wet wipes for quick cleanups. Once everything is set up, change into old, dark-colored clothing or a swimsuit that you don’t mind getting stained, and tie your hair back to keep it out of the way. Now, you’re ready to start your tanning session with confidence.
Step 3: Familiarize Yourself with Your Spray Tan Machine
Before using your spray tan machine, read the user manual and familiarize yourself with its settings. Practice spraying some water on a piece of paper or cardboard to get a feel for how the machine works and adjust the settings according to your preference.
Most machines come with adjustable nozzle sizes, so make sure you choose one that’s suitable for the area you’re tanning—use a larger nozzle for larger areas like legs and arms and a smaller one for more precise spots like hands and feet.
Step 4: Load Your Tanning Solution into the Machine
Once you are comfortable with using your spray tan machine, it’s time to load the tanning solution. First, give the tanning solution bottle a good shake to ensure the ingredients are well-mixed. Next, carefully pour the solution into the machine’s designated reservoir, filling it according to the manufacturer’s recommended level. Be cautious not to overfill, as this can cause the solution to spill and create a mess during application.
After filling the reservoir, securely fasten the cap or lid to prevent any leaks. It’s a good practice to double-check for any drips or loose fittings before starting the application. With your machine loaded and ready, you are all set to begin your tanning session. Make sure you are in your prepped tanning area and have all the necessary items within reach, as it’s now time to achieve your perfect at-home tan.
Step 5: Start Spraying
Stand approximately 12 inches away from your body and hold the machine at a slight angle, pointing down towards the area you are spraying. Begin by spraying in long, even strokes, moving the machine in a circular motion to avoid any missed spots. Remember to apply the tanning solution lightly—less is more when it comes to spray tanning.
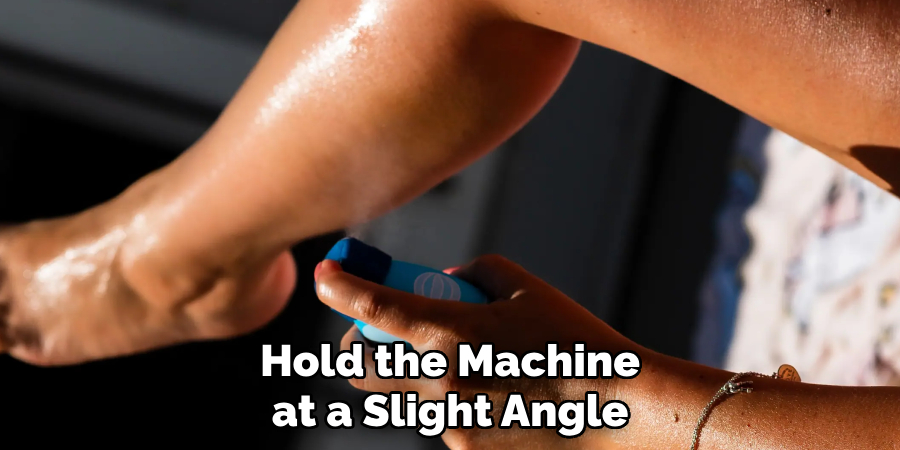
Start with larger areas like your legs and stomach before moving on to more delicate areas like your face and neck. For these areas, use a smaller nozzle or adjust the settings for lighter pressure to achieve a natural look.
Step 6: Use the Applicator Mitt
Once you’ve sprayed the tanning solution over your body, it’s time to use the applicator mitt to ensure an even distribution. Gently glide the mitt over your skin in circular motions, blending the solution thoroughly to avoid streaks or uneven patches. Pay extra attention to areas like your elbows, knees, and feet where the solution may settle and create darker spots. The mitt helps to buff the tan into your skin, giving you a smooth, flawless finish.
If you notice any areas where the tanning solution has pooled or appears too thick, use the mitt to blend it out immediately. The applicator mitt also works well for blending around tricky spots like your hairline and wrists, ensuring a seamless transition between tanned and untanned skin. Make sure the mitt is clean and dry before starting, and rinse it out after use to keep it in good condition for future tanning sessions. By taking this extra step, you’ll achieve a more natural and uniform tan that looks professionally applied.
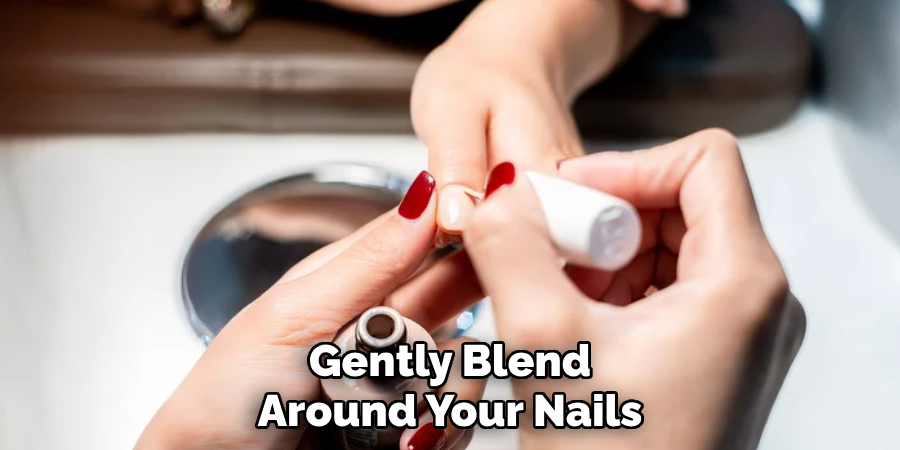
Step 7: Finishing Touches and Cleanup
After you’ve finished spraying and blending the tanning solution, use a makeup brush or cotton swab to gently blend around your nails, in between your fingers and toes, and in any other areas where the tan may have settled. This step helps to prevent any dark spots or streaks in these hard-to-reach places.
Once you’re satisfied with your tan, wait a few minutes for it to dry before getting dressed. Avoid wearing tight-fitting clothes that could rub off the tanning solution during this time. After about 8-10 hours (or as recommended by your tanning solution), take a shower to rinse off any excess solution and reveal your beautiful, bronzed glow. Be sure to pat yourself dry with a towel instead of rubbing and avoid using harsh soaps or exfoliants that could fade the tan faster.
Following these steps and tips on how to spray tan yourself will help you achieve a flawless, natural-looking tan from the comfort of your own home. Remember to always read and follow the instructions provided by your tanning solution and machine, and don’t be afraid to practice until you find the perfect technique for you. Happy tanning!
Frequently Asked Questions
Q: How Long Does a Spray Tan Typically Last?
A: This can vary depending on the individual’s skin type, aftercare routine, and tanning solution used. On average, a spray tan can last anywhere from 5-10 days. By following proper aftercare, you can prolong the lifespan of your tan.
Q: Will a Spray Tan Protect Me From Sunburn?
A: No, spray tanning does not provide any protection against the sun’s UV rays. It is essential to still use sunscreen when spending time outdoors to avoid sunburn and other skin damage.
Q: Can I Shower After Getting a Spray Tan?
A: It is best to wait at least 8-10 hours before showering after getting a spray tan. This allows enough time for the tanning solution to fully develop on your skin. After that, you can shower normally without worrying about washing off the tan.
Q: Will a Spray Tan Turn Me Orange?
A: This is a common concern, but as long as you follow the instructions and use a high-quality tanning solution, you should not end up with an orange tint. It is essential to choose a shade that complements your natural skin tone and to apply the solution evenly for the most natural-looking results.

Conclusion
Achieving a flawless, natural-looking tan at home can be a straightforward and rewarding process with the right tools, techniques, and aftercare routines. By following the step-by-step guide on how to spray tan yourself outlined above, you can confidently spray tan yourself without the need for salon visits.
Remember to take your time, practice patience, and pay attention to detail to ensure even coverage and a smooth finish. With these tips in mind, you’ll be able to enjoy a sun-kissed glow all year round while saving time and money. Happy tanning!
About the Author
Jane Hubbard is a passionate beauty expert with a wealth of experience in makeup, hair, and overall beauty techniques. After years of working as a hairdresser specialist, she followed her entrepreneurial spirit and started her own consultancy business.
Jane has always been driven by her desire to help others feel confident in their own skin, and she does this by sharing her knowledge, experiences, and practical beauty tips. Through her consultancy, she empowers individuals to embrace their unique beauty, offering tailored guidance that boosts both self-esteem and personal style.
Professional Focus
Specializes in makeup, hairstyling, and beauty consulting.
Provides personalized beauty advice, tips, and techniques to help individuals feel confident in their appearance.
Dedicated to staying up-to-date with the latest industry trends and developments.
Passionate about creating a comfortable and empowering experience for every client.
Education History
University of Craft and Design – Bachelor of Fine Arts (BFA) in Woodworking and Furniture Design
Woodworking Apprenticeships – Extensive hands-on training with skilled craftsmen to refine carpentry and furniture making techniques
Online Courses & Masterclasses – Continued education in advanced woodworking techniques, design principles, and specialized tools
Expertise:
Makeup artistry, hairstyling, and beauty consulting.
Personalized beauty techniques to enhance confidence and self-expression.
Educating clients on how to maintain their beauty routines at home.