
Social media has completely transformed the way we approach at-home manicures, constantly introducing us to innovative hacks that make salon-quality designs accessible to everyone. One of the most captivating trends to emerge recently is the “aura” nail effect, which traditionally requires a professional airbrush machine and a steady hand. However, beauty enthusiasts have discovered a brilliant workaround that delivers that same soft, diffused, and dreamy look using a product you likely already have in your makeup bag. Learning how to do eyeshadow nails at home is easier than you think, and it allows you to create stunning, gradient designs without investing in expensive equipment or undergoing hours of professional training.
This technique is perfect for beginners because it is incredibly forgiving and allows for endless creativity with color combinations. Unlike precise line work or intricate hand-painting, the eyeshadow method relies on soft blending and diffusion. Whether you want a bright pop of neon for summer or a moody, dark aura for the cooler months, the principles remain the same. By using eyeshadow pigment over gel polish, you can achieve a seamless fade that looks like it was sprayed on by a pro. In this guide, we will walk you through every single detail you need to know to master this viral trend from the comfort of your own home.
Why Learn How to Do Eyeshadow Nails?
The primary reason this technique has taken the beauty world by storm is its accessibility and versatility. Traditional airbrushing requires a compressor, a specialized gun, specific paints, and a lot of maintenance to keep the equipment from clogging. For the average person doing their nails at home, that is simply too much hassle and cost. The eyeshadow technique mimics that airbrushed “aura” effect perfectly by utilizing the powdery texture of eye makeup to create soft blooms of color. It bridges the gap between professional artistry and DIY convenience, democratizing a style that was once exclusive to high-end nail studios.
Step-by-Step Guide: How to Do Eyeshadow Nails
Step 1: Prep and Prime Your Nails
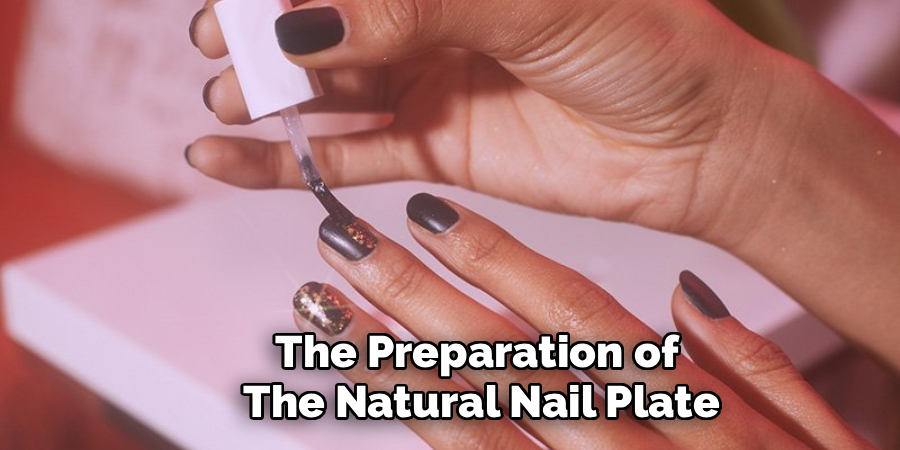
The foundation of any long-lasting manicure lies in the preparation of the natural nail plate. Before you even reach for a bottle of polish, you must ensure your canvas is immaculate. Start by pushing back your cuticles gently with a pusher or an orange wood stick to create more surface area. Using a fine-grit buffer or file, lightly buff the surface of your nails to remove the natural shine; this texture helps the gel product adhere significantly better and prevents premature lifting.
Shape your nails to your desired form, whether that is almond, square, or coffin. Finally, cleanse the nail plate thoroughly with isopropyl alcohol or a lint-free wipe to remove any dust, oils, or debris. This step is non-negotiable because any remaining oil will cause your beautiful design to peel off within days.
Step 2: Apply a Base Coat
Once your nails are clean and dry, it is time to apply your gel base coat. This clear layer acts as the anchor for your entire manicure, protecting your natural nail from staining while bonding the color to the nail plate. Apply a thin, even layer of base coat, being careful not to flood the cuticles or the sidewalls of your skin.
If you do get product on your skin, clean it up with a brush dipped in acetone before curing. Cap the free edge of the nail by running the brush along the tip to prevent chipping. Cure the base coat in your UV or LED lamp according to the manufacturer’s instructions, which is typically thirty to sixty seconds. The layer will remain tacky after curing, which is normal and necessary for the next step.
Step 3: Choose and Apply the Base Color
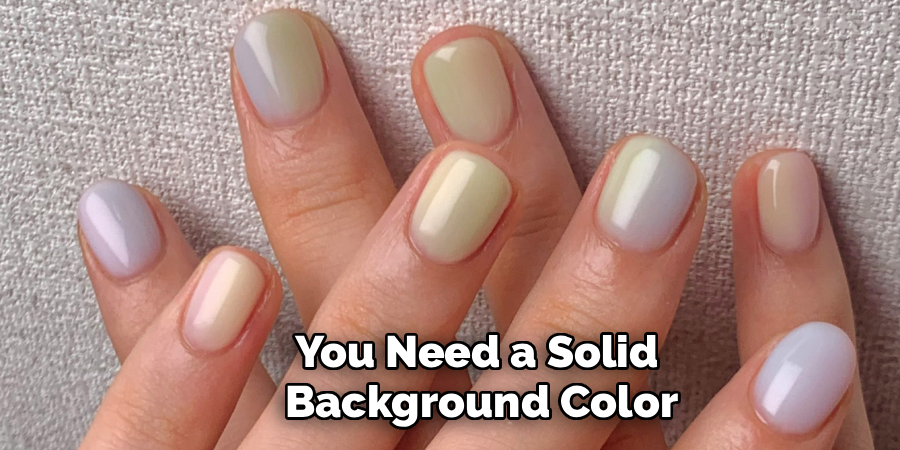
For the eyeshadow pigment to pop and the aura effect to be visible, you need a solid background color. A milky white, soft nude, or pale pink usually works best as it provides a neutral canvas that allows the gradient to stand out, but you can use black for a moody, galaxy-inspired look. Apply your chosen gel color in thin, smooth strokes. It is better to apply two or three thin coats rather than one thick coat, as thick gel can bubble or wrinkle in the lamp.
Cure each coat for the recommended time. Ensure that your final layer of color is fully opaque and smooth. At this stage, you have a choice: you can either wipe off the tacky inhibition layer with alcohol for a more subtle pigment grip, or apply a matte top coat and cure it, which creates a velvety surface that grabs eyeshadow pigment exceptionally well.
Step 4: Selecting and Buffing the Eyeshadow
Now begins the artistic part of the process where the magic happens. Select the eyeshadow color you want to use for your aura design; highly pigmented matte shadows tend to work better than shimmers for this specific look. Take a small sponge applicator—the kind that often comes free with palettes—or a small, fluffy makeup brush. Rub the applicator into the eyeshadow pan to pick up a generous amount of dust.
When you are figuring out how to do eyeshadow nails, the application technique is key. Gently tap the pigment onto the center of the nail, or wherever you want the “aura” center to be. Do not swipe it immediately; just pack the color onto that specific spot to establish the highest point of saturation.
Step 5: Creating the Gradient or Design
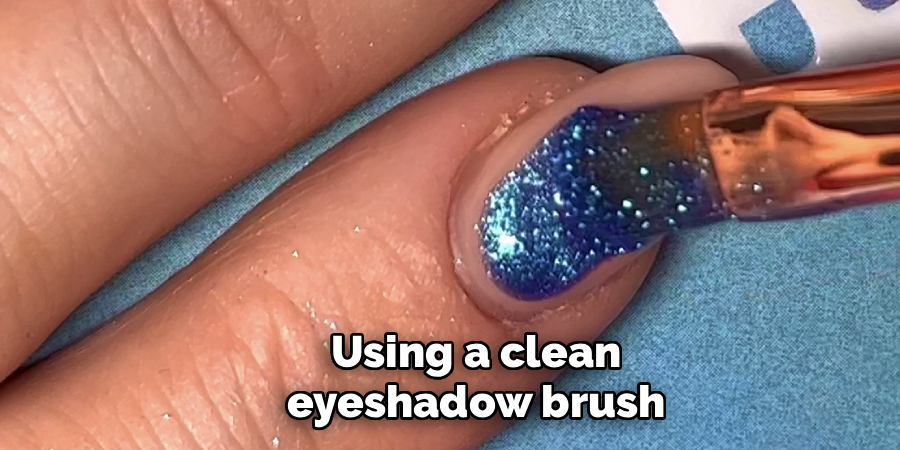
With your color packed into the center, you now need to diffuse it outwards to create that seamless, airbrushed fade. Using a clean eyeshadow brush or a clean side of your sponge, gently buff the edges of the pigment in circular motions. The goal is to have the color intense in the middle and slowly fading into nothingness as it reaches the edges of the nail.
You can layer different colors here as well; for example, you could put a dark pink in the center and a lighter orange on the outside to create a sunset effect. If the color is not vibrant enough, add more pigment to the center and repeat the buffing process. The beauty of this step is that dry powder is very easy to manipulate, so take your time blending until you are happy with the smoothness of the gradient.
Step 6: Cleaning Up the Edges
Working with loose powder inevitably leads to a bit of a mess, and you will likely find eyeshadow dust on your fingertips and cuticles. Before you seal the design, it is crucial to clean up the surrounding skin to ensure a professional finish. Take a small brush dipped in isopropyl alcohol or acetone and carefully wipe away any pigment that has landed on your skin or cuticles.
Be very careful not to touch the nail surface itself, or you will smudge your beautiful blending work. You can also use a fluffy brush to dust off excess loose powder from the nail that has not adhered to the gel. This step ensures that when you apply your top coat, you are not dragging loose particles across the nail or sealing dirt onto your skin, which could lead to allergic reactions or lifting.
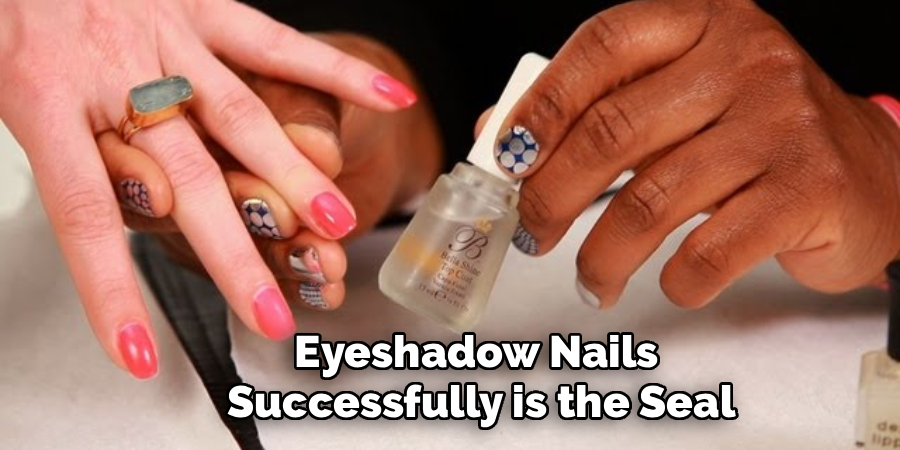
Step 7: Sealing with a Top Coat
The final secret in how to do eyeshadow nails successfully is the seal. Because eyeshadow is just loose powder, it will wash off immediately with water if it is not encapsulated correctly. You must apply a generous layer of gel top coat over your design. When applying the top coat, try to “float” the brush over the nail rather than dragging the bristles hard against the surface; dragging can smear the powder and ruin the gradient.
Ensure you cover the entire nail, including capping the free edge. You can choose a glossy top coat for a high-shine, jelly look, or a matte top coat for a soft, velvet finish. Cure this final layer for a full sixty seconds to ensuring everything is locked in tight. Once cured and wiped (if using a wipe-top coat), your design is indestructible.
Frequently Asked Questions
Can I Use Old or Expired Eyeshadow for This?
Yes, you absolutely can use old or expired eyeshadow for nail art. In fact, this is one of the best ways to repurpose makeup that is no longer safe to use near your eyes. While the skin on your eyelids is extremely sensitive and prone to infection from expired products, your fingernails are made of hard keratin and are sealed under layers of gel polish. As long as the pigment is dry and mold-free, it will work perfectly for this technique. It is a fantastic method for reducing waste and getting value out of palettes you rarely reach for anymore.
Do I Need to Use Gel Polish for This Technique?
While it is technically possible to try this with regular nail polish, gel polish is highly recommended and yields significantly better results. The reason is the “tacky layer” or the matte surface that cured gel provides, which grabs the powder pigment effectively.
Regular polish dries quickly and does not retain the stickiness needed for the eyeshadow to adhere smoothly without smudging. Additionally, sealing the powder with a regular top coat often results in dragging the design, whereas floating a gel top coat preserves the gradient. For longevity and ease of application, gel is the superior choice.
Why Is My Eyeshadow Not Sticking to the Nail?
If the eyeshadow is not sticking, your base surface is likely too smooth or too dry. If you wiped the inhibition layer off your color coat completely, the nail might be too slick for the powder to grip. To fix this, you can apply a matte top coat and cure it; matte top coats have a microscopic texture that acts like velcro for powder pigments. Alternatively, do not wipe the sticky layer off your base color after curing, although this can sometimes be too wet and cause the powder to clump. The matte top coat method is generally the most foolproof way to ensure even, smooth adhesion.
How Long Does an Eyeshadow Manicure Last?
When prepped and sealed correctly with gel polish, an eyeshadow manicure should last just as long as a standard gel manicure—typically two to three weeks. The longevity depends entirely on your prep work (Step 1) and your sealing work (Step 7). Because the eyeshadow is sandwiched between layers of cured gel, it is protected from water, soap, and daily wear and tear. If you notice chipping earlier than that, it usually means the top coat did not fully encapsulate the powder at the free edge, allowing water to seep in and lift the polish.
Can I Use Blush or Bronzer Instead of Eyeshadow?
Absolutely! Any pressed powder cosmetic product can be used for this technique. Blush is actually a favorite among nail artists for creating the popular “blush nail” trend, which looks like rosy, flushed cheeks on your fingertips. Bronzer can be used to create warm, brown gradients or coffee-inspired aura looks. The only requirement is that the product is a powder. Cream blushes or liquid bronzers will not work with the buffing technique described in this guide and would require a different application method entirely. Feel free to experiment with highlighters for a shimmery aura as well.
Final Thoughts
Experimenting with nail art is one of the most fun ways to express your personal style, and the aura trend is a testament to how creative the beauty community can be. By repurposing a simple makeup staple, you can achieve a sophisticated, high-end look that turns heads. The soft gradients and diffused colors offer a dreamy aesthetic that suits every nail shape and length.
Remember that practice makes perfect. Your first attempt might be a little dusty or uneven, but once you get a feel for how the pigment blends, you will be addicted to the process. Now you know how to do eyeshadow nails like a pro, it is time to dig out those old palettes, fire up your UV lamp, and start creating your own airbrushed masterpieces at home.
About the Author
Jane Hubbard is a passionate beauty expert with a wealth of experience in makeup, hair, and overall beauty techniques. After years of working as a hairdresser specialist, she followed her entrepreneurial spirit and started her own consultancy business.
Jane has always been driven by her desire to help others feel confident in their own skin, and she does this by sharing her knowledge, experiences, and practical beauty tips. Through her consultancy, she empowers individuals to embrace their unique beauty, offering tailored guidance that boosts both self-esteem and personal style.
Professional Focus
Specializes in makeup, hairstyling, and beauty consulting.
Provides personalized beauty advice, tips, and techniques to help individuals feel confident in their appearance.
Dedicated to staying up-to-date with the latest industry trends and developments.
Passionate about creating a comfortable and empowering experience for every client.
Education History
University of Craft and Design – Bachelor of Fine Arts (BFA) in Woodworking and Furniture Design
Woodworking Apprenticeships – Extensive hands-on training with skilled craftsmen to refine carpentry and furniture making techniques
Online Courses & Masterclasses – Continued education in advanced woodworking techniques, design principles, and specialized tools
Expertise:
Makeup artistry, hairstyling, and beauty consulting.
Personalized beauty techniques to enhance confidence and self-expression.
Educating clients on how to maintain their beauty routines at home.